For those keen on servicing their cleaning appliance, beginning with the nozzle assembly is paramount. Start by ensuring the equipment is completely powered off and unplugged from the mains. This step mitigates the risk of accidental operation while carrying out maintenance tasks.
Next, locate the retaining screws on the nozzle unit. Use a suitable screwdriver to carefully remove these screws. Often, they are positioned around the circumference, so a thorough inspection may be necessary to identify all attachment points. Once the screws are extracted, gently pull the nozzle from its housing. Be cautious of any locking mechanisms that may require slight pressure or a twisting motion to release.
After detaching the primary assembly, inspect the internal components for any signs of wear or damage. This inspection aids in determining whether parts need replacement or merely cleaning. A soft brush or cloth comes in handy for clearing out any debris accumulated within the system. If necessary, lubricate the O-rings or seals present to ensure a tight fit upon reassembly.
Steps to Separate the Spray Nozzle Assembly
For effective separation of the nozzle assembly, follow these steps:
- Disconnect the unit from the power source and water supply. Safety first.
- Locate the locking mechanism or release button on the handle. Gently press or slide it to disengage the nozzle.
- Examine the connection points closely. If there’s a retaining clip or screw, use the appropriate tool to remove it.
- Carefully twist and pull the nozzle away from the wand. Avoid using excessive force to prevent damage.
Removing the Spray Tip
The removal of the spray tip is straightforward with these actions:
- Ensure the unit is completely depressurised before starting.
- Identify the spray tip release mechanism, typically a button or latch at the base of the tip.
- Press the release mechanism and observe the spray tip as it becomes loose.
- Pull the tip away from the nozzle until completely detached.
Separating the Lance from the Body
To disconnect the lance from the main body:
- Locate the locking collar at the junction of the lance and body.
- Twist the collar counterclockwise to unlock it.
- Gently pull the lance away from the body, maintaining a firm grip.
- Inspect the O-rings and seals for wear during separation.
Disassembling the Internal Components

For thorough examination or repair, internal components might need removal:
- Look for screws holding the outer casing together, using an appropriate screwdriver.
- After removing screws, gently pry the casing apart, taking care to not damage any clips.
- Document the placement of parts as they are removed for easier reassembly.
- Check for any additional components requiring removal, such as springs or gaskets.
Post-disassembly, it’s advisable to clean and inspect all parts before reassembling to ensure optimal performance. Proper care can greatly extend the lifespan of the equipment.
Gathering Necessary Tools for Dismantling

Start with a sturdy screwdriver set, both Phillips and flathead varieties. A socket wrench set is beneficial for loosening any nuts or bolts. Ensure a pair of pliers is on hand for gripping and pulling stubborn components.
Adjustable wrenches provide versatility for dealing with various sizes of fasteners. Including needle-nose pliers can assist in accessing tight spaces. A soft brush is useful for cleaning debris from components before disassembly.
Safety Gear

Protective gloves safeguard hands from sharp edges and grime. Safety goggles are advisable to prevent debris from causing eye injuries during the process. A work surface with sufficient lighting ensures visibility while handling small pieces.
Organising Workspace
Use a magnetic tray or a small container to keep screws and small parts organised, preventing loss during the process. A clean, uncluttered workspace allows for easier access to tools and components, contributing to a smoother experience.
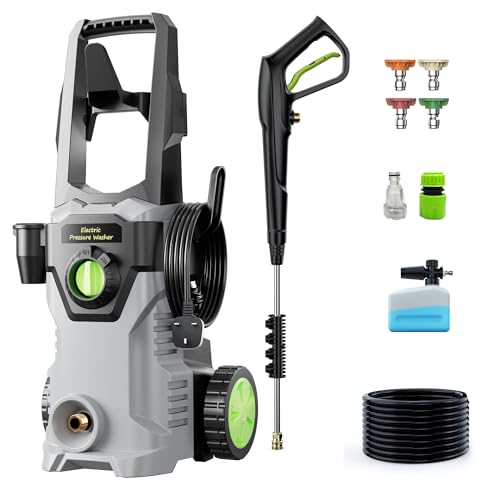
Identifying the Pressure Washer Head Components
Recognising the core components of the cleaning device’s nozzle assembly is pivotal for an efficient breakdown process. Major parts to focus on include:
- Nozzle: Available in various sizes and shapes, the nozzle controls the spray pattern and flow rate.
- Injector: Responsible for mixing water with cleaning agents, ensuring effective cleaning performance.
- Filter: Prevents debris from entering and clogging the nozzle, thus maintaining optimal flow.
- Connection fittings: These secure the assembly to the main unit and ensure a tight seal.
- Venturi tube: Facilitates the chemical mixing process, important for achieving desired cleaning results.
Understanding Component Functions
Each part plays a unique role in the overall functioning of the unit. Failure to identify or properly assess these components could hinder the maintenance process and affect performance quality:
- The nozzle directly influences the effectiveness of the cleaning action by allowing for adjustments based on the surface being cleaned.
- The injector should be cleaned periodically to avoid blockages that could lead to inefficient operation.
- A filter must be inspected regularly; a clogged filter limits water flow and reduces pressure.
- Ensure connection fittings are not worn or damaged to prevent leaks.
- The venturi tube must be free of obstructions to allow proper chemical mixing for enhanced cleaning results.
Each component’s condition directly impacts the equipment’s longevity and performance. A thorough inspection can prevent future issues and optimise cleaning efficiency.
Steps to Remove the Nozzle from the Head

Begin by ensuring the unit is disconnected from any power source and the water supply is turned off. This is crucial for safety during the procedure. Locate the nozzle release mechanism–this is usually a simple button or lever positioned near the top of the assembly.
Depress the nozzle release button firmly. In cases where it appears stuck, gently wiggle the nozzle to relieve any tension. If there is resistance, applying a small amount of lubricant can help free it. Several models also have a collar that requires twisting to unlock; ensure to check for this feature.
Inspecting and Detaching the Nozzle

Once the release mechanism is activated, pull the nozzle straight outwards from the main body. Avoid using excessive force, as this could damage the attachment point. After the nozzle is removed, examine the connection area for any debris or build-up that may hinder future operation.
Cleaning the Connection Point
Clean the area with a soft cloth to ensure that no residue interferes with the next attachment. If the nozzle has a filter screen, check it for clogs and clean as necessary. Following these steps contributes to the longevity and performance of the equipment.
Disassembling the Inner Mechanism Safely
Before engaging with the intricate parts within the sprayer assembly, ensure the unit is completely powered down and disconnected from any water source. Wear protective eyewear and gloves to prevent injury from sharp edges or water residues.
Step-by-Step Approach
The following steps guide the careful removal of the inner workings:
- Remove the outer casing using suitable screwdrivers. Keep track of the screws; a magnetic tray can help avoid loss.
- Locate the main components: the pump mechanism, seals, and any internal tubes. Document their arrangement, as it aids in reassembly.
- Loosen any retaining clips or fasteners. Be gentle to prevent breakage, as these can often be fragile with age.
- Carefully extract the pump assembly; it may require some wiggling due to fitted seals. Always pull straight out, avoiding angled forces.
Table of Common Issues to Avoid
| Issue | Consequence | Prevention |
|---|---|---|
| Rushing disassembly | Injuries or damaged parts | Proceed at a measured pace |
| Not labelling parts | Confusion during reassembly | Use labels or a notebook |
| Ignoring safety gear | Risk of injury | Always wear protective equipment |
After completing the process, inspect each part for wear. Replace any damaged components to ensure optimal performance once reassembled.
Cleaning and Inspecting Parts During Dismantling
Thorough cleaning of individual components is critical for optimal performance. Begin by submerging parts in warm soapy water to break down accumulated grime. A soft brush or cloth removes stubborn deposits without scratching surfaces.
Focus on critical areas such as nozzles and filters, ensuring all blockages are cleared. Rinse with clean water and dry each piece meticulously to avoid moisture-related damage. Inspect for wear, cracks or any signs of degradation, especially in seals and gaskets that may impact functionality.
A systematic check of all components is advisable. Look for misalignment or unusual wear patterns, indicating potential issues that could hinder performance. If any part appears damaged beyond repair, it’s prudent to replace it before reassembly. Keeping a checklist of inspected parts aids in maintaining a clear overview throughout the process.
Finally, lubricate moving parts lightly with a suitable oil to ensure smooth operation during reassembly. This step is often overlooked but plays a major role in longevity and efficiency. Cleanliness and inspection boost reliability, ensuring the cleaning equipment operates at its best once reassembled.
Reassembling the Pressure Washer Head Properly
Align components systematically, ensuring each part fits precisely into its designated position. Begin with the inner mechanisms, placing the rotary assembly back into the outer casing. Secure with any screws previously set aside, tightening them sufficiently without stripping the threads.
Next, attach the nozzle. Check the seating before locking it in place to prevent leaks during operation. Consider using a small amount of thread sealant if plastic threads show signs of wear.
Inspect seals and gaskets; replace any that appear worn or damaged to maintain optimal function. Proper placement of these elements is critical to avoid pressure loss. Ensure that each seal is properly seated before proceeding to the final assembly stage.
After confirming all parts are in their correct locations, check for any additional retaining clips or fasteners specific to your model. These may be essential for stabilising the assembly.
Finally, perform a quick visual inspection and tighten any remaining fittings. It’s always beneficial to reference the manufacturer’s guide for layout specifics. This step guarantees functionality and prolongs the lifespan of the unit.