

Setting the right parameters for your pressure cleaning machine can greatly enhance its functionality and lifespan. Ensure consistent pressure and minimise unwanted fluctuations by following a few straightforward steps to recalibrate the mechanism responsible for regulating water flow.
Locate the adjustment mechanism, typically found on the side of the unit. Familiarise yourself with the specific model’s guidelines to efficiently manage both the pressure output and the water flow. Using the right tools, turn the dial or screw clockwise to increase pressure or counterclockwise to decrease it, keeping an eye on the performance during operation.
Pay close attention to how the machine reacts during this process. Inadequate settings can lead to subpar cleaning results or even damage to surfaces. Regular checks and minor tweaks can significantly reduce wear and tear, prolonging the life of your equipment and ensuring optimal cleaning efficiency.
Identifying Unloader Valve Location on Your Pressure Washer
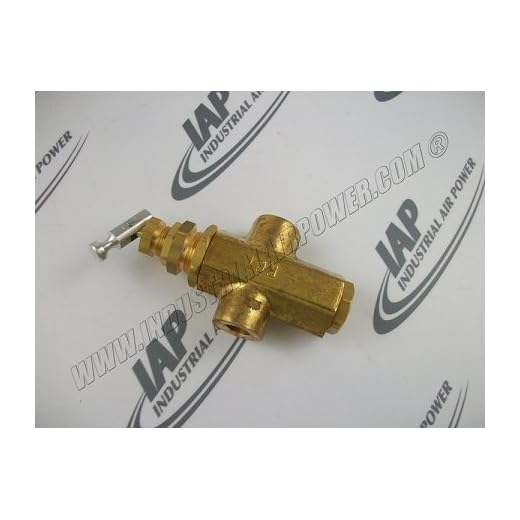
To locate the disengagement mechanism, examine the assembly where the high-pressure hose connects to the unit. This component is typically situated near the pump or motor area. Look for a cylindrical shaped part with a few connection tubes leading away from it.
Another indication of its position is the presence of a pressure control knob or lever, often integrated into the unit. This will be adjacent to the aforementioned component. You might also find a small adjusting screw that allows for fine-tuning pressure output.
Check your user manual for a diagram that clarifies part identification, as different models may vary in layout. If the manual is unavailable, a quick online search for your specific model can provide insights or visuals that identify this crucial assembly.
When inspecting the unit, ensure to do so when it is powered off and cooled down to avoid injury. Use a flashlight if necessary to illuminate dark corners where components may be hidden.
Tools Required for Adjusting the Unloader Mechanism

Begin with a socket or adjustable wrench. Ensure it fits the specific nut or bolt size on the mechanism. A flathead screwdriver is essential for turning the adjustment screw accurately. I suggest keeping both tools handy to make the process smoother.
A pressure gauge is indispensable. This helps check settings during modifications, ensuring performance remains within desired parameters. Also, a pair of gloves protects your hands from any sharp edges or sudden movements.
Finally, utilize a clean cloth to wipe away any debris or moisture around the assembly. This contributes to a seamless working environment. Preparing these items in advance will streamline adjustments and improve overall functionality.
Steps to Release Pressure Before Adjustment
Ensure the system is completely devoid of tension prior to any modification. Follow these straightforward steps:
-
Switch off the motor. This halts operations and prevents any unintended activation during adjustments.
-
Disconnect the supply hose from the water inlet. This step breaks the cycle and halts any flow.
-
Activate the trigger gun. Doing so releases any residual liquid trapped within the circuitry, ensuring no stress remains.
-
Wait for a few moments. Allowing sufficient time ensures that any remaining liquid is fully expelled.
-
Reconnect the trigger gun and check for potential leaks before proceeding. This ensures a safe environment when adjustments are made.
Taking the time to release all residual tension guarantees a safer experience, allowing for precise modifications without hazards.
Correctly configuring unloader settings

Begin by locating the adjustment screw, typically found on the side of the device. This screw regulates water flow and pressure discharge. Use a suitable screwdriver to turn it; clockwise usually increases resistance while counter-clockwise decreases it. Adjust in small increments, testing each change by running the unit briefly.
Monitor the output stream to gauge the effect of your adjustments. A consistent spray indicates appropriate setting; erratic flow suggests further tuning is necessary. Aim for a balance where the motor runs smoothly without straining, avoiding excessive pressure that could lead to damage.
After optimal settings are achieved, secure the adjustment screw to prevent accidental changes during future use. Perform a final test to ensure all is functioning correctly, confirming that the adjustments hold under operational conditions.
Regularly checking these settings ensures reliability and longevity of your equipment, maintaining performance at its best.
Testing Pressure Output After Valve Adjustment
After making necessary changes to the mechanism, verifying the output is crucial. To start, reattach the spray wand and ensure no leaks are present at the connections. Next, power on the unit and let it run for a minute, allowing the system to stabilise.
Conducting the Test

Engage the trigger on the spray gun while holding it securely. Observe the water flow and assess for consistency and strength. A proper setting will yield a strong, steady jet without pulsation. If the flow appears weak or fluctuating, further tuning may be required.
Measuring Pressure
For a more precise analysis, utilise a pressure gauge. Connect it to the outlet where the wand attaches. Turn on the unit and record the reading. Compare this measurement against the specifications provided in your manual. Adjust accordingly until the readings align with the recommended limits.
Troubleshooting Common Issues with the Unloader Mechanism

If water continuously flows from the nozzle when the gun is released, or if the machine fails to start, a thorough check of the unloader mechanism is necessary. Begin by inspecting for clogs or debris obstructing the flow of water. Clean any visible obstructions that may hinder smooth operation.
Next, examine the connections to ensure there are no leaks. Leaks can reduce overall efficiency and cause erratic function. Tighten any loose fittings or replace worn-out seals to restore flow integrity.
Listen for unusual noises during operation. Grinding or excessive rattling may indicate internal wear or a need for lubrication. Apply appropriate lubrication to moving parts, ensuring they are properly maintained.
Inconsistent pressure levels can arise from incorrect spring tension. If the machine fluctuates between high and low outputs, consult your specifications to verify that springs are set to the manufacturer’s recommendations.
If the unit shuts off unexpectedly, inspect the wiring and connections for faults. Frayed wires or disconnected components can trigger safety mechanisms, preventing proper use.
As you conduct your examination, keep a notepad handy. Document any anomalies during your assessment to track recurring issues. Addressing these specific points promptly can enhance the longevity and performance of your equipment.


