Before you proceed, ensure the equipment is powered off and disconnected from the power source. Begin by locating the locking mechanism on the attachment. This is typically a simple twist or push mechanism designed for ease of use. Grip the old attachment firmly and either twist or push as necessary until it releases from the lance.
Next, align the new jet head with the lance. Most designs have guide tabs that aid in proper alignment. Insert the attachment until you hear a click, signalling a secure fit. Double-check the connection by gently tugging on the new component to ensure it is firmly attached. Proper installation is crucial to avoid any leaks or performance issues.
Once replaced, it’s beneficial to test the new attachment briefly under controlled conditions. This allows you to confirm functionality and performance before engaging in your cleaning tasks. Treating these routine adjustments with care ensures longevity and optimal performance of your cleaning apparatus.
Replacing the Spray Tip on Your Cleaning Machine
Begin with disconnecting the power supply from the device to ensure safety. Next, identify the spray tip release mechanism; most models feature a simple push-button or twist-lock system. Once located, press or turn this mechanism to release the existing tip. Make sure to hold the wand firmly to prevent any accidental slips during this process.
Attaching a New Tip

Select the desired spray tip that best suits your cleaning task. Align it with the end of the wand and secure it by pressing or twisting the release mechanism back into place. It should click or lock to ensure a tight fit. Finally, restore the power and perform a quick test to verify that the new tip is functioning correctly. Adjust the angle or pressure as necessary for optimal performance.
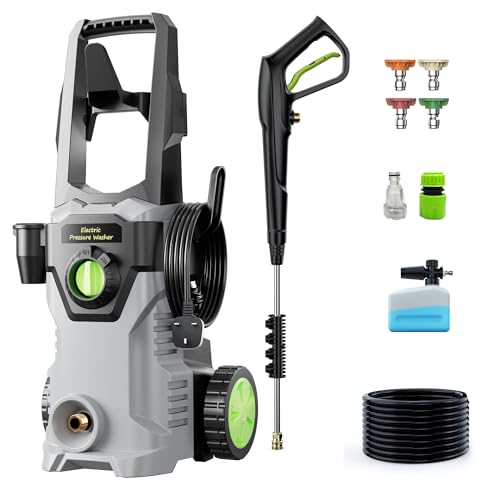
Identifying the Correct Nozzle for Your Karcher Model
Before selecting a compatible tip, check your specific model’s manual for the recommended accessories, as different units require distinct attachments for optimal performance.
Examining the existing accessory can also provide insights. Most attachments are colour-coded or marked with numerical designations indicating their intended use. For example:
| Colour Code | Tip Type | Application |
|---|---|---|
| Yellow | High Pressure | Stubborn dirt removal |
| Green | Medium Pressure | General cleaning tasks |
| White | Low Pressure | Delicate surfaces |
| Black | Soap Application | Applying detergent |
If you are unsure, I recommend visiting the official manufacturer’s website, where you can input your model number or serial code to find compatible accessories.
In case of lost or damaged parts, many retailers offer replacement options that are made specifically for your unit’s specifications, ensuring you maintain performance standards without risking damage.
Finally, be wary of generic or third-party accessories that may not fit correctly. These can lead to performance issues or void warranties. Always opt for original equipment to guarantee compatibility and reliability.
Gathering Necessary Tools for Nozzle Replacement

Before proceeding with any adjustments, assemble required equipment for a seamless transition. Here’s a concise list of items you will need:
- Protective gloves to shield your hands during the process.
- A flathead screwdriver for potential fastening tasks.
- A wrench or pliers to ensure a secure grip on components.
- A cloth or towel to wipe any excess water or debris.
- New spray attachment compatible with your machine model.
Verify that all tools are in working condition before you start. This practice avoids unnecessary interruptions. Keep your workspace organised; it helps in locating tools quickly and maintaining focus.
Always ensure that the device is disconnected from the power source. This vital step enhances safety as you perform any modifications or replacements.
Once you have gathered your tools, you are well-prepared to execute the transformation efficiently. Each piece of equipment contributes to a smoother experience in enhancing your cleaning capabilities.
Switching Off and Unplugging Your Equipment Safely
Before disconnecting your cleaning device, ensure it is turned off properly. Locate the main power switch and press it to turn off the motor. Wait a moment for the unit to come to a complete stop.
Disconnecting from Power Source
To safely disconnect, grab the plug firmly and pull it out of the socket. Never tug on the cable itself, as this could damage the cord or the socket. If the socket is difficult to access, switch off the power at the fuse or breaker box before removing the plug.
Clearing Remaining Pressure
After unplugging, release any remaining pressure in the system. Locate the trigger on the gun and press it while pointing it away from yourself and others. This ensures any residual water is expelled, preventing unexpected sprays. Once the pressure has been relieved, disconnect the hose from the unit carefully.
Removing the Existing Nozzle from the Lance

To detach the current attachment from the lance, grip the lance firmly with one hand while using your other hand to twist the component in a counterclockwise direction. Most models will have a simple threaded connection that allows for easy removal.
Steps to Follow

- Ensure the equipment is completely powered off and disconnected from its power source.
- Hold the lance and apply a steady pull while turning the attachment.
- If there is any resistance, verify if there are locking mechanisms or clips that need to be released first.
- Once detached, inspect the lance for any debris or damage before proceeding with installation of a new attachment.
After successfully removing the old component, store it in a safe place to avoid damage. This ensures that replacements can be made easily in the future.
Attaching the New Tip to the Lance Properly
Align the new component with the lance, ensuring the connection points are facing each other. Gently push the accessory onto the lance until you hear a distinct click, indicating that it’s securely fixed in place.
Confirming Secure Fit
After attaching, tug lightly on the component to confirm it’s firmly connected. If it feels loose, detach and repeat the previous steps, ensuring no debris is obstructing the connection.
Testing Functionality
Once assured of a tight fit, perform a quick test run. With the unit plugged in and the water supply connected, activate the machine for a brief moment while directing the lance away from any surfaces. This final check guarantees everything is operating as intended.
Testing the New Attachment for Leaks or Performance Issues

After fitting the new accessory, it’s crucial to conduct a performance assessment. Start by connecting the equipment to a water source and activating it briefly without any attachments. This will help verify if there are leaks at the joints or within the assembly. If water is escaping, check the fittings and seals for a snug fit.
Next, reattach the lance and activate the machine. Observe the water spray pattern. An even and consistent flow indicates proper functionality. If the spray is uneven or weak, there may be obstructions in the attachment or a mismatch in the nozzle type.
Testing under varying pressure settings is advisable. Adjust the pressure and note any changes in performance. A decrease in spraying force or irregular patterns could point to compatibility issues. Furthermore, evaluate the cleaning effectiveness on a specific surface, such as a driveway or patio. If the results are below expectations, reassess the attachment’s specification against the manufacturer’s guidelines.
Conclude the testing process by inspecting for residual leaks after shutting down the unit. Regular checks following use will help identify any wear or damage that could affect future operations.
Maintaining and Storing Accessories for Longevity

Rinse the attachments with clean water after each use. This prevents residue buildup that can clog and damage components over time.
Dry the items thoroughly before storing. Moisture can lead to rust or corrosion, which shortens their lifespan.
Store in a cool, dry place, away from direct sunlight and extreme temperatures. Exposure to heat can weaken materials, while cold can make them brittle.
Organise and keep everything in designated compartments or containers. This reduces the risk of damage and makes it easier to locate the correct tip when needed.
Periodically inspect for wear or damage. Replace any worn parts immediately to maintain optimal performance and avoid larger issues down the line.
Utilise protective caps or covers for sensitive components. This simple step guards against dust, dirt, and accidental impacts during storage.
Remember to refer to the manufacturer’s guidelines for specific care instructions. Each model may have unique recommendations to enhance durability.
FAQ:
How do I know when it’s time to change the nozzle on my Karcher pressure washer?
If you notice a significant drop in cleaning performance, uneven water spray, or if the nozzle appears to be clogged or damaged, it might be time to replace it. Regular use can cause wear over time, and if the nozzle’s pattern has changed or it is causing unwanted splattering, changing it will help ensure optimal performance.
What is the process for changing the nozzle on a Karcher pressure washer?
To change the nozzle on a Karcher pressure washer, first, ensure the machine is turned off and disconnected from the power source. Locate the nozzle at the end of the spray lance. Depending on the model, you may need to twist or pull the nozzle to remove it. Once it is detached, take the new nozzle and align it with the lance, pushing it in firmly until it clicks into place. Finally, test the pressure washer to ensure the new nozzle is working correctly.
Are there different types of nozzles for Karcher pressure washers, and how do I choose the right one?
Yes, Karcher offers various nozzle types, including fan nozzles, rotary nozzles, and dirt blaster nozzles, each serving different purposes. For instance, fan nozzles are great for general cleaning, while rotary nozzles provide a powerful, concentrated spray for tough grime. To choose the right one, consider the surface you will be cleaning and the type of dirt or stain. Always refer to your pressure washer’s manual for specific compatibility and recommendations.