

To achieve an optimal cleansing experience, ensure you select the correct nozzle for your high-pressure equipment. It is crucial to use a foam applicator designed to work seamlessly with your machine’s specifications. Check the adapter compatibility as this will determine the ease of attachment and efficiency of operation.
Begin by referring to the user manual of your high-pressure unit to locate the specifications required for the foam device. It’s important to identify the optimal PSI and flow rate that your model can handle for effective foaming. Attach the foam head securely to the trigger gun, ensuring a firm connection to prevent any leaks or pressure loss during operation.
Fill the foam container with an appropriate cleaning solution. Look for products specifically formulated for use with high-pressure cleaning equipment to achieve the best results. Dilution ratios are usually indicated on the product label; adhering to these ensures maximum lathering and surface penetration, enhancing your cleaning efficiency.
Once both devices are set up, it’s best practice to test the foam output on a small, inconspicuous area before tackling larger surfaces. Adjusting the mixture or nozzle settings may be necessary to achieve your desired foam consistency. With everything in place, you will be ready to tackle even the toughest grime with ease.
Attaching the Foam Lance to a High-Pressure Cleaning Unit
Begin by ensuring your cleaning unit is powered off and unplugged to prevent any accidental activation. Locate the high-pressure outlet where accessories are typically attached. Remove the existing nozzle or trigger wand by following the manufacturer’s instructions. Most attachments will require a simple twist or pull mechanism.
Next, take the foam lance and align it with the outlet. It should fit snugly; if it does not, double-check compatibility as not all tools work with every model. Twist it securely to ensure no leaks occur during use.
After securing the lance, connect the chemical reservoir. Add the appropriate cleaning solution mixed with water according to the recommended dilution ratio indicated on the product label. This ensures optimal foam generation for effective cleaning.
Finally, plug in your unit and turn on the water supply. Test the equipment on a low-pressure setting first to verify that everything is functioning correctly before moving to higher settings. Adjust the foaming level by changing the nozzle or rotating the dial, if available, on the lance. This will allow you to achieve the desired thickness of the cleaning foam.
Choosing the Right Accessory for Your High-Pressure System
Selecting the correct attachment requires attention to several factors: compatibility, design, and functionality. As an expert, I’ve examined numerous options and recommend focusing on these key aspects:
1. Compatibility with Your Device
- Check the specifications of your high-pressure unit. Look for the required outlet size and PSI rating.
- Choose a tool that matches these requirements to avoid inefficiency or damage.
2. Material and Build Quality
- Opt for units made from durable materials like brass or high-grade plastic, ensuring longevity and resistance to wear.
- Consider the nozzle design–different shapes and sizes can impact the quality of the detergent application.
While contemplating your choice, examine user reviews and performance ratings closely. This hands-on feedback often highlights the practicality and effectiveness of specific brands. Through my experience, I’ve observed that a robust design with proper filtration can greatly enhance the cleaning task.
Ultimately, investing time in researching and selecting the most appropriate tool will significantly improve your cleaning efficiency and satisfaction with the results.
Necessary Attachments and Adapters for Compatibility

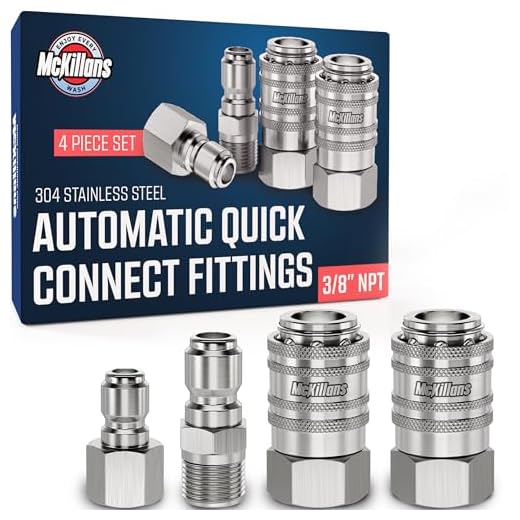
To achieve optimal integration between a suds dispenser and your cleaning unit, specific connectors and accessories are paramount. Most importantly, ensure that the inlet fitting of your device matches the output of the suds dispenser. Typically, a quick-connect fitting is recommended for seamless transitions.
Key Adapters

First, consider the type of connector your cleaning unit uses. Common sizes are M22 and 3/8-inch quick couplings. An M22 to 1/4-inch adapter is frequently necessary if your sudser has a different size fitting. Always verify these specifications before purchasing.
Additional Accessories
In some cases, an extension may be needed for adequate reach. A straight or angled extension can provide flexibility when working in tight areas. Additionally, check the hose diameter; it is crucial to pair standard sizes to maintain performance.
Lastly, some sudsers might include a pressure adjustment nozzle, allowing you to modify the flow rate. This feature can enhance the cleaning experience, especially with thicker suds. Always consult the manual for detailed instructions on compatibility and installation.
Step-by-Step Guide to Attaching the Foam Cannon
Ensure your cleaning equipment is powered off and disconnected from its power source before starting. This prevents any accidental activation during setup.
Step 1: Prepare the Foam Bottle
Fill the bottle with a suitable cleaning agent. Use a mixture recommended by the manufacturer for optimal results. Avoid overfilling; leave some space to avoid spills.
Step 2: Secure the Lance Connector
.jpg)
Fit the connector of the lance onto the outlet of your spraying unit. Check for a tight seal to prevent leaks. If there’s any play, consider using a compatible wrench for a secure fit.
Once the lance is attached, it’s crucial to adjust the nozzle settings according to your specific cleaning requirement. Test the flow briefly on a surface to ensure proper application.
Preparing the Equipment for Foam Application

Ensure the machine is turned off and detached from any power source before proceeding with modifications. Start by inspecting the water supply; make certain it is clean and free of debris, as any contaminants can affect performance and output. Clear any blockages in the hoses to guarantee optimum water flow.
Check Fluid Levels
Verify the water tank’s capacity and refill if necessary. If the machine uses additional chemical reservoirs, inspect those as well to ensure compatibility with the cleaning agent you plan to utilise. Using the proper detergent is critical for achieving the desired cleaning outcomes.
Inspect Nozzle and Hose Condition
Examine the nozzle and hoses for signs of wear, cracks, or other damage that could hinder operation. Replace any damaged components immediately to prevent leaks or reduced functionality. A uniform spray pattern is essential for effective application.
| Component | Action | Notes |
|---|---|---|
| Water Supply | Check for cleanliness | Use filtered water if available |
| Fluid Levels | Inspect and refill if needed | Use compatible cleaning agent |
| Nozzle | Examine for damage | Replace if necessary |
| Hoses | Inspect for leaks | Ensure secure connections |
Once these checks and preparations are complete, your equipment will be ready for the attachment of the cleaning device, ensuring optimal performance for your cleaning tasks.
Mixing Foam Solution for Optimal Results
Use a precise ratio of cleaning agent to water based on the manufacturer’s instructions. Typically, a 1:10 or 1:5 ratio works effectively, depending on the concentration. A visual clue is the thickness of the mixture; it should hold onto surfaces and create a rich lather.
Selecting the Right Cleaner
- Choose a pH-neutral product suitable for your vehicle or surface type. Acidic or abrasive cleaners can damage paint finishes.
- Consider biodegradable options to protect the environment.
- Always verify compatibility with the equipment to avoid malfunctions.
Mixing Techniques
- Start with clean water in the container before adding the cleaner to minimise foaming during mixing.
- Gently stir the solution instead of shaking to avoid excessive bubbles.
- Test a small area to ensure the mixture cleans effectively without causing damage.
Adjust the mixing ratio based on the level of dirt or grime. Heavy soiling may require a stronger solution, while light cleaning may only need a diluted mix. After use, flush the system with clean water to prevent residue build-up.
Maintenance Tips for Your Cleaning Equipment
To prolong the life of your wash apparatus and foam dispensing device, perform regular maintenance checks. Rinse the components with clean water immediately after use to prevent any residue build-up that can clog the nozzles or damage seals.
Monthly inspections should include checking hoses for leaks or cracks. Any signs of wear should prompt a replacement. Ensure all connections are tight but not over-tightened, which may lead to stripping or damage.
Clean the mixing tank frequently. Bacteria can grow if foam solution is left unused, affecting performance. Use mild soap and a soft brush for cleaning; avoid harsh chemicals that can degrade plastic materials.
Inspect seals and O-rings for wear. Replacing these components can prevent leaks and sustain optimal pressure. Keep spare parts on hand for quick replacements during your cleaning sessions.
Store your devices in a dry and cool environment. Exposure to extreme temperatures can cause materials to degrade faster and impact functionality. Proper storage will help maintain performance and extend lifespan.
After extended periods of non-use, run a warm water cycle through the system to flush out any stagnant solutions. This maintenance step ensures that the equipment is ready for action whenever needed.
Always refer to the manufacturer’s guidelines for specific maintenance practices tailored to your models. Following these recommendations will help ensure your cleaning tasks are both efficient and trouble-free.


