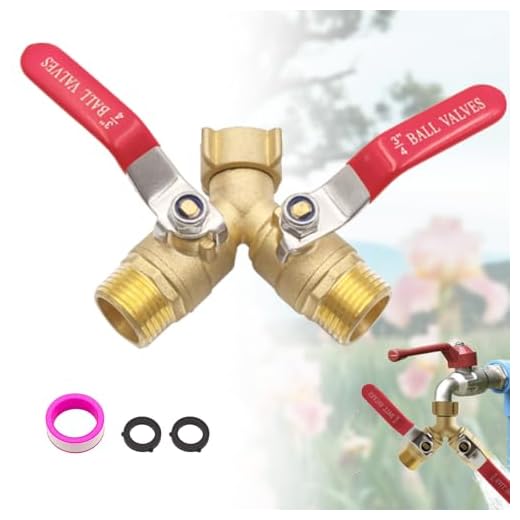


Begin by ensuring you have the right adapter that fits your water supply outlet. Most outdoor taps have a standard 3/4 inch threading, so investing in a good quality hose connector can save you time and frustration. Carefully attach the adapter to your water source, ensuring a snug fit to prevent leaks.
Next, obtain an appropriate length of hose to reach your cleaning area comfortably. A durable hose is essential for maintaining water pressure and flow, which directly impacts the performance of your cleaning device. Inspect both ends of the hose to ensure they are free of debris and securely fit the machine and the adapter.
Once everything is properly set up, turn on the water supply gradually. This helps you check for leaks at connection points. With the machine’s trigger gun closed, allow water to fill the system for a few moments before starting the device. This will help eliminate air pockets, providing a steady stream during use.
Finally, ensure that safety features, such as the trigger lock, are functioning properly. Familiarise yourself with the operation of your cleaner before putting it into action. This preparation will lead to a smooth and efficient cleaning session.
Connecting Your Cleaning Unit to a Water Supply

Utilise a standard garden hose for this procedure. Ensure the hose is in good condition, free from cracks or leaks. Start by attaching one end to the water supply spout. Tighten the connection securely by hand to prevent any leakage during operation.
Next, take the other end of the hose and connect it to the inlet on the device. This connection should also be hand-tightened, ensuring a snug fit. Avoid using tools, as over-tightening can damage the fittings.
Check for compatibility between your hose and the inlet. Most units require a specific diameter; typically, a 1/2 inch hose is standard. If necessary, consider using an adaptor for non-standard sizes.
After securing both ends, turn on the water supply slowly. This allows any air trapped in the hose to escape. Once water flows without interruption, proceed to power on your machine.
Before commencing work, ensure that there are no leaks at either connection point. Any visible water can lead to inefficient operation or damage to the appliance. If leaks are present, troubleshoot by checking the tightness of your fittings or replacing worn washers.
For optimal performance, this setup is best done on level ground, allowing for consistent water flow and stability during use.
Choosing the Right High-Pressure Cleaner for Your Water Source
Select a device that matches the flow rate of your supply. Most domestic connections provide a flow of around 9-15 litres per minute. Ensure the cleaner you choose operates effectively within this range to prevent fluctuations in performance.
Pay attention to the pressure output of various models. For outdoor tasks such as driveway cleaning or patio maintenance, a machine with a minimum of 130-160 bar is advisable. If you require more intensive handling, look for options that exceed this threshold.
Consider the type of motor. Electric motors tend to be quieter and suitable for light to medium-duty tasks, while petrol-powered units provide greater mobility and are ideal for heavy-duty applications.
Check the availability of compatible fittings and hoses. Opt for a cleaner that allows for various attachments to enhance versatility in tackling different surfaces and stains.
Look for weight and portability. A lighter model facilitates easy manoeuvring, especially during longer cleaning sessions. However, ensure that the construction is robust enough to withstand regular use without compromising durability.
Investigate the brand reputation and warranty options. Choosing a reliable manufacturer increases the chances of performance satisfaction and availability of service support when needed.
Identifying Your Water Supply Type and Compatibility
.jpg)
Begin by inspecting the fitting on the water source you plan to use. Most outdoor water supplies have either a threaded outlet or a quick-release coupling. For a threaded outlet, you’ll typically find a ¾ inch BSP or a smaller ½ inch BSP thread. Measuring the diameter of the outlet will ensure you select the appropriate adapter for a secure fit.
Next, confirm the water pressure available at your supply. Most domestic water supplies offer a standard pressure range of 1-5 bar. Testing the pressure can help determine whether your cleaning equipment will perform efficiently, as some units require a minimum pressure for optimal operation.
If your outlet has a quick-release system, check whether it is compatible with standard hose connectors. Many modern hoses and equipment come with universal fittings, but it’s best to verify as brands may differ. Ensure that any required adapters meet your specifications.
Finally, examine the general condition of your water supply. Check for leaks, rust, or other damage that could affect the flow rate or connection integrity. A reliable supply will enhance performance, providing steady water flow throughout your tasks.
Gathering Necessary Equipment and Accessories

For successful operation, I recommend collecting specific components before proceeding. Ensure you have a reliable hose that meets the required length to reach from your water source to your equipment. A standard diameter of 3/4 inch is commonly used, but verify compatibility with your model.
Essential Components

Among the vital items you need are:
- Hose connector: This should match both the water source and your machine. Look for models that feature universal fittings.
- Brass or plastic couplings: Choose sturdy materials to ensure durability. Brass is more reliable for prolonged usage.
- Adapters: Depending on your particular set-up, these can help bridge any gap between differing connection types.
Additional Accessories
Consider including the following accessories to enhance functionality:
- Pressure gauge: Monitor water flow and pressure levels for optimal performance.
- Inline filter: Prevent debris from clogging your equipment, ensuring a cleaner output.
- Longer hoses: If using your equipment in larger spaces, a longer hose might be essential.
| Accessory | Recommended Material | Purpose |
|---|---|---|
| Hose Connector | Plastic/Brass | Ensures secure water flow |
| Couplings | Brass/Plastic | Connects hoses and appliances |
| Adapters | Various | Facilitates compatibility |
| Pressure Gauge | Metal/Plastic | Monitors water pressure |
| Inline Filter | Plastic/Metal | Prevents clogging |
| Longer Hoses | Rubber/Plastic | Increases reach |
By gathering these items, you ensure a smoother experience and enhance the functionality of your cleaning equipment. Prior preparation translates directly to efficiency and effectiveness in usage.
Steps to Attach the Pressure Washer Hose to the Tap
Begin by turning off the water source to ensure a safe setup. Make sure the fitting on the end of the hose is compatible with your water outlet. If not, you may need an adapter.
Next, align the hose fitting with the water outlet. Firmly push it onto the outlet, ensuring a snug fit to prevent leaks. Hold the hose in place while you secure it using a locking mechanism or a clamp, if your setup requires one.
Once connected, double-check the secure attachment by gently tugging on the hose. If it feels loose, disconnect and reattach it to ensure it’s tightly secured.
Turn on the water source gradually. Monitor for any leaks at the connection point. If a leak occurs, tighten the fitting further until the issue is resolved.
Finally, ensure that the other end of the hose is properly attached to the cleaning unit, and check all connections before activating the equipment to commence your cleaning task efficiently.
Checking for Leaks and Ensuring a Secure Connection
After establishing the attachment between the cleaning device and the water source, it’s imperative to confirm that the join is watertight. Here are key steps to verify and secure the connection:
- Turn on the water supply and observe the joint closely.
- Look for any signs of dripping or spraying. A small amount of moisture can indicate a weak fit.
- Should you notice leaks, turn off the water and tighten the connection carefully. Avoid overtightening, as this may damage fittings.
- If leaks persist, inspect the rubber washer inside the connector. A wear or improper fit here can lead to fluid escape. Replace if necessary.
- Once adjustments are made, re-enable the water flow and check again.
For enhanced security, consider using Teflon tape on threaded joints. This tape provides an additional layer to prevent leaks and ensures a stable seal. Wrap it around the threads before attaching the connector.
Always ensure that the coupling is properly aligned to avoid cross-threading, which can create leaks and damage components. Regular maintenance and checks on all connections can help extend the lifespan of your equipment.
Perform these checks each time the cleaning apparatus is set up. A little diligence here can prevent minor issues from escalating into troublesome leaks during operation.
Adjusting Water Flow for Optimal Performance
For achieving the best outcomes with your cleaning equipment, it’s essential to fine-tune the water flow. I recommend starting by examining the flow rate from your supply. Standard household fittings typically provide around 8 to 10 litres per minute. If your system allows, increase the pressure without exceeding your device’s capacity, which is often specified in the manual.
Optimising Flow Rate
Utilising a pressure reducer is advisable in situations where excessive flow could lead to inefficiencies or damage. Ensure that your attachment is suited to both your equipment and the water source. If your output seems insufficient, check for any blockages in hoses or nozzles. Regular maintenance will keep the water channel clear and functioning well.
Temperature Considerations
Another aspect to consider is temperature. Warmer water can enhance the cleaning impact; however, avoid using water hotter than 60°C, as this could harm internal components. For a quick test, feel the water; if it’s too hot for your hand, it’s likely too hot for the equipment as well.
Troubleshooting Common Connection Issues
If leaks occur after establishing the link, ensure that all connectors are tightly fastened. Inspect the rubber washers within the fittings; replacements are often necessary when they appear worn or damaged.
Inconsistent water flow may point to blockages. Detach the hose at both ends and check for any obstructions. Sometimes, mineral deposits can accumulate, so running water through without the unit attached can help clear these issues.
If the hose does not fit correctly, confirm that you are using the right adapter for your specific fixture type. Adapters come in various sizes and threads, so verifying compatibility is key.
In case of low water pressure, make sure that the supply is open fully and that there are no kinks in the hose. If the tap is also serving multiple fixtures, closing others may enhance flow.
Should the equipment fail to start, inspect the connections to ensure they are secure. Look for signs of wear on the trigger or other operational components. If any part appears damaged, replacing it might be necessary.
Lastly, if the mechanism is making unusual noises, it often indicates air entering the system. Bleeding the lines can resolve this issue. Open the equipment while running water to clear any air pockets.


