To resolve issues with your cleaning device, first check the fuel and oil levels. Insufficient fuel or low oil can lead to performance problems. Ensure that materials are topped up as needed, and use the correct type as per the manufacturer’s recommendations.
Next, inspect the high-pressure hose and connections. Look for cracks or leaks that might hinder operation. Tighten any loose fittings and replace damaged hoses to restore functionality. Clean the inlet filter to prevent blockages that could affect water flow.
Pay attention to the nozzle as well. A clogged or damaged nozzle can massively impact pressure. Clean or replace the nozzle based on its condition to guarantee optimal spraying capabilities.

If you encounter starting troubles, check the spark plug. Remove and inspect it for wear or carbon build-up. Cleaning or replacing the spark plug can make a noticeable difference in ignition quality.
Regular maintenance is key. Ensure proper storage after use and regularly clean components to prolong the lifespan of your equipment.
Repairing Honda High-Pressure Cleaner
Inspect the hose for any signs of leaks or cracks. A damaged hose can significantly hinder performance. Replace it if necessary to restore proper water flow.
Check the nozzle for clogs. If water pressure drops, a blocked nozzle is often the culprit. Remove the nozzle and clean it with a small wire or a dedicated cleaning tool to ensure unobstructed spray.
Verify the oil levels in the engine. Low or dirty oil can lead to poor operation or even engine damage. Change the oil if it appears dark or has been on the machine longer than recommended.
Examine the filter located in the water inlet. A dirty filter restricts water flow, leading to inadequate performance. Clean or replace the filter based on its condition.
Pay attention to the spark plug. A worn or fouled spark plug can prevent the engine from starting. Inspect, clean or replace the spark plug if you notice excessive wear or carbon build-up.
Inspect the pressure control switch. If there’s no pressure build-up, the switch may be faulty. Test the switch continuity with a multimeter and replace it if it fails to conduct electricity.
Finally, check the fuel. Stale fuel can cause engine starting issues. If the fuel has been sitting for an extended period, drain the tank and fill it with fresh petrol.
Identifying Common Equipment Issues

Begin by checking for a lack of water flow. Ensure the supply hose is connected securely and the water source is turned on. Inspect for kinks in the hose that could restrict water circulation. A blocked inlet filter can also impede flow; clean or replace it if necessary.
No pressure output is often caused by air trapped in the pump. Engage the trigger on the gun for a few moments to expel any air. If pressure remains low, examine the nozzle for clogs or damage and clean or replace as needed.
Engine Problems
For difficulty starting the machine, consider the fuel. Ensure it is fresh and that the tank is adequately filled. Check the ignition system, including the spark plug, for wear and replace if damaged. A malfunctioning choke can also prevent starting; adjust it according to the manufacturer’s instructions.
Leak Troubles
Locate any fluid leaks by inspecting hoses, connections, and the pump assembly. Common leak sources include worn seals and O-rings. If you identify a leak, replace any degraded parts to prevent further loss. Tightening connections may also resolve minor leaks.
Checking the Fuel System for Problems
Inspect the fuel tank for cracks or leaks. A damaged tank can introduce air into the system, leading to poor performance.
Ensure the fuel is fresh. Stale fuel can cause starting issues and engine misfires. If fuel smells off or has been stored for over 30 days, drain and refill with new petrol.
Examine the fuel lines for blockages or kinks. These restrictions can limit fuel flow. Clean or replace any obstructed lines to restore appropriate fuel delivery.
Check the fuel filter. A clogged filter restricts flow, preventing the engine from running smoothly. Replace it if you notice any signs of dirt or blockage.
Inspect the carburettor for build-up. Accumulated debris can impede fuel flow. Cleaning or rebuilding the carburettor may be necessary to ensure smooth operation.
Test the fuel shut-off valve. Make sure it opens and closes properly; a malfunctioning valve can halt flow altogether. If the valve is faulty, replace it.
Examine the fuel pump. Listen for unusual sounds or lack of fuel delivery. Replace the pump if it’s not functioning properly.
Look for air leaks in the system. Inspect gaskets and connections for wear or damage that could introduce air, affecting fuel delivery. Replace any compromised components.
Inspecting the Spark Plug and Ignition

Start by removing the spark plug using a suitable socket wrench. Inspect it for signs of wear or damage, such as corrosion or carbon buildup. If any of these issues are present, replace the spark plug with a new one that matches the specifications of your equipment.
Check the electrode gap between the terminals. This gap should typically be around 0.028 to 0.032 inches; refer to your manual for the exact measurement. Use a feeler gauge to measure. Adjust it if necessary by carefully bending the side electrode.
Next, examine the ignition coil. Ensure the connections are secure and free from rust or dirt. Any loose or corroded connections could lead to ignition issues. If the coil appears damaged, it will need replacing.
Look closely at the ignition switch as well. Turn it on and off to see if there’s a change in resistance through the circuit. A functioning switch should have continuity when in the ‘on’ position and none when ‘off’.
Lastly, connect everything back and crank the engine. If it fails to start, you might consider testing the system with a multimeter to check for voltage inconsistencies. This will help identify if there are deeper issues within the ignition system that may require professional evaluation.
Testing the Water Supply and Hoses
Ensure an adequate supply of water to the unit. Begin by checking the source; it should provide a steady flow without interruptions. Run a hose connected directly to the faucet to confirm the pressure and quantity. If the flow is weak, consider cleaning the faucet or inspecting for any blockages in the plumbing.
Next, inspect the hose used for water intake. Look for any signs of damage such as cracks, kinks, or leaks, which may impede water flow. To test the hose’s integrity:
- Disconnect the hose from the machine and turn on the water supply.
- Observe for any leaks while the water is flowing; a leaking hose needs replacement.
- Check if the water flows smoothly through the hose without significant splattering or reduction in flow.
If the hose appears damaged, replace it with a new one that matches the specifications for your equipment. Using an incorrect size or type may lead to performance issues.
After ensuring the hose is functional, reconnect it to the machine. It’s also wise to examine the filter screen where the hose connects to the appliance. Clean it thoroughly to prevent debris from obstructing water flow.
Finally, turn on the model and activate it briefly to ensure that water is being drawn effectively. If you notice any unusual sounds or the machine doesn’t start correctly, further investigation into other components may be necessary.
Evaluating the Pressure Pump Functionality
Before proceeding with any repairs, it’s crucial to evaluate the functionality of the pump. Begin by checking for any unusual noises during operation. A loud or rattling sound may indicate internal wear or damage. If the pump operates quietly but fails to build up pressure, this points to a potential malfunction.
Steps for Assessment
1. Inspect the connections: Ensure all hoses and fittings are tight. Loose connections can lead to pressure loss.
2. Examine the pump oil: Check the oil level and condition. Dark or milky oil suggests contamination, requiring an oil change.
3. Monitor the output: While the machine runs, place a pressure gauge on the outlet. A normal reading confirms the pump’s ability to create pressure.
| Observations | Potential Issues | Recommended Actions |
|---|---|---|
| No pressure build-up | Damaged seals or valves | Replace seals and inspect valves |
| Unusual sounds | Worn bearings or components | Disassemble for inspection, replace worn parts |
| Low or contaminated oil | Pump overheating or damage | Change oil and monitor temperatures |
Confirming the proper operation of the pump will guide you in deciding the next steps for maintenance or component replacement. Regular checks contribute to prolonged service life and optimal performance of your equipment.
Cleaning or Replacing the Spray Nozzle
Firstly, ensure the unit is powered off and disconnected from the water supply. A clogged spray nozzle often leads to diminished performance, causing uneven water distribution.

To clean the nozzle, use a soft brush and a mixture of water and mild detergent. Gently scrub the nozzle exterior and the orifice. If debris remains, you can use a pin to clear any blockage. Rinse thoroughly with clean water before reattaching.
If cleaning does not resolve issues, consider replacing the nozzle. Check the nozzle type specified in your user manual to ensure compatibility. Purchase a replacement from a reputable supplier to maintain optimal performance.
Replacing involves removing the old nozzle by unscrewing it, then screwing in the new one securely. Test the functionality after installation to confirm proper operation.
Regular maintenance of the spray nozzle significantly enhances the effectiveness of the equipment, preventing further complications.
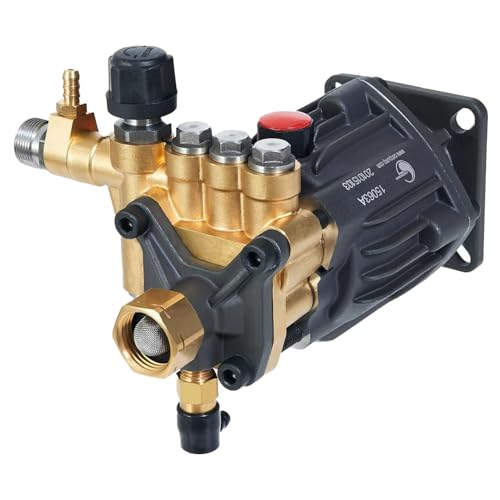
Examining and Replacing the O-Rings
.jpg "How to fix a honda pressure washer")
Inspect the O-rings in your unit regularly. If you notice leaking or reduced pressure, this could indicate that O-rings have worn out and need replacing. Carefully dismantle the housing to access these seals. Ensure to clean the area, removing any dirt or debris that may affect the installation of the new components.

Steps for Replacement

First, identify the size and type of O-ring required; refer to the equipment manual for precise specifications. Use a pick tool to gently remove the old ring to avoid damaging the surrounding components. Apply a light lubricant like petroleum jelly to the new O-ring before installation to facilitate a tighter seal.
| O-Ring Size | Application | Replacement Frequency |
|---|---|---|
| 9.75mm ID x 2.5mm W | Pump Housing | Annually |
| 10mm ID x 1.78mm W | Fuel System | Every 6 months |
| 12mm ID x 3mm W | Water Inlet | Annually |
Final Checks

Once the new O-rings are in place, reassemble the unit carefully. Test for leaks by running the machine at low pressure first. Observe for any signs of water escaping from the joints. If everything holds, you’re set for an efficient performance ahead.
Maintenance Tips to Prevent Future Issues
Regular maintenance is key. Here are my recommendations to keep your machine running smoothly:
Routine Oil Changes
- Change the engine oil every 50 hours of usage.
- Use the recommended oil type specific to your model.
- Check the oil level before each use; a low level can lead to engine damage.
Clean Air Filters
- Inspect the air filter every month.
- Replace or clean foam filters according to your manufacturer’s guidelines.
- A clean filter ensures optimal airflow, improving efficiency.
Water Supply Checks
- Ensure the water source is always clear of debris.
- Replace worn-out hoses to prevent leaks.
- Flush the system occasionally to remove any build-up.
Winter Preparation

- Before storage, run a winterisation solution through the system to prevent freezing.
- Store in a dry place away from extreme temperatures.
Owner’s Manual Reference
- Consult your manual for specific maintenance schedules related to your model.
- Follow the manufacturer’s guidelines for cleaning and replacement parts.
Adhering to these simple practices will enhance longevity and reliability, allowing you to tackle any cleaning task with confidence.