


First, select the right nozzle for your tasks. Different attachments provide varying spray patterns and pressures. For delicate surfaces like car paint, use a wide angle; for tougher dirt on driveways, a narrow jet works best.
Next, ensure that your water source is adequate. A high-pressure cleaner requires consistent water flow to maintain performance. Check for any kinks in hoses and ensure that the intake is properly connected. This is critical for optimal operation.
Before operation, add the appropriate detergent if cleaning requires it. Always read the product labels to determine compatibility. Some surfaces benefit from foaming agents that cling to grime more effectively, enhancing cleaning results.

Begin your task, keeping the nozzle at a consistent distance from the surface being cleaned. Too close can damage, while too far reduces efficiency. Practice a sweeping motion to evenly distribute clean water across the area. Regularly check the progress to avoid missed spots.
After completing the job, it’s crucial to perform maintenance checks. Rinse the unit thoroughly to prevent any detergent residue from clogging the system. Store the equipment in a dry place, ensuring hoses are coiled neatly to avoid kinks. These simple steps extend the lifespan of your cleaner.
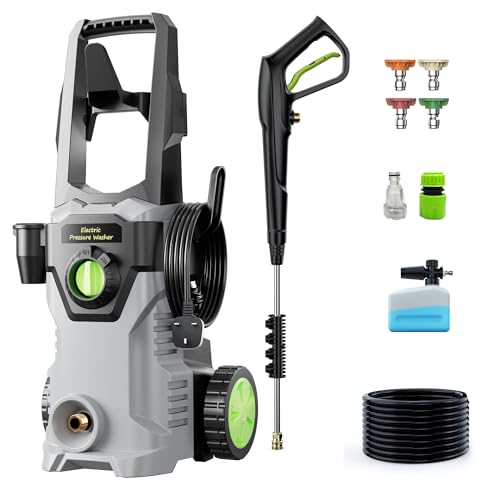
Choosing the Right Nozzle for Your Cleaning Task

For optimal results, select the appropriate nozzle based on the surface and type of dirt. A 0-degree nozzle delivers a concentrated stream, ideal for tough stains on concrete or brick; however, it can damage softer surfaces. A 15-degree nozzle offers a wider spray, suitable for heavy-duty tasks while being safer on many surfaces.
If cleaning vehicles or delicate areas, opt for the 25-degree or 40-degree nozzles. The 25-degree is great for general cleaning, providing a balance between pressure and coverage, while the 40-degree will gently remove dirt from glass, painted surfaces, and wood.
When applying soap, use a specific soap nozzle, often featuring a low-pressure setting. This allows the cleaning solution to effectively adhere to the surface before rinsing.
Test different nozzles on a small, inconspicuous area first. This ensures your choice won’t lead to unexpected damage. Each nozzle serves a purpose, so matching it to your task is key to achieving the best cleaning outcomes.
Setting up your nutool pressure washer for the first time
Begin by ensuring the unit is placed on a stable surface, preferably outside and away from delicate items. Next, connect the water inlet hose to the machine. Ensure it’s tightened securely to avoid leaks. Use a garden hose or a suitable water source, and check that your supply has adequate pressure.
Fill the detergent tank if your model includes one. Choose an appropriate cleaning solution to match your task, avoiding harsh chemicals that may damage the equipment. Make sure to follow the manufacturer’s recommendations on dilution ratios.
Prepare the electrical source, ensuring it adheres to the specified voltage. For safety, use an RCD adapter if your outlet does not have built-in protection. Check the power cord for any damage before plugging it in.
Select your desired nozzle and attach it firmly to the gun. Verify it’s connected correctly by giving it a slight tug. This ensures it won’t detach during operation. Prior to starting, hold the gun and press the trigger to release any trapped air from the system.
Once everything is connected and double-checked, turn on the water supply and energize the machine. Allow it to run for a few moments to purge any air. Adjust the pressure settings according to your cleaning needs before proceeding.
Confirm all connections are secure and that you have your safety gear on, including gloves and goggles, before starting your first cleaning task.
Adjusting water pressure for different surfaces
For optimal cleaning results, match the water intensity to the surface type.
- Delicate Surfaces: Set the water force low for delicate materials like wood or painted surfaces. A nozzle with a wider spray pattern is recommended. This helps prevent damage while effectively removing dirt.
- Concrete and Brick: Use medium pressure for robust surfaces such as concrete or unpainted brick. A narrower nozzle will be effective to remove stains without risking surface integrity.
- Vehicles: When cleaning cars, bikes, or other vehicles, adjust to low pressure with a fan-style nozzle. Maintaining a safe distance helps avoid scratches and paint damage.
- Patios and Decks: For patios or wooden decks, start with medium pressure. Test a small area first to assess the reaction of the material before proceeding.
- Heavy Stains: In areas with stubborn grime, applying higher intensity works well for challenging stains. However, always test the pressure on a hidden spot first to ensure safety.
Prioritise adjusting to the specific cleaning task while considering the surface material. This approach not only enhances cleaning efficiency but also prolongs the lifespan of your surfaces.
Utilising Detergent Effectively

For optimal results, select a detergent designed specifically for high-pressure equipment. This ensures compatibility and maximises cleaning power. Fill the detergent container according to the manufacturer’s recommendations, typically marked on the bottle, to avoid dilution errors.
When applying the detergent, use the low-pressure nozzle to maintain control and avoid damage to surfaces. Start from the bottom and work upwards, allowing the detergent to sit for several minutes, which aids in breaking down grime and stains.
It’s crucial to rinse thoroughly after application. Switch to a high-pressure nozzle, and begin at the top of the surface, working your way down to prevent streaks. Adjust the distance between the nozzle and the surface to effectively remove the detergent residue without causing harm.
Consider the following table for various surfaces and recommended detergents:
| Surface Type | Recommended Detergent |
|---|---|
| Concrete | Degreaser |
| Wood | Wood cleaner |
| Vehicle | Car wash detergent |
| Decking | Eco-friendly deck cleaner |
After cleaning, ensure to clean the detergent container and any attachments to prevent build-up, which can affect future performance. Regular maintenance extends the life of your equipment and ensures consistent results.
Maintenance Tips to Prolong the Life of Your Pressure Cleaning Equipment

Regularly inspect and replace the filter to ensure a clear water supply, preventing dirt and debris from damaging internal components.
Flush the system with clean water after each session. This removes any soap residues and prevents the build-up of mineral deposits that can compromise performance.
Check hoses for signs of wear or damage. A frayed or kinked hose can lead to leaks, reducing water flow and pressure. Replace any damaged sections promptly.
Examine the nozzle for blockages. Cleaning it regularly ensures an optimal spray pattern and prevents pressure loss.
Store the equipment in a dry, sheltered area to shield it from harsh weather conditions, which can cause unnecessary wear on seals and hoses.
Lubricate the pump and motor as per the manufacturer’s recommendations. Regular lubrication reduces friction and extends the life of moving parts.
Schedule periodic professional maintenance for more complex components to keep everything functioning smoothly and to catch potential issues before they become problems.
Always refer to the specific user manual for detailed care instructions, as each model may have unique requirements that differ from general practices.
Common troubleshooting steps for pressure washer issues
If the equipment is not starting, check that the power supply is functioning properly and that the unit is plugged in securely. Inspect the extension cord for damage and ensure it is suitable for outdoor use.
For low pressure during operation, examine the inlet filter for blockages and clean it if necessary. Ensure that the nozzle is not clogged and is the correct type for the task at hand. If the detergent is being used, check that it is being siphoned correctly into the system.
If water is leaking, inspect all hoses and connections for cracks or loose fittings. Tighten as needed and replace any damaged components to prevent further leakage. Check the O-rings in the lance and connections as these often wear out over time.
Should the engine be running but not delivering water, the issue could be trapped air in the system. To resolve this, hold the trigger down for a few moments to release any air pockets. If the problem persists, verify that the water supply is adequate and not turned off.
For unusual noises, examine the pump for any signs of wear or damage. Listen for any grinding or rattling, which might indicate internal issues. It’s advisable to consult the manual for guidance on maintenance and repair.
If there’s a reduction in cleaning effectiveness, it’s often due to dirty components. Regularly clean or replace the filter, inspect the nozzles, and ensure the right cleaning solution is being used depending on the surface type.
Always adhere to regular inspection and maintenance schedules to preempt these common issues and extend the lifespan of the equipment. It is far easier to maintain than to fix major problems later.


