Attach the cleaning solution dispenser to your device before commencing any maintenance project. This step ensures optimal performance during cleaning sessions, enhancing results significantly.
Fill the container with the appropriate cleaning agent, ensuring to dilute it according to the manufacturer’s instructions. Using the right concentration maximises cleaning effectiveness while preserving the equipment’s integrity. Secure the container tightly to prevent leaks.
Adjust the flow rate setting on your machine to manage the solution dispersion. A lower setting is advisable for delicate surfaces, whereas a higher flow suits tougher residues. This adjustment allows for customised application based on the task at hand, increasing efficiency.

Stand at an appropriate distance from the surface being treated, typically around 30 to 40 centimetres. This distance prevents excessive foaming or running of the solution while ensuring thorough coverage. Test on a small, inconspicuous area first to verify surface compatibility and achieve desired results.
Rinse after application to remove any remnants of the cleaning agent, preventing residue accumulation. This step is critical for maintaining surface longevity and ensuring optimal cleanliness.
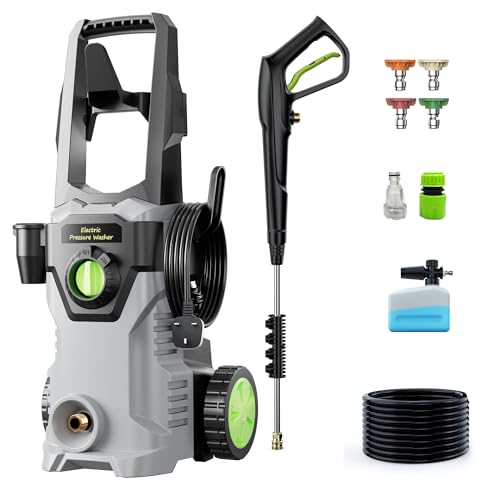
Understanding the Parts of Your Nilfisk Cleaning Machine
Familiarity with each component significantly enhances functionality and ease of operation. Key elements include the motor, pump, hose, lance, and spray nozzle.
| Part | Function | Tips |
|---|---|---|
| Motor | Powers the unit and drives the pump. | Ensure it is well-ventilated during operations to avoid overheating. |
| Pump | Pressurises water to produce a powerful spray. | Regularly check for leaks and ensure it’s compatible with the fluid being used. |
| Hose | Connects the pump to the lance. | Inspect for kinks and damages; replace if necessary to maintain pressure. |
| Lance | Directs the flow of water. | Interchange nozzles to adjust spray patterns according to cleaning tasks. |
| Spray Nozzle | Controls water flow and spray intensity. | Use lower settings for delicate surfaces to prevent damage. |
Understanding these parts enables effective maintenance and can potentially extend the longevity of the equipment. Regular inspections and adherence to operational guidelines ensure optimal performance year-round.
Selecting the Right Cleaning Solution for Your Task

Choose a cleaning product specifically designed for the surface you intend to treat. For instance, when tackling concrete or stone driveways, opt for an alkaline cleaner that effectively removes grime and oil. If addressing wood surfaces, select a gentle solution that protects while cleaning.
Concentration Matters
Consider the concentration level of the formulation. Higher concentrations often yield better results and may require dilution according to the manufacturer’s guidelines. This allows for optimal performance without surface damage.
Environmental Impact
Look for eco-friendly options to minimise environmental harm. Many manufacturers now provide biodegradable cleaning agents that offer powerful results while safeguarding nature. Always check for certifications to verify their environmental claims.
Review the specific application needed. For vehicles, dedicated automotive products ensure safe cleaning without affecting paintwork. In contrast, heavy-duty formulations are ideal for tackling tough outdoor areas. Align your choice with the required cleaning intensity to achieve the best outcome.
Filling the Detergent Container Correctly
.jpg "How to use detergent bottle with nilfisk pressure washer")
Begin by ensuring the container is clean and free from any residues from previous substances. This step prevents unwanted chemical reactions that could affect cleaning efficiency. Next, measure the appropriate amount of cleaning solution as per the manufacturer’s recommendation, usually found on the packaging. Pour the solution into the container carefully, avoiding spills that could lead to slippery surfaces.
After adding the solution, fill the remaining space with water. This dilution is crucial for optimal performance and ensures the mixture is effective yet safe for various surfaces. Make sure to leave some space at the top to allow for any foaming that may occur during operation.
Once filled, tightly secure the lid to prevent leaks while in use. It’s advisable to shake the container gently to mix the solution thoroughly, ensuring an even distribution. Be cautious not to overfill, as this can cause back pressure during application, potentially damaging the equipment.
Finally, inspect the container for any cracks or damage that could lead to leaks or inefficiencies. A well-maintained container ensures a smooth cleaning process and extends the lifespan of your equipment.
Attaching the Detergent Container to the Cleaning Machine

Align the connector of the container with the designated attachment point on the unit. Ensure that the connection is secure by pushing it firmly until you hear a click. This sound indicates that the mechanism has locked into place.
Steps for Proper Attachment:

- Check the alignment of the container’s neck with the coupling on the machine.
- Push down gently but firmly until the container clicks into position.
- Inspect the connection to confirm no gaps are present between the container and the attachment.
- Ensure the release tab is accessible in case of disconnection.
Once attached, give the container a slight tug to guarantee it’s secure. This step is vital to prevent accidental dislodging during operation. In case of any leaks, detach the container and recheck the connection to identify any issues.
Removing the Container
- Press the release tab carefully while holding the base of the container.
- Gently pull the container away from the machine until it is fully detached.
Ensure no residue remains on the connector before storing or attaching a new container. This practice will prolong the life of both the container and the cleaning equipment.
Adjusting settings for optimal detergent application
For achieving the best results, I recommend setting the foam intensity according to the task. If your surface is particularly dirty, a higher concentration can help break down stubborn grime. Adjust the nozzle to a wider spray pattern for large areas and narrow it for precision on smaller spots.
The pressure level should be moderate; high pressure can cause detergent to splatter or overly dilute the cleaning solution. Generally, a setting between 1000 to 1500 PSI works well for most cleaning scenarios.
Pay attention to the distance from the surface as you apply the solution. Keeping the nozzle approximately 30-45 cm away ensures even coverage without causing damage.
For optimal results, start at the top of the surface and move to the bottom. This technique allows the cleaning mixture to flow downwards, ensuring thorough cleaning as it works on the dirt.
After applying, allow the solution to dwell for a few minutes. This time lets the ingredients penetrate and soften the grime. Remember to rinse thoroughly right after, as letting the solution dry may leave streaks or residue.
Regularly inspect and clean the nozzle to prevent clogs. A well-maintained unit will apply the cleaning agent more effectively, enhancing your overall cleaning efficiency.
Cleaning Techniques with Detergent Using the Pressure Washer
Begin by applying a low-pressure setting to ensure an even distribution of the cleaning solution. This approach prevents the chance of damaging surfaces, especially delicate materials. Position the nozzle approximately 30 cm from the target area for optimal coverage.
For vertical surfaces, start from the bottom and work upwards. This technique allows the cleaning agent to flow down, lifting dirt and grime effectively. For horizontal surfaces, use a back-and-forth pattern to ensure uniform application.
Always allow the cleaning solution to dwell for the recommended time according to the manufacturer’s instructions; this enhances its effectiveness. Avoid letting it dry on surfaces, as this can lead to streaks or residues.
When rinsing, switch to a high-pressure setting to remove the cleaning solution thoroughly. Maintain a distance of about 30-50 cm from the surface to prevent damage while ensuring all residues are washed away.
After cleaning, inspect the area. If any spots remain, repeat the application process on those stubborn areas. Consistency and patience are key to achieving the best results.
For specialised tasks such as automotive cleaning, adjust the technique accordingly, focusing on areas with heavy contamination. Ensure that you select the correct solution that caters to the specific needs of the surface you are addressing.
Maintenance Tips for the Detergent Container and Cleaning Machine
To ensure longevity and optimal performance, regular care and cleaning of the cleaning solution receptacle and device is essential. Here are specific actions to consider:
- After each session, empty the contents of the container. Leaves any residual product in the tank which can lead to clogging or damage.
- Rinse the interior thoroughly with warm water. This prevents any buildup of substances that could affect future applications.
- Inspect seals and connections for wear. Replace any damaged parts immediately to maintain a secure fit during operations.
- Store the container away from extreme temperatures. Insulation from cold or heat will help to preserve the integrity of plastic materials.
- Keep the nozzle free of blockages. Regularly check for debris or dried product that could hinder the delivery of liquid.
- Clean the exterior of both the storage unit and the appliance using a damp cloth. This will prevent dirt build-up and maintain a neat appearance.
In addition, schedule a deeper maintenance routine every few months:

- Disassemble parts as per the user manual guidelines. This allows for thorough cleaning and inspection.
- Lubricate moving components with manufacturer-approved grease to ensure smooth operations.
- Run a specialist cleaning solution through the internal systems to eliminate any stubborn residues.
By adhering to these practices, I have found that equipment not only operates more efficiently but also has a significantly extended lifespan.