

If your high-pressure cleaning device is failing to function, start by checking the power source. Ensure the unit is properly plugged in, and inspect the cord for any visible damage. A faulty outlet can also be the culprit; test it by plugging in another device.
Next, examine the water supply. Insufficient water flow can lead to operational problems. Verify that the hose is adequately connected and not kinked or blocked. Clear any debris or obstructions in the inlet filter as well, as this can prevent water from entering the system.
Another area to explore is the spray nozzle. If it is clogged or damaged, it can impede performance. Clean or replace the nozzle to restore proper functionality. Additionally, check the pressure gauge; it should indicate the correct levels for optimal operation.
Lastly, consider any internal mechanical issues. If you hear unusual noises or notice leaks, this may signal a need for professional repair or maintenance. Regularly servicing your equipment can help prevent these complications and extend its lifespan.
Checking the Power Supply and Connections
Ensure that the power source is functional. Plug another device into the same outlet to verify it supplies electricity. If that device doesn’t work, the issue lies with the outlet or circuit.
- Inspect the power cord for any visible damage, such as fraying or cuts. If damaged, replace it immediately.
- Securely plug the power cord into the electrical socket. A loose connection may prevent the equipment from receiving power.
- Utilise an extension cord rated for outdoor use if needed, ensuring it matches the required voltage.
- Examine any circuit breakers or fuses associated with the outlet. If a breaker has tripped, reset it or replace any blown fuses.
Confirm that the on/off switch is in the correct position. Occasionally, the simplest solutions are overlooked. If the switch has an indicator light, ensure it is illuminated, confirming that the machine is receiving power.
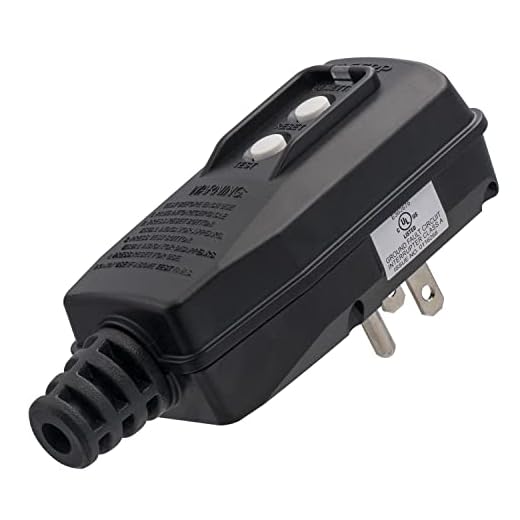
For models with built-in GFCI (Ground Fault Circuit Interrupter), press the reset button. These safety features can trip even with slight fluctuations in power, necessitating a reset.
In summary, verifying the electrical supply and inspecting connections can often resolve many issues. Taking these steps will help determine if the problem lies elsewhere.
Inspecting the Pump for Blockages
Begin by disconnecting the power supply to ensure safety. Next, examine the inlet filter and hose connections for debris. Remove any visible obstructions carefully. A clogged filter can significantly restrict water flow, affecting performance.
Steps to Inspect the Pump
- Detach the water inlet hose from the pump.
- Inspect the hose for kinks or blockages that could impede water flow.
- Check the inlet screen for dirt or sediment. Clean or replace it if necessary.
If the pump is still unresponsive, look for waste caught in the pump itself. This can occur due to improper water source conditions, like using untreated water with contaminants.
Clearing Internal Blockages
- Remove the pump housing by unscrewing the necessary fasteners.
- Check internal components for scale build-up or foreign material.
- Gently clear any blockages using a soft brush or a suitable cleaning solution, taking care not to damage surfaces.
After cleaning, reassemble the pump carefully, ensuring all seals are intact to prevent leaks. Reconnect the hose and water supply, then test the machine to check if the flow has improved. Regular inspections can prevent future issues and maintain high efficiency.
Examining the Spray Gun and Hose for Leaks
Start by disconnecting the spray gun and hose from the main unit. Inspect both components carefully for any signs of wear, cracks, or leaks. A malfunctioning spray gun or hose can significantly affect performance and lead to water loss.
Steps to Identify Leaks
To identify leaks in the spray gun and hose, follow these steps:
- Visual Inspection: Examine both parts for visible damage, bulges, or tears. Pay close attention to the connection points.
- Feeling for Leaks: With the unit powered on, hold the spray gun to check for any escaping water. A significant drop in pressure often indicates a leak.
- Soap Solution Test: Mix a small amount of dish soap with water and apply it to the suspected areas. Bubbles will form where air is escaping, indicating a leak.
Common Issues and Solutions
| Issue | Solution |
|---|---|
| Cracked Hose | Replace the hose immediately to prevent further issues. |
| Defective Spray Gun | Inspect the trigger and seals; replace if damaged. |
| Loose Connections | Tighten connection fittings to ensure a secure fit. |
| Blocked Nozzle | Clear any obstructions in the spray nozzle for optimal flow. |
After addressing any found issues, reassemble the components and conduct a performance test to ensure everything works effectively. Regular maintenance of the spray gun and hose will help prolong their lifespan and maintain efficiency.
Reviewing the Safety Features and Reset Mechanisms

Always check the built-in safety mechanisms before troubleshooting further. Many models come equipped with a thermal overload protection feature that prevents overheating. If the machine feels excessively hot, it may have automatically shut down. Allow it to cool for at least 30 minutes before attempting to restart.
Reset Procedures
If the system shuts down unexpectedly, look for a reset button, usually located on the back or side of the unit. Press this to reinitiate operation. Ensure the power is connected, and recheck all connections to ensure functionality.
Safety Locks
.jpg)
Inspect the spray gun for any safety locks that may be engaged. Some designs incorporate a trigger lock to prevent accidental discharge. If this is engaged, it will stop the unit from functioning until released. Familiarise yourself with your model’s specific safety features to ensure proper usage.
Assessing the Water Supply and Pressure Settings
Always ensure the water source provides adequate flow and pressure. A simple method to check this is by detaching the garden hose and turning on the water. The fluid should flow freely without any interruptions or drips. If you notice low flow, inspect for kinks in the hose or blockages in the tap. Sometimes, installing a hose without a filter can cause debris build-up, restricting water flow.
Checking Water Pressure
The optimal water supply should be around 20-100 psi for most models. To measure this, use a pressure gauge at the tap before connecting your device. If the pressure is below the manufacturer’s recommended settings, you might need to adjust the tap or look into installing a pressure booster.
Testing for Leaks and Blockages
Inspect all connections from the source to the unit. Ensure that fittings are tight and secure. A loose connection may lead to significant pressure loss. Additionally, check the intake filter – it should be clean and unobstructed. Regular maintenance of the filter prevents build-up that could inhibit water intake, thus affecting performance. Keeping these aspects in check ensures a consistent delivery of water, ultimately improving efficiency.
Identifying Electrical Issues and Circuit Problems
Inspect circuit connections thoroughly. Check the power cord for frays or damage. A damaged cord can interrupt electric flow and prevent functionality. Ensure all connections are secure and free from corrosion; loose wires can disrupt power supply.
Test the outlet with a multimeter to confirm it’s delivering the correct voltage. Sometimes, the problem lies there rather than in the device itself. If the outlet is faulty, it must be repaired before proceeding.
Examining Circuit Breakers and Fuses

Examine circuit breakers and fuses associated with your equipment’s outlet. A tripped breaker or blown fuse can stop operation. Reset the breaker or replace the fuse if necessary, ensuring you utilise the proper amperage to avoid future issues.
Checking for Overheating and Short Circuits
Overheating can lead to automatic shutoff mechanisms activating. After extended use, allow the machine to cool before attempting to restart. In addition, inspect for signs of short circuits, such as burnt wiring or melted components. Addressing these signs promptly can prevent major damage.
Finally, consult the manufacturer’s manual for troubleshooting specific to your model. Each device has unique circuit requirements and safety protocols, ensuring optimal performance when all components function correctly.


