

First and foremost, if you’re noticing water escape at the fitting point between the tubing and the unit, the immediate action is to inspect the O-ring. This essential rubber component often wears out or becomes misplaced, leading to a faulty seal. Replacing it is usually an easy and inexpensive fix that can mitigate leaks in no time.
Another common factor involves the tightness of the connection. Frequent operations can loosen fittings over time. Ensure that all attachments are securely fastened by hand, and if necessary, use a wrench for additional torque, but take care not to overtighten, as this can cause damage to the threads.
If you’ve checked both the O-ring and the snugness of the connections and are still encountering issues, it’s prudent to examine the integrity of the tubing itself. Look for any signs of wear, such as cracks or abrasions, which could contribute to the malfunction. Should you find any damage, replacing the affected section may be your best solution.
Lastly, consider the quality of the attachments you are using. In some cases, using non-compatible or lower-quality parts can markedly increase the risk of leaks. Opt for components suggested by the manufacturer or those of proven reliability to maintain optimal performance.
Identifying leaks at the hose connection

Check the tightness of the fitting at the interface; it should be snug, but not over-tightened, as excessive torque can cause damage. Use a wrench specifically designed for this purpose to ensure a secure fit.
Inspect the sealing washer within the connector. Often made from rubber or silicone, this component can wear out over time. Replace it if you notice cracks or hardening. A fresh washer can make a noticeable difference in retaining water.
Examine the condition of the connector itself. Look for any signs of wear or cracking in the plastic or metal parts. If any damage is detected, consider replacing the connector entirely to stop unwanted drips.
Be mindful of the alignment of the lines. Any misalignment can put stress on the joint, leading to leaks. Ensure both ends are properly aligned and seated within their respective fittings.
Check for kinks or sharp bends in the line leading to the connector. This can create pressure points, resulting in seepage. Straighten any bends and ensure a smooth flow path.
Consider the type of liquid used. Certain cleaning solutions can degrade materials over time. If using a specific chemical, confirm compatibility with the materials of the connection to avoid degradation.
When all else fails, it may be beneficial to disassemble the setup and clean the threads and washers to remove any debris. Any foreign matter can compromise the seal, leading to unwanted water flow.
Common causes of pressure washer hose leaks
Regular maintenance and careful handling can significantly reduce the likelihood of issues occurring at the joint where the water supply pipe meets the appliance. However, multiple factors can still contribute to the unwanted escape of water. Here are the major reasons for such occurrences:
1. Damaged fittings
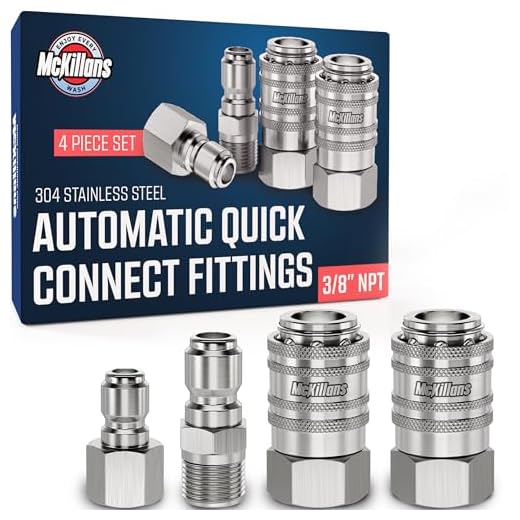
Fittings can degrade over time, causing gaps that allow fluid to seep through. Inspect for cracks or wear on both the connector and the quick-release couplings to ensure a snug fit.
2. Worn-out rubber seals
The rubber seals that create a tight barrier can wear out due to exposure to high pressure and chemicals. Replace these seals regularly to maintain a reliable bond at the junctions.
3. Incorrect assembly

Improper installation of the tubing may lead to misalignment, creating opportunities for leaks. Always follow the manufacturer’s guidelines for assembling the components.
4. Corrosion or rust
Metal components may corrode when exposed to water and cleaning agents. This deterioration weakens the connections. Inspect for any signs of rust and replace affected parts.
5. High-pressure settings
Excessive pressure can strain connectors and hoses. If you operate the equipment beyond recommended settings, consider adjusting the pressure output to alleviate stress on these areas.
Maintenance checklist
| Task | Frequency |
|---|---|
| Inspect fittings for damage | Every use |
| Check rubber seals | Monthly |
| Ensure proper assembly | Before each use |
| Look for signs of corrosion | Every six months |
| Evaluate pressure settings | Before each use |
By addressing these common causes, maintaining equipment, and being attentive during operation, I have found that the risk of issues at the junctions can be significantly mitigated.
How to check for damage in hoses and fittings
Inspect each flexible line and coupling closely for visible signs of wear. Look for cracks, splits, or fraying that could indicate a compromised structure. If you’re using a transparent or semi-transparent pipe, such as some PVC options, check for any discolouration or cloudiness which can suggest degradation.
Conduct a thorough examination of the fittings to ensure they are securely attached. Twist or gently tug the connections to ensure there is no movement. Any looseness may suggest that the fitting is failing. Use a wrench to tighten the fittings if necessary, but avoid overtightening, as this can lead to additional stress.
Run water through the system while keeping an eye out for any drips or consistent moisture forming around these points. Pay special attention to areas where the hose connects to the machine and other components. If you detect any moisture at these spots, it might be indicative of a faulty seal or fitting.
For a more detailed assessment, you can submerge sections of the line in water to look for bubbles, which signifies air escaping from a breach. This method is particularly effective for identifying small leaks that may not be visible to the naked eye.
Throughout all inspections, keep an eye on the overall condition and age of the components. Older hoses often become brittle or less pliable, increasing the likelihood of damage. If they appear worn, consider replacing them as a preventive measure.
Steps to Properly Tighten Hose Connections
Ensure you have the correct tools handy; commonly, a pair of adjustable wrenches will suffice.
Step 1: Hand-Tightening

Start by hand-tightening the fittings. This initial step should be done without applying excessive force. Just ensure that they are snug.
Step 2: Use Tools for Final Tightening

Once hand-tightened, employ wrenches for final adjustments. Grip one fitting securely while using the second wrench to tighten the other. Aim for a snug fit, but avoid over-torquing, as this can damage the threads.
Check your connections periodically after use to maintain a secure seal. If you notice any movement or looseness, repeat these steps promptly.
If leakage persists after tightening, inspect for potential damage in both the fittings and connection points.
When to Replace the Hose or Connector
Inspect the tubing and fittings for any signs of wear, such as cracks, fraying, or severe stiffness. If you notice significant damage or the material feels compromised, it’s time to replace them. A general rule is to consider replacement every 2-5 years, depending on usage and environmental factors.
During routine maintenance, pay attention to any persistent dripping or seepage, even after tightening the fittings. If the leaks continue, the sealing mechanisms might be deteriorated, indicating a need for new components.
If you’ve repaired or replaced seals multiple times with no improvement in function, it’s likely more cost-effective to buy a new hose or connector altogether. This avoids further downtime and ensures reliable operation.
For enhanced performance, select components that are compatible with your equipment’s model and specifications. Investing in quality replacements will extend the lifespan and efficiency of your cleaning apparatus.
Lastly, if you experience any sudden pressure loss or a drop in performance while using the unit, inspect the entire system, including the tubing and fittings, as these issues often indicate a failure that may require immediate attention and potential replacement.
Preventative maintenance to avoid future leaks
Regular inspections of all couplings and tubes are fundamental. Check fittings for signs of wear such as cracks or deformation.
- Inspect all seals and O-rings. Replace them if they appear brittle or damaged.
- Utilise thread tape on threaded connectors to enhance sealing.
- Store equipment in a protected environment to prevent exposure to extreme temperatures or moisture.
Establish a schedule for cleaning and maintaining connections. Ensure that debris, dirt, or grime are cleared away from attachment points.
Once a month, check for twisting or kinking in lines which can compromise integrity. Use protective wraps to prevent abrasion at high contact points.
- Before each use, confirm that all components are securely fastened.
- Test connections under normal operating pressures to spot potential issues early.
Consider using a pressure gauge to monitor performance. Any drop in pressure might indicate an underlying concern that needs addressing.
Finally, stay informed about the latest advancements in connection technology. Upgrading to newer materials can significantly reduce the risk of leaks.
FAQ:
What are the common reasons for a pressure washer to leak from the hose connection?
Pressure washers can leak from the hose connection for several reasons. Firstly, it might be due to a loose connection; if the hose is not tightly secured to the pressure washer, water can escape. Secondly, worn or damaged washers or O-rings inside the connection can lead to leaks. Another reason could be that the hose itself is cracked or damaged, which may cause water to leak at the point of connection. Lastly, improper installation of the hose or using incompatible fittings can also result in leaks.
How can I fix a leaking hose connection on my pressure washer?
To fix a leaking hose connection on your pressure washer, start by turning off the machine and disconnecting the hose. Check the connection point for any visible damage, including cracks or worn washers. If you identify any damaged parts, replace them. Tighten the connection by securely fastening the hose back onto the pressure washer, ensuring it is properly seated. If the leak persists after tightening, inspect the hose for any damage along its length and replace it if necessary. Conduct a final check to make sure everything is properly secured, and test the pressure washer to see if the leak has stopped.
Is it safe to use my pressure washer if it is leaking from the hose connection?
Using a pressure washer that leaks from the hose connection is not advisable. A leak can lead to reduced water pressure and can compromise the performance of the machine. Furthermore, leaking water could create a slip hazard in the area where you are working. More importantly, continuing to operate the pressure washer while it has a leak could cause further damage to the machine or its components. It’s best to diagnose and repair the leak before using the pressure washer again. Ensuring that all connections are secure and intact will help maintain the safety and efficiency of the appliance.


