
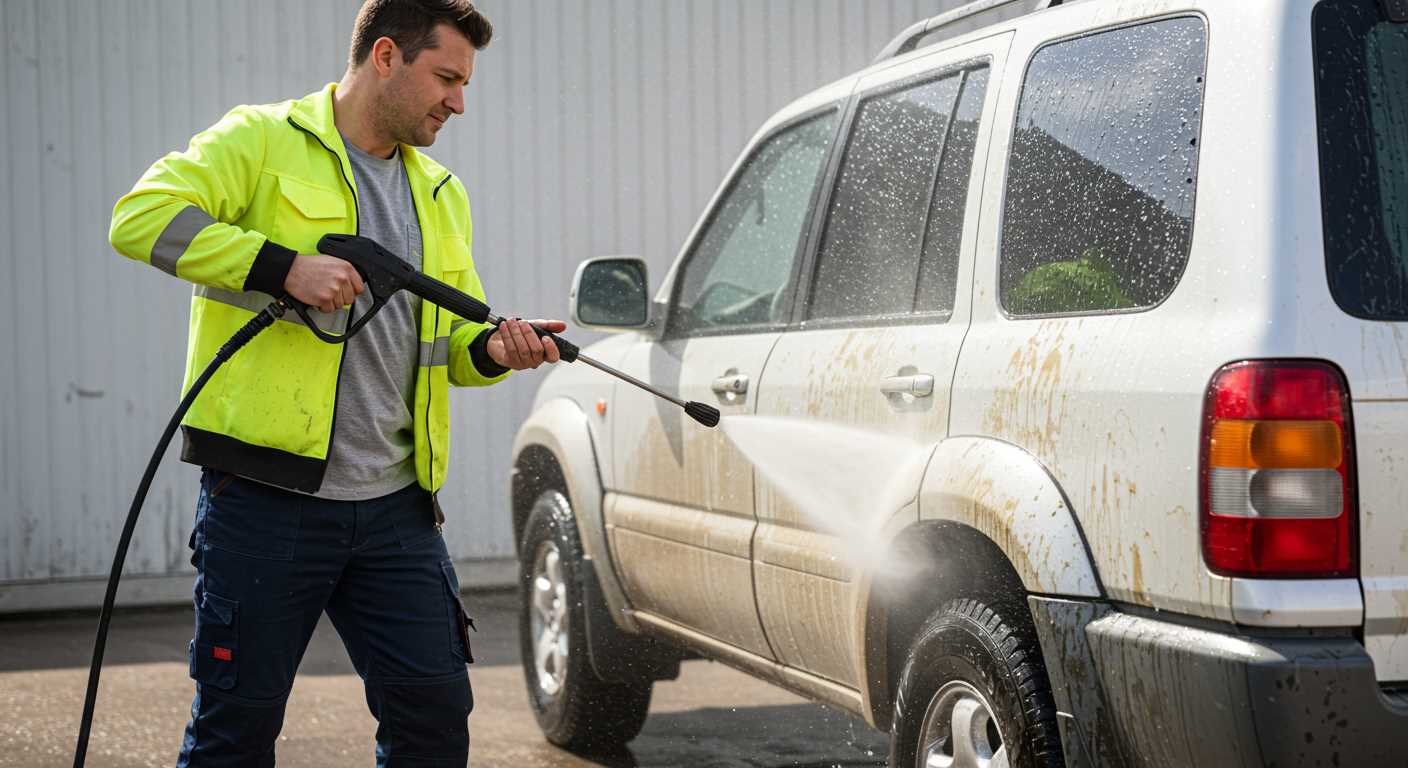


Absolutely, high-pressure cleaning devices can effectively clean vehicles, but there are specific guidelines to follow to prevent damage. During my decade in the cleaning equipment industry, I encountered numerous situations where improper use led to unwanted results.
For instance, maintaining a distance of at least two feet from the surface is crucial. Getting too close can result in scratches or even paint removal. In one case, a colleague used a high-pressure cleaner too aggressively on a luxury vehicle, causing significant paint damage. The lesson learned: always assess the vehicle’s finish before applying high-force streams of water.
Another important aspect is selecting the right nozzle. A wide-angle nozzle is generally recommended for vehicles, as it disperses the water over a larger area, reducing the risk of concentrated pressure that can harm the paint. I remember a time when a narrow nozzle was used on a delicate finish, leading to deep etching. It’s these small details that make a big difference.

Temperature settings also play a role. Warm water can enhance cleaning without the harshness of high pressure. A gentle approach with the right temperature often yields the best results, especially for removing stubborn grime and road debris. Always test a small, inconspicuous area first to ensure compatibility.
Ultimately, it’s about balancing effectiveness with care. Following these practices can lead to a beautifully clean vehicle without the risk of damage. Through my experiences, I’ve seen how a cautious approach can transform vehicle maintenance while preserving its appearance.
Using a High-Pressure Cleaner on Automobiles
Opting for a high-pressure cleaner on an automobile can yield outstanding results when done correctly. Begin with a suitable nozzle, ideally one that disperses the water widely. A narrow stream might risk damaging paintwork or seals. Always maintain a safe distance, usually around two feet from the surface.
Start from the top and work your way down. This allows dirt and grime to flow downwards rather than being pushed into clean areas. Pay particular attention to wheel arches and undercarriage, where muck tends to accumulate. A dedicated attachment for these areas can significantly ease the cleaning process.
Be cautious around sensitive components like electrical connections and air intakes. Water intrusion can lead to malfunctions. For stubborn stains, consider using a pre-treatment solution before the cleansing process, ensuring it is safe for automotive finishes.
After rinsing, it’s wise to dry the vehicle properly to prevent water spots. A microfiber towel works best for this task, providing a gentle touch that avoids scratches. Regular maintenance with this method can keep your vehicle looking pristine.
If interested in other cleaning tips, check out this guide on how to clean laminate wood floors steam mop.
Understanding Pressure Washer Settings for Car Cleaning
For optimal results while cleaning vehicles, it’s crucial to adjust the settings appropriately. Typically, a lower pressure setting, around 1200 to 1900 PSI, is ideal for automotive surfaces. This range effectively removes dirt without risking damage to paint or sensitive components.
Choosing the Right Nozzle
The nozzle selection significantly influences the cleaning process. A 25-degree or 40-degree nozzle is generally recommended for vehicles. The wider spray pattern helps distribute the water more evenly, minimising the risk of concentrated pressure that can harm the finish. Avoid using a zero-degree nozzle, as it directs a strong stream that can strip paint and cause dents.
Temperature Considerations
When it comes to temperature, warm water can enhance cleaning efficiency. If your equipment allows, set the temperature to around 60°C. This warmth helps dissolve grime and grease more effectively. However, always ensure that the heat setting doesn’t exceed the manufacturer’s recommendations for your vehicle’s materials.
Choosing the Right Nozzle for Car Washing
For optimal results when cleaning vehicles, selecting the appropriate nozzle is paramount. I’ve found that a 25-degree nozzle is typically ideal for most automotive surfaces. This nozzle provides a balanced spray pattern that effectively removes dirt without the risk of damaging the paintwork.
Types of Nozzles
There are several types of nozzles available. The 0-degree nozzle delivers a concentrated jet, perfect for stubborn grime but risky on delicate surfaces. The 15-degree nozzle offers a more powerful spray, suitable for heavy-duty cleaning but should be used with caution. The 40-degree nozzle produces a wider spray, making it excellent for rinsing and gentle cleaning.
Adjustable Nozzle Benefits
Consider using an adjustable nozzle for versatility. This tool allows you to switch between different spray patterns quickly. I’ve had times when an adjustable nozzle saved me from having to switch equipment mid-clean, streamlining the process significantly.
Always test the nozzle on a small, inconspicuous area to ensure compatibility with your vehicle’s finish. Remember, the right choice makes a difference in achieving that spotless shine while protecting your paintwork from potential damage.
Preparing Your Vehicle Before Using a Pressure Washer
Before tackling the cleaning process, ensure the vehicle is parked in a shaded area to prevent soap and water from drying too quickly. This simple step can save you from unsightly streaks and spots.
Remove any loose debris and dirt with a soft brush or a microfiber cloth. Pay special attention to areas like the wheel wells, undercarriage, and around the bumpers, as these spots tend to accumulate grime. I recall once overlooking the wheel wells, only to find the dirt reappearing immediately after cleaning.
Inspect the vehicle for any existing damage, such as scratches or chips in the paint. Addressing these areas before applying high-pressure water helps prevent further damage, as the force of the water can exacerbate existing flaws. I learned this the hard way when I inadvertently widened a small chip in the paint during a wash.
Ensure windows and sunroofs are fully closed. Water entering these areas can lead to interior damage or electrical issues. I’ve encountered a few friends who had to deal with wet upholstery because they forgot this crucial step.
Remove any accessories, like antennas or custom spoilers, that could be dislodged or damaged. If removable, take them off to avoid complications. I once lost a decorative antenna during an enthusiastic cleaning session, which was a hassle to replace.
Consider pre-treating stubborn stains with a suitable cleaner. Applying a dedicated product to areas with bird droppings or tree sap can make the washing process much smoother. I’ve found that letting the cleaner sit for a few minutes aids in breaking down tough residues.
Finally, ensure all electrical connections, such as those for sensors or cameras, are dry and free from moisture before starting. This prevents any potential electrical issues during or after cleaning. I’ve seen instances where moisture caused sensors to malfunction, leading to frustrating alerts on the dashboard.
Best Practices for Washing Your Vehicle with a Pressure Washer
Start with a thorough rinse to remove loose dirt and debris. This prevents scratching the surface during the cleaning process. Position the nozzle at least two feet away from the surface to avoid damage. A gentle approach is key; a moderate flow setting is typically sufficient for most vehicles.
Choosing the right cleaning solution is vital. Ensure it’s specifically formulated for automotive finishes. Dilute according to the manufacturer’s instructions and apply it using a foam cannon or a spray bottle for even coverage. Allow the cleanser to sit for a few minutes before rinsing, but don’t let it dry on the surface.

After applying the cleaning solution, use a soft brush or microfiber cloth for stubborn spots, particularly around the wheels and lower panels. Avoid abrasive materials that could leave scratches.
When rinsing, use a sweeping motion from top to bottom. This ensures dirt runs off without being pushed back onto the cleaned areas. Pay special attention to crevices and undercarriage, as dirt often accumulates in these spots.
After rinsing, dry the vehicle using a soft towel or chamois. This prevents water spots from forming. You might also want to apply a wax or sealant for added protection and shine.
| Step | Details |
|---|---|
| Initial Rinse | Remove loose dirt; keep nozzle 2 feet away. |
| Apply Cleaner | Use automotive-specific formula; allow to sit. |
| Scrub | Use soft brushes for stubborn spots. |
| Final Rinse | Rinse from top to bottom; focus on crevices. |
| Dry | Use soft towels; consider wax application. |
For additional insights, check out these tips and techniques for pressure washing brick. These methods can be applied broadly and may enhance your overall cleaning skills.
Common Mistakes to Avoid When Using a Pressure Washer on a Car


Using a high-powered cleaning device on a vehicle can lead to damage if not done correctly. Here are the key pitfalls to steer clear of:
- Wrong Nozzle Selection: Opting for a narrow nozzle can result in damaging the paint. Always choose a wider nozzle to distribute the water pressure evenly.
- Inadequate Distance: Keeping the spray too close can strip off paint and finish. Maintain at least 2-3 feet of distance from the surface.
- High Pressure Settings: Using maximum pressure can lead to scratches and dents. Adjust the settings to a lower pressure suitable for automotive surfaces.
- Neglecting to Rinse: Failing to rinse off soap thoroughly can leave residue that attracts dirt. Ensure all soap is removed after washing.
- Ignoring Sensitive Areas: Avoid spraying directly at vulnerable components like electrical connections and rubber seals. Cover these areas or use a lower pressure setting.
- Washing in Direct Sunlight: This can cause soap to dry too quickly, leaving streaks. Choose a shaded area to wash for better results.
- Not Pre-Treating Stains: Skipping pre-treatment for stubborn spots can lead to ineffective cleaning. Use a dedicated automotive cleaner for tough stains before rinsing.
- Skipping the Drying Process: Letting water dry naturally can lead to water spots. Always dry the vehicle with a microfiber cloth after rinsing.
Avoiding these common errors ensures a thorough clean without compromising the vehicle’s integrity. Trust me, I’ve seen too many cars that suffered the consequences of improper technique. Taking the time to follow these guidelines will keep your vehicle looking pristine.
How to Protect Sensitive Areas of Your Vehicle
Before tackling any cleaning task, focus on the vulnerable spots. Areas like the headlights, tail lights, and any sensors require special attention. I recommend applying a layer of painter’s tape around these sections. This simple step acts as a barrier against potential damage from water jets.
Additionally, be cautious with door seals and other rubber components. Water can infiltrate these areas, leading to issues such as mould or corrosion over time. To safeguard them, consider using a silicone spray on seals prior to washing. This helps to create a water-repellent surface.
Wheels and brake components also merit consideration. High-pressure streams can dislodge brake dust and dirt, but they can also inadvertently introduce water into sensitive areas. Instead of aiming directly at brake components, use a less intense setting and maintain a safe distance.
Inspect the undercarriage before proceeding with any cleaning. Certain parts, like electrical connections, are particularly susceptible. By gently rinsing these areas from a distance, you can minimise the risk of water intrusion.
Finally, after the washing is complete, verify that all openings and seals are dry. A simple towel can help absorb any residual moisture, ensuring that sensitive areas remain protected. This attention to detail not only prolongs the life of your vehicle but also enhances its overall appearance.
Post-Wash Care After Using a Pressure Washer
After rinsing off the vehicle, drying it thoroughly is vital. I always reach for a soft, microfiber towel to prevent any scratches or swirl marks on the surface. A damp towel works wonders to absorb water, especially in hard-to-reach areas.
Once the exterior is dry, applying a wax or sealant is a great move. This not only protects the paint but also enhances shine. I’ve found that using a spray wax can be quick and effective. Just spray it on and wipe it down with a clean towel for a brilliant finish.
Pay attention to the wheels and tyres. After the initial cleanse, I recommend giving them a dedicated treatment. A good tyre dressing not only improves appearance but also provides some protection against the elements. I often use a foam applicator to ensure even coverage.
Inspect for any missed spots or areas that may have been overlooked. A quick touch-up with a sponge or cloth can make a big difference. From experience, I’ve learned to check the lower panels and wheel arches, as these areas tend to collect dirt and grime.
Don’t forget about the interior! After an exterior clean, I like to vacuum out the cabin and trunk. A thorough cleaning of the mats and upholstery ensures everything matches the freshly cleaned exterior. A good air freshener can add a nice finishing touch.
For those who have used a foaming attachment during the wash, double-check that no residue remains. A gentle wipe-down with a microfiber cloth can prevent any potential streaking or spotting.
Finally, ensuring that all windows are clean and streak-free is a must. I always keep a glass cleaner handy for this purpose. A spotless finish on the glass not only looks great but also enhances visibility while driving.
Alternatives to Pressure Washing for Car Maintenance
For those looking for effective methods to maintain vehicle cleanliness without resorting to high-pressure methods, there are numerous viable options available. Below are several alternatives that can yield excellent results while being gentler on your vehicle.
- Hand Washing: Using a soft sponge or microfiber cloth with car-specific soap is a classic approach. It allows for control over pressure and contact with the surface, reducing the risk of scratches.
- Foam Cannon: Attaching a foam cannon to a standard garden hose provides thick foam that clings to the paint, loosening dirt and grime. This method is effective and can be rinsed off with a gentle flow.
- Waterless Wash Products: These sprays are designed to lift dirt without the need for rinsing. Simply spray on the surface and wipe off with a clean cloth. Ideal for light dirt and quick touch-ups.
- Detailing Clay: For stubborn contaminants, using a clay bar can be beneficial. It effectively removes embedded particles without damaging the paint.
- Steam Cleaning: This method utilises high-temperature steam to clean surfaces. It’s effective for both interior and exterior, sanitising surfaces without harsh chemicals.
- Microfiber Towels: Investing in quality microfiber towels can enhance the drying process and remove any remaining residue after washing without scratching the surface.
Each of these methods provides unique benefits, allowing for tailored cleaning that suits individual needs and preferences. Regular maintenance through these alternatives helps preserve the vehicle’s appearance and longevity.

.jpg)


