


Yes, high-pressure cleaners can effectively eliminate a spray coating, provided you use the right technique and equipment. From my experience in the field, I have witnessed numerous cases where a powerful cleaner successfully stripped away layers of unwanted finish, restoring surfaces to their original state.
When using these machines, selecting the appropriate nozzle and pressure setting is crucial. A narrower nozzle generates a concentrated stream that can penetrate and dislodge stubborn coatings, while adjusting the pressure can help prevent damage to the underlying surface. For example, I often recommend starting with a lower setting and gradually increasing it until the desired results are achieved. This approach not only protects the surface but also optimises the cleaning process.
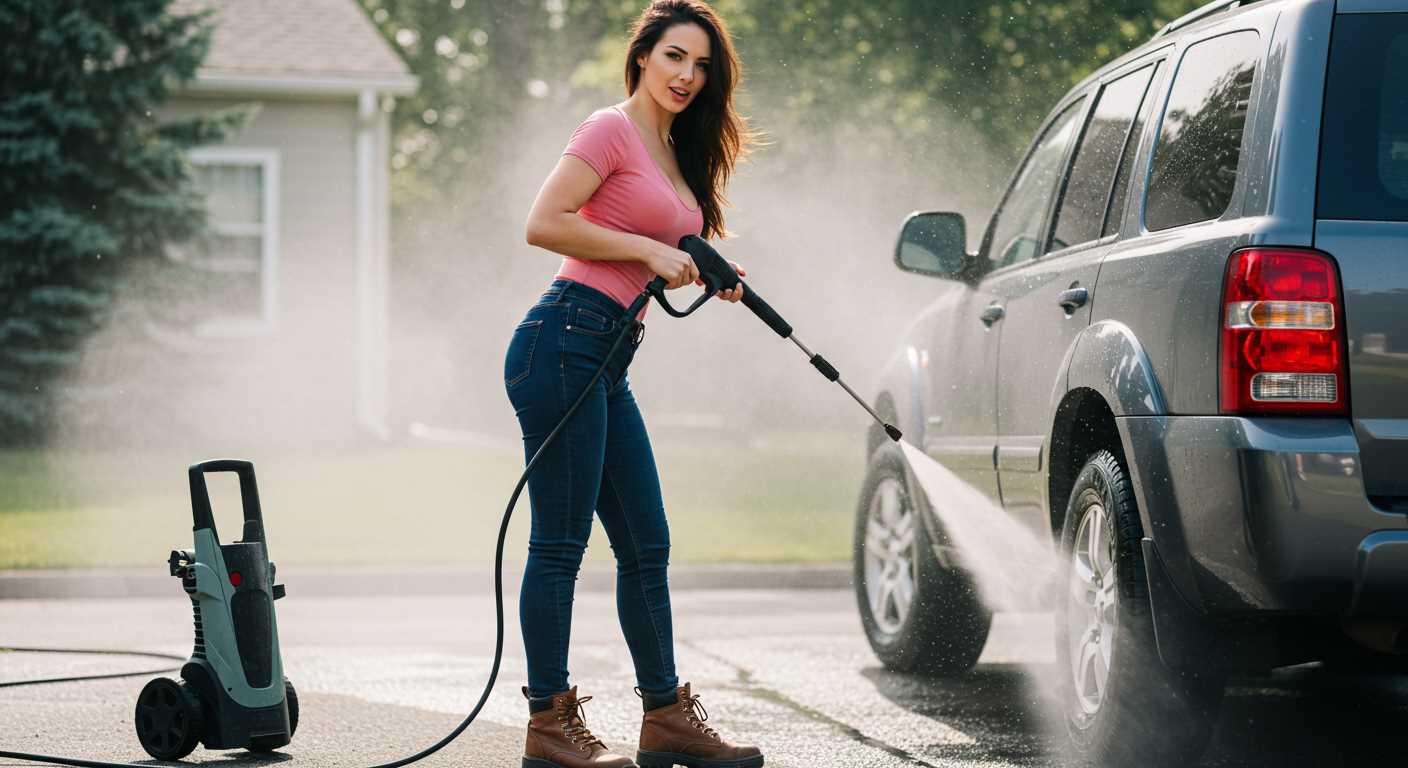
Another key aspect is the distance from which you spray. Keeping the nozzle at least 12 inches away from the surface helps to avoid gouging or etching. In my trials, I found that maintaining a steady, sweeping motion aids in evenly distributing the force, leading to more effective removal.

Additionally, pre-treating the area with a suitable cleaning solution can enhance the performance of the high-pressure equipment. Many formulations are designed to break down paint compounds, making it easier for the force of the water to dislodge them. In my practice, I often combine mechanical and chemical methods for optimal results.
Do Pressure Washers Remove Spray Paint?
Yes, these devices can effectively eliminate spray coatings, but the results depend on several factors including the surface type, the age of the coating, and the machine’s specifications. In my experience, a unit with a minimum of 3000 PSI combined with an appropriate nozzle can tackle most common varieties of spray applications.
Surface Considerations
When dealing with different materials, it’s crucial to adjust your technique. For instance, concrete and brick surfaces respond well to higher pressures, while wooden decks might require a gentler approach to avoid damage. I once encountered a wooden fence covered in a thick layer of spray coating. Using a lower setting and a fan nozzle allowed me to strip the surface without harming the wood fibres.
Preparation and Technique
Before starting, pre-treating the area with a suitable remover can enhance results. After applying the remover, let it sit for the recommended time before using the device. I often found that this step significantly reduces the time and effort needed to achieve a clean surface. If you’re in the market for equipment, check out black friday deals on pressure washers for great offers on high-quality models.
Remember, the right combination of pressure, nozzle type, and cleaning solution leads to the best outcomes. Don’t rush the process; sometimes patience pays off with cleaner results.
Understanding Spray Paint Composition
To effectively remove unwanted coatings, it’s crucial to grasp the elements that constitute these coatings. Spray coatings typically comprise a blend of pigments, solvents, resins, and additives, each contributing to its adhesion and durability.
- Pigments: These are the colour particles responsible for the hue and opacity. The type of pigment can influence how resistant the coating is to removal.
- Solvents: These liquids dissolve the resins and pigments, allowing for a smooth application. Once the coating dries, the solvents evaporate, leaving behind a solid layer that can be challenging to eliminate.
- Resins: These are the binding agents that hold the pigments together and adhere them to surfaces. The resin type significantly affects the coating’s toughness and longevity.
- Additives: These are included to enhance specific properties, such as drying time, glossiness, and resistance to environmental factors. Some additives can make the coating more stubborn to remove.
Understanding these components helps in selecting the right removal method. For instance, coatings with a higher resin content may require stronger solvents or mechanical action for effective removal. In my experience, the age and condition of the coating also play a pivotal role; older coatings often become more brittle, which can affect the removal process.
Choosing the correct approach hinges on identifying the specific type of coating you’re dealing with. Always perform a test on a small area to gauge how the surface reacts before proceeding with larger sections. This method saves time and prevents potential damage to the underlying material.
How High-Pressure Cleaning Equipment Functions
To achieve optimal results, understanding the mechanics of high-pressure cleaning devices is essential. These machines operate by drawing in water from a source, which is then pressurised through a pump. Here’s a breakdown of the components involved:
- Water Intake: This is where the device connects to the water supply. The intake typically has a filter to prevent debris from entering the system.
- Pump: The heart of the machine, the pump intensifies the water pressure. There are two main types: axial and triplex. Axial pumps are common in residential units, while triplex pumps are found in commercial models due to their durability.
- Motor: This powers the pump. Electric motors are standard in domestic units, while gasoline engines can be found in equipment designed for heavy-duty tasks.
- Unloader Valve: This crucial component regulates pressure, allowing for safe operation. It ensures that if the trigger is not engaged, the water flow will be redirected back to the inlet.
- Trigger Gun: This is how you control the flow of water. Pulling the trigger releases the pressurised water, while releasing it stops the flow.
- Nozzles: Different nozzle types adjust the spray pattern and intensity, from a wide fan to a narrow jet. The choice of nozzle affects the effectiveness of the cleaning process.
Once activated, the water is forced through the nozzle at high velocity, creating a powerful stream. This stream dislodges dirt, grime, and, in some cases, coatings from surfaces. To enhance cleaning, various detergents can be introduced into the mix, but compatibility with the machine is vital.
From my experience, selecting the right model depends on the task at hand. For lighter cleaning jobs, a lower PSI (pounds per square inch) unit suffices, while tougher jobs require machines with higher PSI ratings. I recall a time when a friend called me to help with a stubborn oil stain on his driveway. We opted for a unit with a higher PSI, and the results were remarkable. It’s all about matching the equipment to the challenge.
In summary, understanding how these devices operate allows for more effective cleaning strategies and better results, whether you’re tackling a tough stain or maintaining your property. Select the right tools and techniques, and the outcome will speak for itself.
Choosing the Right Pressure Washer for Paint Removal
Select a unit with a minimum of 3000 PSI for effective removal of coatings. Higher pressure means more force, which is crucial for stripping away stubborn layers. In my experience, models from reputable brands often deliver the best results. I’ve tested various makes, and those with a solid reputation consistently outperform others.
Consider the flow rate, measured in gallons per minute (GPM). A unit with a higher GPM can wash away residue more thoroughly, making it easier to clear surfaces. For example, I found that a model with 3 GPM paired with 3000 PSI made quick work of an old deck coated in multiple layers of gloss finish.
Look for adjustable nozzles. A versatile nozzle allows you to control the intensity of the stream, which is particularly useful for different surfaces. When tackling a delicate surface, I always opt for a wider spray angle to avoid damage, while a narrow stream works wonders on tougher areas.
Be mindful of the heat. Hot water machines are more effective at cutting through thick layers, as heat enhances the cleaning action. I once used a hot water machine to strip a metal fence coated in years of old paint, and the results were remarkable.
Don’t forget about attachments. A surface cleaner attachment can significantly speed up the process on flat surfaces. I recall using one on a driveway, and it saved me time and effort compared to a standard nozzle.
Finally, ensure you have the right safety gear. Goggles and gloves are a must when dealing with high-pressure equipment. I’ve seen accidents happen when safety precautions are ignored. Always prioritise safety while working.
For those who enjoy canning, check out this guide on how to can green beans with a pressure cooker as another way to maximise your tools at home.
Optimal Pressure Settings for Removing Spray Paint
For effective removal of unwanted coatings, I recommend setting your machine between 2000 and 3000 PSI. This range provides adequate force to dislodge the finish without damaging the underlying surface. In my experience, starting at the lower end of this spectrum is wise, especially on more delicate materials like wood or certain plastics. Gradually increase the intensity if necessary, but keep an eye on the surface condition to avoid etching or chipping.
Distance Matters
Maintain a distance of at least 12 to 18 inches from the surface. This spacing allows the water to expand and lose some of its intensity, which can help in safely lifting the coating without causing harm. I’ve often seen users get too close, resulting in damage that could have been easily avoided.
Technique is Key
Use a sweeping motion, moving the nozzle from side to side. Concentrate on the edges of the coating first, where it typically bonds more strongly. I’ve found that working in sections and overlapping slightly can enhance the removal process. Patience is vital; rushing can lead to uneven results or the need for additional applications, which wastes time and resources.
Lastly, don’t forget to wear appropriate safety gear. Eye protection and gloves should be your first line of defence. I’ve had a few close calls that reminded me just how important it is to safeguard oneself while engaging in this type of work.
Tips for Preparing Surfaces Before Cleaning
Begin with a thorough inspection of the area. Identify any loose debris, dirt, or grime that could hinder the effectiveness of the cleaning process. Use a broom or a brush to clear away larger particles, ensuring a clean surface for optimal results.
Next, assess the condition of the surface. If there are any cracks or damage, repair these issues prior to starting. This step prevents water from entering vulnerable areas during the cleaning process, which can cause further deterioration.
For surfaces that have been previously treated with coatings, like sealants or finishes, verify compatibility with the cleaning method. Testing a small, inconspicuous area can help ensure that the surface won’t be damaged during the process.
Moisten the area lightly if the surface is particularly dry. This can help to loosen any embedded dirt and enhance the overall cleaning effect. Be cautious not to oversaturate, as this can lead to pooling and other complications.
Lastly, ensure you have the right attachments ready. Nozzles and extensions should be appropriate for the surface type. Using the correct tools can significantly improve the efficiency of the cleaning task.
| Preparation Step | Description |
|---|---|
| Inspect the Area | Look for debris, grime, and surface damage. |
| Clear Debris | Use a broom or brush to remove loose particles. |
| Repair Damage | Fix any cracks or issues before starting the cleaning process. |
| Test Compatibility | Check if previous treatments are compatible with cleaning methods. |
| Moisten Surface | Lightly dampen to enhance cleaning efficiency. |
| Gather Attachments | Ensure correct nozzles and extensions are available. |
Safety Precautions to Consider When Using a Pressure Washer
Always wear protective goggles to shield your eyes from debris and chemicals. I recall a time when I mistakenly thought my old sunglasses would suffice; a small piece of paint flew into my eye, reminding me of the importance of proper gear.

Gloves are a must. Choose sturdy, waterproof gloves to protect your hands from harsh substances and high-velocity water. I learned this the hard way when I felt the sting of a chemical solution on my skin; it wasn’t pleasant.
Ensure you have a firm footing while operating. Slippery surfaces can lead to accidents. I remember losing my balance on a wet patio, which taught me to be more mindful of my surroundings and stance.
Be mindful of your surroundings. Look out for electrical outlets, power lines, and fragile items nearby. I once damaged a prized garden ornament because I didn’t assess the area before starting my work.
Utilise the right nozzle for your task. I found that using a wider spray pattern reduced the risk of injury and damage to surfaces. Switching nozzles can be as crucial as choosing the right equipment.
Ensure that the area is clear of children and pets. Distracted by their playful antics, I nearly misdirected the water stream once, which could have resulted in injury. Establish a safety perimeter before beginning.
Maintain your equipment regularly. A well-maintained unit operates more safely and efficiently. I remember neglecting routine checks once, leading to a frustrating malfunction that could have been easily avoided.
Always follow the manufacturer’s instructions. I’ve seen people overlook this and face unnecessary risks. Familiarise yourself with the manual to understand the machine’s capabilities and limitations.
Consider the weather conditions. Wind can cause debris to blow back towards you, which I found out during a breezy day. Being aware of environmental factors is crucial for safe operation.
Lastly, make sure you have a reliable water source to avoid overheating the motor. I once had to stop halfway through a project because my supply ran dry, leading to unnecessary delays and frustration.
Alternative Methods for Removing Spray Paint
For stubborn coatings, consider a solvent-based approach. Products containing acetone or methyl ethyl ketone can effectively dissolve various types of coatings. Always test on a small area first to avoid damaging the underlying surface. Apply the solvent with a cloth or sponge, allowing it to penetrate for a few minutes before scrubbing with a stiff brush.

Another option is to use a heat gun. Carefully direct the hot air onto the area, softening the coating. Once pliable, use a scraper to remove the material. Keep the nozzle at a safe distance to prevent scorching the surface, and work in small sections for better control.
For those seeking a more eco-friendly solution, try a mixture of vinegar and baking soda. Apply the paste to the coating and let it sit for at least 30 minutes. The natural acidity of vinegar can help lift the coating, while the abrasiveness of baking soda aids in scrubbing it away.
In cases where large areas are affected, a chemical stripper can be invaluable. These products are designed specifically to break down coatings, making removal easier. Follow the manufacturer’s instructions closely, ensuring proper ventilation and safety measures are in place.
Lastly, sandblasting is a powerful method, especially for tough surfaces like concrete or metal. It uses compressed air to propel abrasive materials at high speeds, effectively removing coatings. This technique requires specialised equipment and should only be performed by trained professionals to ensure safety and effectiveness.
Common Mistakes When Using a Pressure Washer for Paint Removal
One common error is using too high a setting without understanding the surface material. I recall a project where I witnessed someone completely strip away wood grain from a deck because they opted for maximum force. It’s critical to adjust the nozzle and intensity based on the substrate.
Another frequent misstep is neglecting to test on a small, inconspicuous area first. I’ve seen individuals jump straight into the task, only to regret damaging the underlying surface. A patch test can save a lot of headaches later.

Failing to maintain a proper distance can also lead to problems. Keeping the nozzle too close can result in gouges or uneven removal. I’ve learned that maintaining a consistent distance–typically about 12 to 18 inches–ensures a more uniform outcome.
Many underestimate the importance of cleaning the area before starting. I’ve often found that removing dirt and debris beforehand significantly improves efficiency. It’s surprising how much grime can interfere with the removal process.
Using the wrong nozzle can hinder results as well. I once grabbed a wide-angle spray instead of a more focused stream, which made the task take twice as long. Each nozzle serves a purpose, so selecting the right one is key.
Lastly, ignoring safety gear can lead to injuries. I’ve seen too many people skip gloves or goggles, thinking they’re unnecessary. Protecting yourself is paramount; a few minutes spent on safety can prevent significant mishaps later.
Post-Cleanup Care for Surfaces After Paint Removal
After you’ve successfully stripped the surface of unwanted coatings, it’s crucial to implement a proper care regimen. Start by rinsing the area thoroughly with clean water to remove any residue from the cleaning agents or materials used during the removal process. This step helps prevent any potential chemical reactions with remaining particles.
Sealing and Protection
Once the surface is dry, consider applying a suitable sealant or primer. This not only protects the surface from future staining but also prepares it for any new applications, ensuring better adhesion. I recall a project where neglecting this step led to peeling after just a few months. Always check the manufacturer’s recommendations for compatibility.
Regular Maintenance
Implement a regular maintenance schedule for your surfaces. Periodic cleaning with mild detergents can prevent build-up, making future removal tasks easier. I’ve seen many homeowners overlook this, resulting in more extensive work down the line. Keeping the area clean not only enhances its appearance but also prolongs the lifespan of the surface.

.jpg)


