
.jpg)


.jpg "Does a pressure washer damage brickwork")
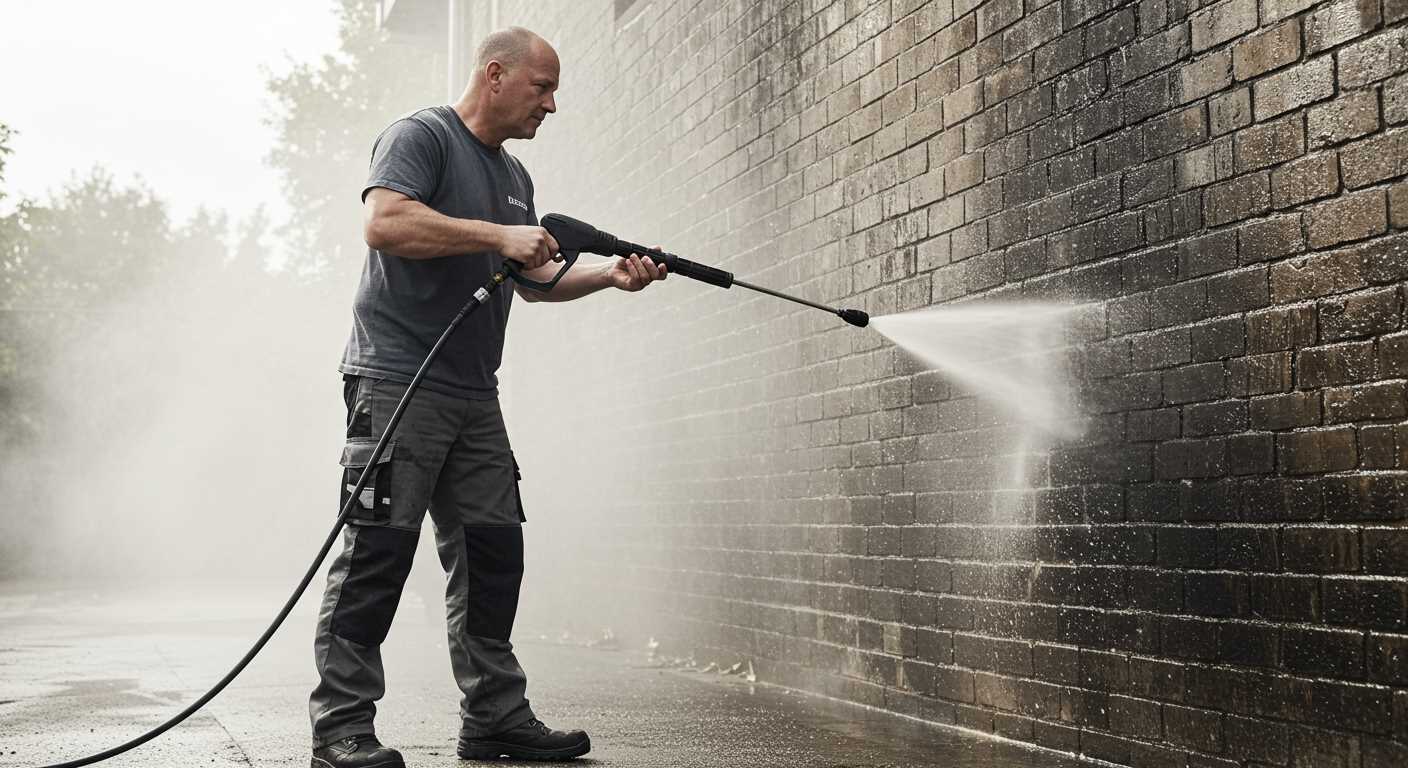
Using a high-pressure cleaning device on brick surfaces can lead to unintended consequences if not done correctly. I’ve seen too many homeowners and professionals alike assume that more power equals better results, only to find themselves with chipped or eroded bricks after the job. My advice? Approach this task with caution and knowledge.
From my extensive experience in the industry, I recommend using a lower pressure setting–ideally below 1500 PSI–for any brick surface. This minimises the risk of damaging the mortar joints, which are often more vulnerable than the bricks themselves. In my early days, I made the mistake of using excessive force, thinking it would save time. Instead, it resulted in costly repairs and a lot of frustration.

Moreover, always maintain a distance of at least 12 to 18 inches from the surface. A close-range blast can dislodge not only the grime but also the mortar between the bricks. I recall a particular job where a colleague got too close, and we ended up having to replace several rows of bricks because of the damage caused. It’s a lesson I’ve never forgotten.
Lastly, consider using a suitable detergent specifically designed for brick cleaning. It can enhance the effectiveness of your efforts without compromising the integrity of the surface. I’ve found that a combination of the right cleaning solution and careful technique yields the best results, ensuring your brick surfaces remain intact and visually appealing.
Impact on Masonry
Using high-powered cleaning equipment on masonry surfaces can lead to unintended consequences if not done with care. In my experience, many homeowners underestimate the force of the water jet and its ability to erode the mortar joints that hold bricks together. I once witnessed a situation where a seemingly routine cleaning session ended with significant damage to an old brick façade. The user was surprised to find that even a setting on the lower end of the scale caused chips and cracks.
Recommendations for Safe Use
To maintain the integrity of your masonry, consider using a fan spray nozzle rather than a concentrated stream. This spreads the force of the water, reducing the risk of damaging the surface. Maintain a distance of at least two feet from the wall when cleaning. Start with a gentle approach; if necessary, gradually increase the power. Always test a small, inconspicuous area first. Remember, preserving the mortar is key to the longevity of your structure.
Understanding Brick Composition and Durability
Bricks are primarily made from clay, shale, or other ceramic materials that undergo firing at high temperatures. This process imparts strength and resilience, making bricks a popular choice for construction. However, not all bricks are created equal; variations in composition and manufacturing methods can affect their longevity and resistance to environmental factors.
When assessing durability, consider the type of brick. For instance, engineering bricks are denser and less porous, offering enhanced resistance to moisture and weathering. In contrast, common house bricks might absorb more water, making them susceptible to deterioration over time. It’s crucial to know the specific type of brick used in your structure to determine its ability to withstand various cleaning methods.
Additionally, the presence of additives during the manufacturing process can influence performance. Some bricks contain pigments or other materials that enhance colour but may also impact their overall strength. Always consult product specifications or seek expert advice to understand how these factors could affect your brick surfaces.
Another aspect to consider is the mortar used between the bricks. Mortar can break down faster than the bricks themselves, leading to structural issues if not maintained. Regular inspections and appropriate repairs are necessary to ensure the integrity of the entire masonry structure.
In my experience, knowledge of brick composition has proven invaluable during restoration projects. Identifying the right cleaning methods tailored to the specific type of brick can prevent unnecessary wear and prolong the life of the masonry. Always approach cleaning with a plan that considers both the bricks and the surrounding materials for optimal results.
Pressure Settings Recommended for Brick Cleaning
For optimal results, set the machine to around 1500 to 2000 PSI. This range effectively removes dirt and grime without causing harm to the surface. In my experience, exceeding 2000 PSI can lead to unwanted erosion or damage, particularly in older structures.
When cleaning, maintain a distance of about 12 to 18 inches from the surface. This distance helps to diffuse the force of the water, reducing the risk of chipping or dislodging any mortar. I once observed a significant difference in results when I adjusted my distance; getting too close resulted in pitting on the surface.
Utilising a wide-angle nozzle–specifically, a 25 or 40-degree nozzle–can also enhance safety during the cleaning process. These nozzles disperse the water more broadly, ensuring a gentler approach that is less likely to compromise the integrity of the surface.
It’s wise to test the settings on a small, inconspicuous area first. I always recommend this step; it allows you to gauge how the surface reacts before committing to the entire area. A quick test saved me from a costly mistake on a historic building once.
Lastly, consider the use of a detergent designed for masonry. Applying it before washing can break down stubborn stains, making the entire process smoother and reducing the time spent on tough spots. Always rinse thoroughly to ensure no residue remains.
Potential Risks of Using a Pressure Washer on Brickwork
Using a high-powered cleaning device on brick surfaces can lead to unintended consequences. I’ve seen firsthand how a seemingly simple task can spiral into a costly repair job. The concentrated streams of water can erode the mortar joints that hold bricks together, especially if the settings are too aggressive. Over time, this erosion compromises structural integrity.
Another concern is the potential for water to seep behind the bricks. This can occur if the cleaning angle is incorrect or if the nozzle is held too close. Trapped moisture may lead to mould growth or frost damage in colder climates, which weakens the wall. Always remain cautious about the distance and angle when directing water at brick surfaces.
In my experience, using a rechargable wireless pressure washer can reduce some risks because of its mobility and ease of control. They often feature adjustable settings that help in applying the right amount of pressure for various tasks. However, even with these devices, caution is paramount.
Additionally, the type of cleaning solution used should be carefully considered. Many standard detergents can react negatively with brick and mortar. Opting for the best chemical for pressure washing concrete can mitigate risks, as these products are designed to be gentle yet effective. Always read labels and ensure compatibility with your specific brick type.
| Risk | Description | Mitigation |
|---|---|---|
| Erosion of Mortar | High pressure can wear down mortar joints. | Use low pressure and wide-angle spray. |
| Water Seepage | Water may enter behind bricks, causing damage. | Maintain distance and angle during cleaning. |
| Mould Growth | Trapped moisture can lead to mould. | Ensure proper drying after cleaning. |
| Chemical Damage | Improper detergents can harm surfaces. | Select appropriate cleaning solutions. |
Being aware of these risks can assist in achieving effective cleaning while preserving the integrity of brick surfaces. Always take the time to evaluate the best approach before embarking on any cleaning project.
Signs of Damage to Look for After Pressure Washing
After cleaning your stone façade, inspect it thoroughly for any signs of harm. Pay particular attention to the following indicators:

Surface Cracks and Chips
- Look for small cracks or chips in the surface. These imperfections can indicate that too much force was applied during cleaning.
- Check for larger fissures that may have opened up along mortar joints, compromising the structure’s integrity.
Discolouration and Efflorescence
- Discolouration can signal that the cleaning solution or high intensity has stripped away protective layers, exposing the material beneath.
- Efflorescence, a white powdery substance, may appear if moisture has been forced into the stones, leading to future deterioration.
Monitoring these signs post-cleaning is crucial. Addressing any issues promptly can prevent further complications and maintain the aesthetics and structural integrity of your stone surfaces.
Best Practices for Safe Pressure Washing of Brick Surfaces
Begin with a thorough inspection of the surface to identify any cracks, loose mortar, or other weaknesses. This step is crucial to prevent exacerbating existing issues. I remember a time when I overlooked a small crack; it turned into a much larger problem after the cleaning process.
Choosing the Right Nozzle
Select a wide-angle nozzle, ideally a 25-degree or 40-degree option. These provide a broader spray pattern, reducing the likelihood of concentrated force that could harm the material. A narrower nozzle might seem more effective at first, but the risk of etching or chipping increases significantly.
Technique Matters
Maintain a distance of at least 2 feet from the surface while working. This helps to diffuse the force of the stream, minimising potential harm. Move the wand in a consistent, sweeping motion rather than focusing on one spot for too long. I recall one project where I got too close, and the results were less than desirable–mortar was dislodged, and it took extra time to fix it.
Utilise a low-pressure setting initially, gradually increasing as needed. Always test a small, inconspicuous area before proceeding with the entire surface. This will help gauge how the material responds to the cleaning process.
Lastly, avoid using harsh chemicals unless absolutely necessary. If you must, ensure they are specifically formulated for use on masonry and follow the manufacturer’s instructions closely. I had a client once who used a generic cleaner, and it left stains that were hard to remove. Sticking to safe products is always the best choice.
Choosing the Right Nozzle for Brick Cleaning
For optimal results when cleaning masonry surfaces, selecting the appropriate nozzle is paramount. Based on my experience, here are the key types of nozzles and their specific applications:
- 0-Degree Nozzle: This nozzle delivers a concentrated stream of water. While effective for stubborn stains, it’s too aggressive for most masonry surfaces and can lead to chipping.
- 15-Degree Nozzle: Slightly wider than the 0-degree, this option provides more coverage while still delivering a powerful jet. Use it cautiously on tougher stains, ensuring to maintain a safe distance.
- 25-Degree Nozzle: This is the go-to choice for general cleaning. It offers a balanced spray that effectively removes dirt without posing excessive risk to the surface.
- 40-Degree Nozzle: Ideal for delicate cleaning tasks, this nozzle is perfect for maintaining the integrity of softer masonry. It’s great for rinsing and applying cleaning solutions.
- Rotary Nozzle: This nozzle combines the power of a narrow jet with the coverage of a wider spray, making it suitable for tough grime while reducing the risk of surface harm.
Selecting the right nozzle also involves considering the cleaning solution. Some products work best with specific types of sprays to enhance their effectiveness. Remember to test on a small, inconspicuous area first.

In my early days, I made the mistake of using a too-powerful nozzle on an old stone wall and ended up eroding some of the surface. Since then, I always recommend starting with the least aggressive option and working up if necessary. Keeping a safe distance while cleaning is equally important; typically, around 12 to 18 inches from the surface is a good rule of thumb.
Always consider the condition of the surface you’re treating. For older or more fragile materials, opting for a wider spray angle can prevent unintended wear. Think about the cleaning task at hand and choose accordingly.
In conclusion, the right nozzle choice is a blend of understanding the task requirements, being aware of the surface condition, and applying the correct technique. This approach not only ensures thorough cleaning but also preserves the integrity of the masonry over time.
Alternatives to Pressure Washing for Brick Maintenance
For those cautious about cleaning their masonry with high-force techniques, there are several effective alternatives worth considering. One of my go-to methods has always been the traditional approach of scrubbing with a stiff-bristled brush. This can effectively remove dirt and grime without risking harm to the surface. Pairing the brush with a mild detergent can enhance results, especially for stubborn stains. I often opt for a pH-neutral cleaner to ensure no adverse reactions occur with the brick material.
Another technique I’ve frequently employed is steam cleaning. This method utilises high-temperature steam to lift dirt and contaminants without the harshness of pressurised water. I’ve found that steam cleaning can be particularly effective for older structures, as it reduces the risk of dislodging mortar or causing cracks. This method is eco-friendly and sanitises surfaces without chemical residues.
For regular maintenance, consider using a natural solution of vinegar and water. This not only helps in cleaning but also acts as a mild disinfectant. I’ve had great success with this mixture for removing moss and algae, which can be quite common on outdoor surfaces. Just remember to rinse thoroughly to prevent any potential residue from affecting the appearance of the masonry.
Lastly, always ensure that the area is properly sealed. A good-quality sealant can protect against moisture and stains, reducing the need for frequent cleaning. I’ve personally seen the difference it makes in longevity and appearance. Regular inspection for cracks and weathering can help maintain the integrity of the structure, allowing for timely repairs before they escalate into larger issues.
| Method | Benefits | Considerations |
|---|---|---|
| Stiff-bristled Brush | Effective for dirt removal; minimal risk | Requires manual effort; may need detergent |
| Steam Cleaning | Gentle yet thorough; eco-friendly | Equipment can be costly; requires access to power |
| Vinegar Solution | Natural cleaner; good for moss removal | Must rinse well; may not tackle heavy stains |
| Sealing | Prevents moisture and stains | Needs to be reapplied periodically |
How to Prepare Brickwork Before Pressure Washing
Ensure the surface is free from loose debris and dirt before any cleaning begins. A thorough brush-down with a stiff-bristled broom can make a significant difference.
- Check for cracks or loose mortar. Repair any visible damage to prevent water infiltration during the cleaning process.
- Cover nearby plants and delicate features with tarps or plastic sheets. Protecting your surroundings is as crucial as cleaning the surfaces.
- Remove any furniture or items within the vicinity. This helps avoid accidental damage and allows for a clear working area.
Consider using a mild detergent mixed with water to pre-treat stubborn stains. Allow it to sit for a short period, which can make the cleaning process more effective.
- Test a small, inconspicuous area first to check for any adverse reactions.
- Ensure the chosen cleaning solution is suitable for the specific type of stone or masonry.
- Wear appropriate protective gear, including gloves and safety glasses, to safeguard against splashes.
Taking these steps not only enhances the cleaning outcome but also minimises potential issues during the process. Preparation is key to achieving the best results while preserving the integrity of the surfaces involved.
Post-Cleaning Care for Brick Surfaces
After completing the cleaning of your masonry, it’s crucial to take steps to maintain its integrity and appearance. The first thing I recommend is to allow the surface to dry thoroughly. This can take anywhere from a few hours to a couple of days, depending on the weather conditions. A completely dry surface helps prevent any potential water damage and allows you to assess the results effectively.
Next, inspect the joints and mortar. Any cracks or gaps should be addressed immediately to prevent moisture infiltration. I once neglected this step and ended up with significant structural issues that required costly repairs. Filling in these spaces with a suitable sealant can help prolong the life of your structure.
Consider applying a breathable water repellent specifically designed for porous materials. This helps to protect against moisture while allowing the surface to breathe. I’ve seen many homeowners overlook this, leading to issues like efflorescence and staining over time.
Regular maintenance is key. Sweep away debris, dirt, and organic growth such as moss or algae. Using a soft-bristle brush can effectively remove these without harming the surface. I personally prefer this method over harsh chemicals, as it’s gentler on the masonry.
If you notice any stains or discolouration, treat them promptly. A solution of warm water and mild detergent can often do the trick. For tougher stains, consider using a poultice, which can draw out the stain without damaging the underlying material, a technique I’ve found effective on various occasions.
Lastly, keep an eye on the condition of any surrounding landscaping. Ensure that plants and soil aren’t directing water toward your masonry. I learned this the hard way when a poorly placed flowerbed led to persistent moisture issues. Proper drainage can save a lot of headaches down the line.

.jpg)


