


Start with a simple solution: a mixture of warm water and mild dish soap. Grab a bucket and combine these ingredients to create a gentle yet effective cleaning solution. Use a soft-bristled brush or a mop to apply the mixture, working in sections. This approach not only lifts dirt but also protects the surface from damage.
For tougher stains, consider a paste made from baking soda and water. This natural abrasive works wonders on stubborn marks. Apply the paste directly to the stained area and let it sit for about 15-20 minutes. Follow up by scrubbing with a brush and rinsing thoroughly. I remember using this method on my own outdoor space; the results were remarkable, bringing back the original beauty of the wood.
Another great technique involves using vinegar. This household staple is a powerful cleaner that can tackle mildew and algae. Mix equal parts of vinegar and water in a spray bottle, apply it to affected areas, and let it sit for a few minutes before scrubbing. I once faced a similar problem, and this vinegar solution worked wonders, leaving my outdoor area looking fresh and inviting.
Lastly, don’t underestimate the power of a garden hose with a spray nozzle. A strong stream of water can help wash away loose debris and dirt after applying your cleaning solutions. This method ensures that your outdoor area is not only clean but also safe for gatherings and relaxation.
Effective Techniques for Deck Maintenance
For a thorough refresh of your outdoor surface, utilize a combination of manual scrubbing and eco-friendly cleaning solutions. Here’s a straightforward process to follow:
-
Gather Supplies:
Top Rated Mold Armor FG505 Deck and Siding CleanerRestores natural wood appearance easilyThe Mold Armor FG505 is designed to restore weathered wood surfaces, making it ideal for decks, siding, and fencing. Its gallon size provides ample supply for extensive cleaning projects.
- Broom or stiff-bristled brush
- Bucket
- Water
- White vinegar or baking soda
- Mild dish soap
- Garden hose with spray nozzle
- Scrubbing pad or sponge
-
Prepare the Area:
Remove all furniture and plants from the area. Sweep the surface thoroughly to eliminate loose debris.
-
Create the Cleaning Solution:
Mix one cup of white vinegar or half a cup of baking soda with a few drops of mild dish soap in a bucket of warm water. This combination effectively tackles grime and mildew.
-
Scrub the Surface:
Dip the brush into the solution and start scrubbing section by section. For stubborn spots, let the solution sit for a few minutes before scrubbing.
-
Rinse:
Once the entire area has been scrubbed, use the garden hose to rinse away the cleaning solution. Ensure that all residues are washed off to prevent slipping.
-
Dry Thoroughly:
Allow the surface to dry completely before placing any furniture back. This helps prevent mildew growth.
After trying various methods over the years, this approach consistently yields great results. It’s straightforward, budget-friendly, and environmentally conscious. Adjust the cleaning solution as needed based on the level of dirt or stains you encounter.
Choosing the Right Cleaning Solution for Your Deck
The best approach for maintaining your outdoor surface starts with selecting the right cleaning agent. I’ve experimented with a variety of products over the years, and here’s what I’ve found to be most effective.
For wood surfaces, a gentle, biodegradable soap is ideal. It lifts dirt without causing damage. Look for a product specifically designed for timber care, as these often contain ingredients that nourish the wood while removing grime. A mixture of dish soap and water can also work in a pinch, but be mindful of the concentration–too much soap can leave a residue.
Composite materials require a different touch. Opt for a cleaner that’s safe for composites, as harsh chemicals can lead to discolouration. One of the best solutions I encountered was a vinegar and water mix, which is both eco-friendly and effective. Mixing one part vinegar with three parts water creates a powerful yet gentle cleaner that helps eliminate stains and mildew.
If mould or mildew is an issue, a solution containing oxygen bleach can be beneficial. This type of cleaner targets organic stains without damaging the surface. I once tackled a particularly stubborn mould problem using this approach. The transformation was impressive, and it didn’t harm the surrounding plants.
For a quick natural solution, baking soda is a game changer. It’s an excellent abrasive that helps scrub away grime. Mix it with water to form a paste, apply it to the stained areas, and let it sit for a while before scrubbing. I’ve had great success with this method, especially on stubborn spots.
Always test any cleaner on a small, inconspicuous area first. This ensures compatibility with your surface and avoids any unintended damage. Remember, the right solution can make all the difference in achieving a refreshed and inviting space for relaxation and enjoyment.
Preparing Your Outdoor Surface for Cleaning
Begin by removing all furniture, planters, and decorative items from the area. This not only gives you a clear space to work, but it also prevents any damage to your belongings during the process. I once left a few pots on a surface, and the residue from the cleaning solution stained them. Trust me; it’s not worth the hassle.
Next, inspect the surface for loose boards or protruding nails. Tighten any loose screws and hammer down any nails that are sticking out. I’ve had experiences where neglecting these details resulted in accidental injuries while scrubbing. Safety first!
Clear away any debris like leaves, dirt, and algae. A broom or a stiff brush will work wonders here. In one of my projects, I overlooked some small twigs and ended up with a less effective cleaning session. It’s amazing how much dirt accumulates over time, and a thorough sweep can make a significant difference.
Once the area is tidy, consider rinsing it with water from a hose. This initial rinse can help to loosen any stubborn grime. I remember using a bucket of water instead, and it took twice as long to saturate the surface. A hose is far more efficient for this job.
Finally, ensure the weather is suitable for your task. Avoid days with high humidity or impending rain. I once started cleaning only to have a sudden downpour ruin my efforts. A sunny day allows for quicker drying times and better results with your chosen cleaning solution.
Manual Scrubbing Techniques for Stubborn Stains
For those persistent marks, a sturdy scrub brush with stiff bristles is indispensable. I’ve found that a long-handled brush helps reach corners and edges effortlessly, reducing back strain. When tackling a particularly tough stain, apply your chosen solution directly onto the area and let it sit for a few minutes before scrubbing. This allows the cleaner to penetrate and loosen the grime.
For mildew or algae, a mixture of vinegar and water works wonders. Use a 1:1 ratio and spray it on the affected spots. After a brief wait, scrub vigorously. The acidity in the vinegar helps break down the organic material, making it easier to remove.
In my experience, an old toothbrush is perfect for detailed work on intricate patterns or grooves. The small bristles can reach into crevices that larger brushes can’t, ensuring a thorough approach. Just dip the brush in your cleaning solution and scrub those hard-to-reach areas.
Don’t underestimate the power of elbow grease. I’ve spent countless hours scrubbing surfaces, but the satisfaction of seeing a vast improvement is unmatched. Always rinse the area with clean water once you finish scrubbing to remove any leftover solution and debris.
For extremely stubborn stains, consider using a plastic scraper. This tool can lift away residue without damaging the surface. Apply your cleaner, let it sit, and then gently scrape at the stain’s edges. With patience and persistence, you’ll see results.
Lastly, if you’re working on a larger area, tackle it in sections. This method keeps your focus sharp and allows you to monitor progress closely. Take breaks as needed; a fresh perspective can sometimes reveal missed spots or areas needing more attention.
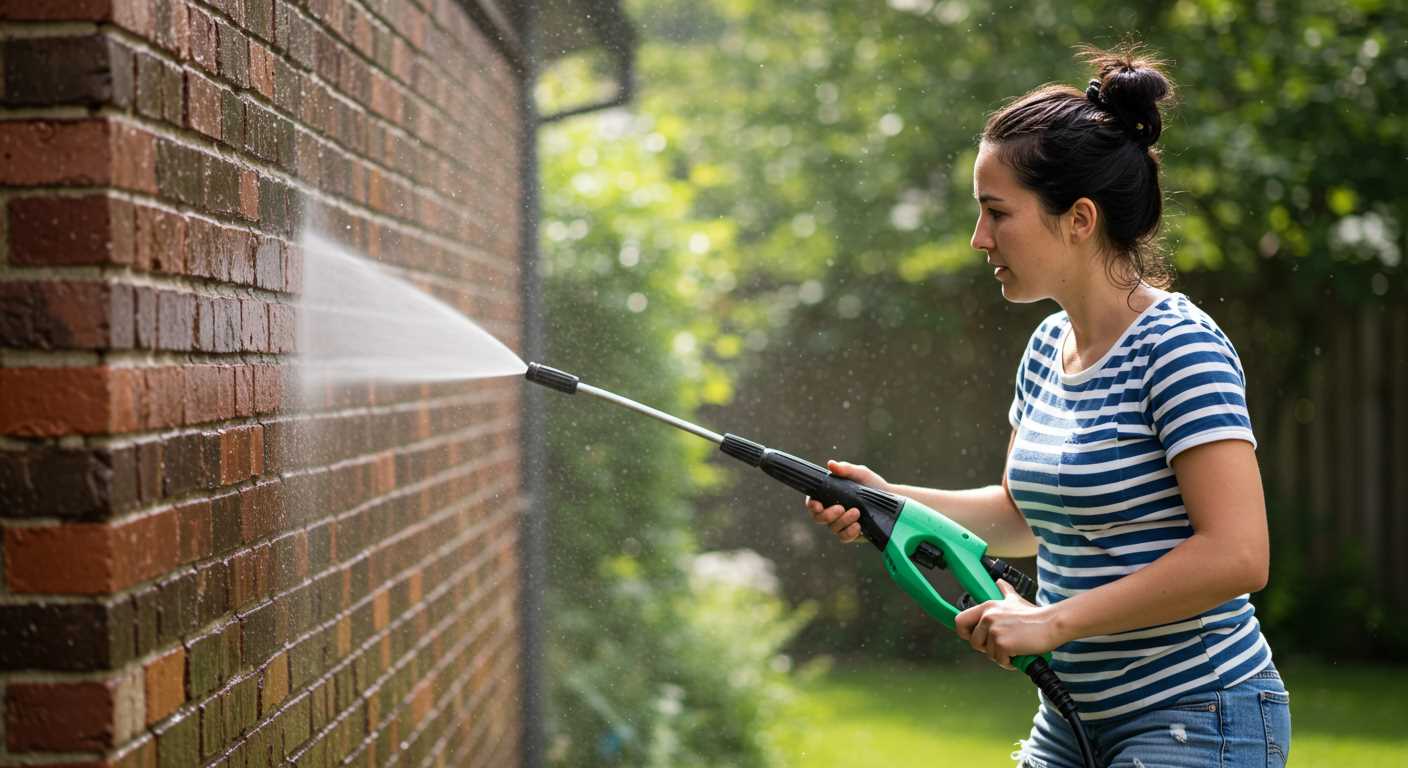
Using a Garden Hose for Rinsing Off Debris
For effective debris removal, a garden hose can be surprisingly handy. Start by attaching a nozzle that allows for adjustable spray patterns. A fan spray is ideal for covering larger areas, while a concentrated stream works well for stubborn spots.
- Begin at one end of the area, working systematically towards the other. This approach prevents missed spots and ensures thorough rinsing.
- Keep the nozzle close to the surface but not so close that it causes damage. Aim for about 30 to 45 centimetres away.
- Utilise hot water if your hose can handle it. Warm water can help loosen debris and grime more effectively than cold.
As you rinse, pay attention to corners and crevices where dirt tends to accumulate. A steady stream can help dislodge trapped particles. After rinsing, allow the surface to dry, checking for any remaining residues that may need further attention.
If you notice stubborn patches after the initial rinse, consider repeated applications with the hose, allowing the water to sit for a few moments before rinsing again. This technique can significantly enhance the rinsing effectiveness.
Finally, ensure that your drainage is clear to avoid pooling water, which could lead to mould or mildew growth. A well-maintained area will not only look better but also prolong the life of your flooring material.
Natural Alternatives for Eco-Friendly Cleaning
Baking soda serves as an excellent abrasive that can tackle grime without harming the surface. Mix it with water to form a paste, apply it to stained areas, and scrub gently with a brush. This method is particularly effective for mildew and mould removal.
Vinegar is another powerhouse. Its acidity breaks down dirt and stains while also acting as a natural disinfectant. For best results, combine equal parts of white vinegar and water in a spray bottle, apply to the affected areas, and let it sit for 15-20 minutes before scrubbing. Rinse thoroughly afterwards.
Citrus Solutions
Citrus fruits can also aid in the cleaning process. The natural oils found in lemon or orange peels can cut through grease and grime. Simply rub the peel directly on stubborn spots or mix lemon juice with water for a refreshing cleaning solution.
Table of Eco-Friendly Cleaning Ingredients
| Ingredient | Properties | Usage Tips |
|---|---|---|
| Baking Soda | Abrasive, deodorising | Mix with water to form a paste for scrubbing |
| White Vinegar | Acidic, disinfectant | Combine with water; let sit before scrubbing |
| Lemon Juice | Natural grease cutter | Use pure or mix with water for tougher stains |
| Olive Oil | Moisturising, protective | Apply to prevent wood drying out after cleaning |
Using these natural ingredients not only achieves a thorough clean but also protects the environment. Avoiding harsh chemicals is beneficial for both the surface and surrounding flora and fauna.

Removing Mildew and Mould from Wood Decking
For effective removal of mildew and mould from wooden surfaces, a mix of vinegar and baking soda proves highly beneficial. Combine one cup of baking soda with one cup of white vinegar in a bucket filled with warm water. This natural solution not only eliminates unwanted growth but is also gentle on your wood.
Steps for Application
- Start by sweeping away any loose debris from the surface.
- Apply the vinegar and baking soda solution using a stiff-bristled brush or a sponge.
- Work in sections, scrubbing vigorously to ensure thorough penetration into the mould.
- Allow the mixture to sit for at least 15 minutes before rinsing.
Rinsing Techniques
After scrubbing, use a garden hose to rinse off the area. A gentle spray will help wash away the residue without damaging the wood. If you find it difficult to manage the debris, consider using the best blower and vacuum for garden to clear the surface efficiently before rinsing.

Regular maintenance, including periodic scrubbing with this solution, will prevent the regrowth of mildew and mould, keeping your wooden surface looking fresh. Always test any solution on a small, inconspicuous area first to ensure compatibility with your specific wood type.
Maintaining Your Deck After the Cleaning Process
Regular inspections are crucial. Check for any loose boards, protruding nails or signs of wear. Address these issues immediately to prevent further damage. A simple tightening or replacement can save you time and money in the long run.
Applying a protective sealant every couple of years is advisable. This creates a barrier against moisture and UV rays, ensuring longevity. Choose a sealant compatible with your wood type for optimal results.
Ensure proper drainage around the area. Standing water can lead to rot and mould growth. If your outdoor space has poor drainage, consider adding gravel or adjusting landscaping to direct water away.
Regular sweeping and debris removal should be part of your routine. Leaves, dirt, and other materials can trap moisture against the surface, promoting decay. A quick clean-up after storms or windy days will keep your surface in good condition.
Utilise a soft-bristle broom or a mop for periodic maintenance. This helps maintain the aesthetic appeal while preventing scratches that could occur with harsher tools. For added shine, a mix of water and vinegar can be beneficial.
If you notice signs of mildew, address it promptly with a diluted vinegar solution. This not only treats the affected areas but also acts as a preventive measure for future growth. Regular inspections will help catch any issues early.
For those who prefer a more automated approach, consider investing in a pressure washer for monobloc. It can be a valuable tool for maintaining cleanliness, though it’s not necessary for everyone. Assess your needs before making a decision.
Tools You Need for a Thorough Deck Cleaning
To achieve a spotless surface, gather the following items before you begin your task:
Basic Equipment
A stiff-bristled broom is invaluable for removing loose debris and dirt. Pair it with a bucket for mixing your chosen cleaning solution. A scrub brush with strong, synthetic bristles will help tackle tougher stains and grime.
Optional Tools for Enhanced Results
Some optional tools can make the job easier. A garden sprayer allows you to apply cleaning solutions evenly across larger areas. For those intricate corners or tight spaces, consider a handheld brush or sponge. If you have a lot of mildew or mould, a putty knife can help you gently scrape away stubborn spots.
| Tool | Purpose |
|---|---|
| Stiff-bristled broom | Remove loose debris |
| Bucket | Mix cleaning solutions |
| Scrub brush | Tackle tough stains |
| Garden sprayer | Even application of solutions |
| Handheld brush/sponge | Detailing tight spaces |
| Putty knife | Scrape away stubborn mould |
Equipping yourself with these tools sets the foundation for a successful refresh of your outdoor space. Each item plays a role in ensuring an effective and thorough approach to your task. Trust me, having the right gear makes all the difference in achieving a spotless finish.
Frequency for Maintaining Your Outdoor Surface
Every three to six months is ideal for upkeep on your outdoor area, depending on the climate and usage. In regions with heavy rainfall or extreme heat, a more frequent approach is needed to prevent the buildup of dirt, grime, and mildew. If the space sees a lot of foot traffic or is surrounded by trees, inspect it every season.
Signs That It’s Time for a Refresh
Pay attention to the appearance and feel of the surface. If it looks dull or has noticeable stains, it’s time to get to work. Mildew or a slick surface can indicate that it requires attention sooner rather than later. After a major weather event, check for any debris or water pooling, as these can lead to further damage if neglected.
Seasonal Considerations
Spring is an excellent time to start fresh after winter. Remove leaves and other debris that may have accumulated. Autumn is another prime time for a thorough refresh, preparing the area for winter. Regular assessments throughout the year will help maintain its condition and extend the lifespan of the materials.

.jpg)


