


Attach a sturdy nozzle to your regular watering device for an instant upgrade in cleaning capabilities. I recall a Saturday morning, overwhelmed by the grime on my patio. Instead of reaching for my bulky cleaning machine, I grabbed my trusty watering tool and a few simple modifications. A quick swap of the standard nozzle with a high-pressure variant made all the difference.
Consider opting for a nozzle that offers adjustable spray patterns. This versatility proved invaluable when I tackled stubborn stains on different surfaces. The narrow jet setting was perfect for blasting away tough dirt, while a wider spray worked wonders for rinsing larger areas efficiently.
After connecting the nozzle, ensure you have a robust connection to avoid leaks. I learned the hard way that a tight seal is paramount; a loose fit can lead to wasting water and energy. Adding a hose clamp can provide that extra security for a seamless experience.

For even better performance, think about using a detergent injector. This little addition transforms your standard cleaning routine. I remember the satisfaction of seeing years of built-up muck disappear with the right cleaning solution combined with high pressure. Just make sure the detergent is compatible with your setup to avoid any mishaps.
Finally, always check the pressure rating of your setup. Using a nozzle with a rating higher than what your device can handle can lead to damage. My first attempt at this transformation ended with a burst pipe, a lesson I won’t forget! Stay within recommended limits to keep your cleaning sessions safe and effective.
Transforming a Standard Hose for High-Pressure Cleaning
Begin with a quality nozzle that provides adjustable spray settings. This is crucial for creating the necessary force that mimics a high-pressure unit. Choose a nozzle that offers a tight jet spray for tackling tough grime, while also allowing for a wider spray for lighter cleaning tasks.
Next, consider the attachment of a pump. A small, portable electric pump can significantly enhance the water flow and pressure. Look for a unit that can handle a minimum of 1.5 gallons per minute (GPM) and provides at least 1000 PSI for effective cleaning. Connect this pump directly to your standard watering device and ensure all seals are tight to prevent leaks.
Utilise a sturdy connection system between the pump and the sprayer. A quick-connect fitting will allow for easy assembly and disassembly. Ensure that the fittings are compatible with both the nozzle and pump to maintain optimal pressure.
When setting up your assembly, use reinforced tubing to withstand increased pressure. Regular garden tubing may not hold up, leading to potential ruptures under high flow. Look for reinforced or specialty tubing designed for higher pressure applications.
Test the setup first in a controlled environment. Start with a softer spray setting to ensure everything is functioning correctly before moving to a tighter jet. This prevents any accidental damage to surfaces or equipment. Adjustments may be needed based on the specific tasks at hand.
| Component | Recommended Features |
|---|---|
| Nozzle | Adjustable spray settings, tight jet spray |
| Pump | Minimum 1.5 GPM, at least 1000 PSI |
| Connection System | Quick-connect fittings |
| Tube | Reinforced for high pressure |
After completing the assembly, regular maintenance is key. Inspect all connections regularly for wear and ensure that the nozzle and pump are clean and functioning properly. This will prolong the life of your equipment and maintain efficiency.
Choosing the Right Hose for Conversion
Selecting the right tubing is crucial for achieving optimal results. I’ve seen too many individuals overlook this step, resulting in subpar performance. Based on my experience, here are the key factors to consider:
Material Quality
- Rubber: Highly durable and resistant to kinks. It’s also less likely to degrade over time compared to plastic.
- Vinyl: Lighter and more flexible, but tends to wear out faster. If you choose vinyl, ensure it’s reinforced.
Diameter and Length
- Diameter: A wider diameter allows for more water flow. Look for at least a ¾-inch size for effective pressure delivery.
- Length: Longer tubing can lead to pressure loss. Aim for a length that meets your needs without excess.
I’ve had good results with hoses that are both flexible and robust, as they withstand high pressure better. Also, consider the fittings; they should be compatible with your nozzle for a secure connection. Regular maintenance of your tubing will extend its lifespan significantly. Don’t skimp on quality; it pays off in the long run.
Necessary Tools and Materials for the Transformation

Gather these items to ensure a smooth transition from a standard watering device to a high-performance cleaning tool. Start with a compatible nozzle, preferably one that adjusts the spray pattern. I recommend a turbo nozzle for enhanced cleaning power, as it focuses the water stream effectively.
Next, secure a pressure regulator. This component is crucial for controlling the water flow and preventing damage to your new setup. I’ve seen too many attempts fail due to excessive pressure, which can lead to leaks or bursts.
A sturdy connector will be required to link the existing pipe to your new components. Look for a brass or heavy-duty plastic connector to ensure durability. I’ve had good experiences with quick-connect fittings; they make the assembly and disassembly much easier.
You’ll need a bucket or container to catch any excess water. This prevents mess and helps you keep track of any adjustments you might need to make during testing. Trust me, a little preparation goes a long way!
Finally, grab some Teflon tape. This handy item seals threads and prevents leaks. I always keep a roll on hand for any plumbing-related projects; it’s a small detail that can save you from bigger headaches later on.
Once you have these tools and materials, you’ll be well on your way to creating a powerful cleaning device. My experience tells me that taking the time to gather quality components pays off in performance and longevity.
Preparing the Hose for Pressure Washer Conversion
Ensure the tubing is free from any kinks or blockages. A smooth flow is crucial, as any obstruction can hinder performance. I recall a project where I rushed this step, which resulted in inconsistent pressure. Take the time to inspect the entire length, from the fitting to the end, checking for leaks or wear.
Next, clean the interior. A simple solution of warm water mixed with a mild detergent works wonders. After that, rinse thoroughly to remove any soap residue. I once skipped this cleaning phase and noticed a significant drop in efficiency. Trust me, a dirty line can lead to unexpected results.
Inspect the connectors. They need to fit snugly to prevent any leaks during operation. I recommend replacing any damaged or worn fittings. It’s a small investment that saves frustration down the line. My experience has taught me that spending a bit more on quality connectors pays off in the long run.
If your setup involves additional attachments, ensure they are compatible with the existing fittings. I found that mismatched components can lead to leaks and reduce the overall effectiveness of the system. It’s better to double-check compatibility before proceeding with the assembly.
Lastly, consider the length. A longer line can result in reduced pressure. I once had to shorten a line after realising that the extra length was causing a drop in performance. Measure carefully and cut only if necessary, keeping efficiency in mind.
Connecting the Hose to a Pressure Source
First and foremost, ensure you have the right fittings to connect your flexible tubing to the water supply. A simple garden tap adapter will often suffice. You’ll want to choose a connector that matches the size of your existing tap. In my experience, a quick-release coupling can save time and allow for easy disconnection when needed.
Choosing the Right Fitting
For optimal performance, select a fitting that provides a tight seal. I once faced a situation where a loose connection led to water spraying everywhere except where I wanted it. A rubber O-ring can help maintain that seal and prevent leaks. I recommend checking for compatibility with your chosen tubing diameter, typically ½ inch or ¾ inch.
Connect to the Water Supply
Attach the connector to the tap and then link your tubing to that connector. Turn the water on slowly to check for leaks. If you spot any, tighten the fittings slightly. Remember, you don’t want to overtighten as this can cause damage. I’ve had success using adjustable wrenches for this task, but hand-tightening often does the job just fine.
Next, ensure that the other end of the flexible tubing is securely attached to the pressure source. If you’re using a submersible pump, position it correctly in the water body. For mains water, make sure everything is aligned and secure. Testing the system at this stage can save you from potential headaches later, ensuring that water flows smoothly through your setup.

In one memorable project, I had a misalignment that caused a significant drop in water pressure. Fixing it only took a few minutes once I identified the issue, but it was a valuable lesson in the importance of thorough checks before starting a task.
Once everything is connected, turn on the water supply fully and check for consistent pressure. This will be crucial when you start using your modified cleaning device. Keep an eye on the fittings during initial use; a slight adjustment may be necessary as pressure builds up.
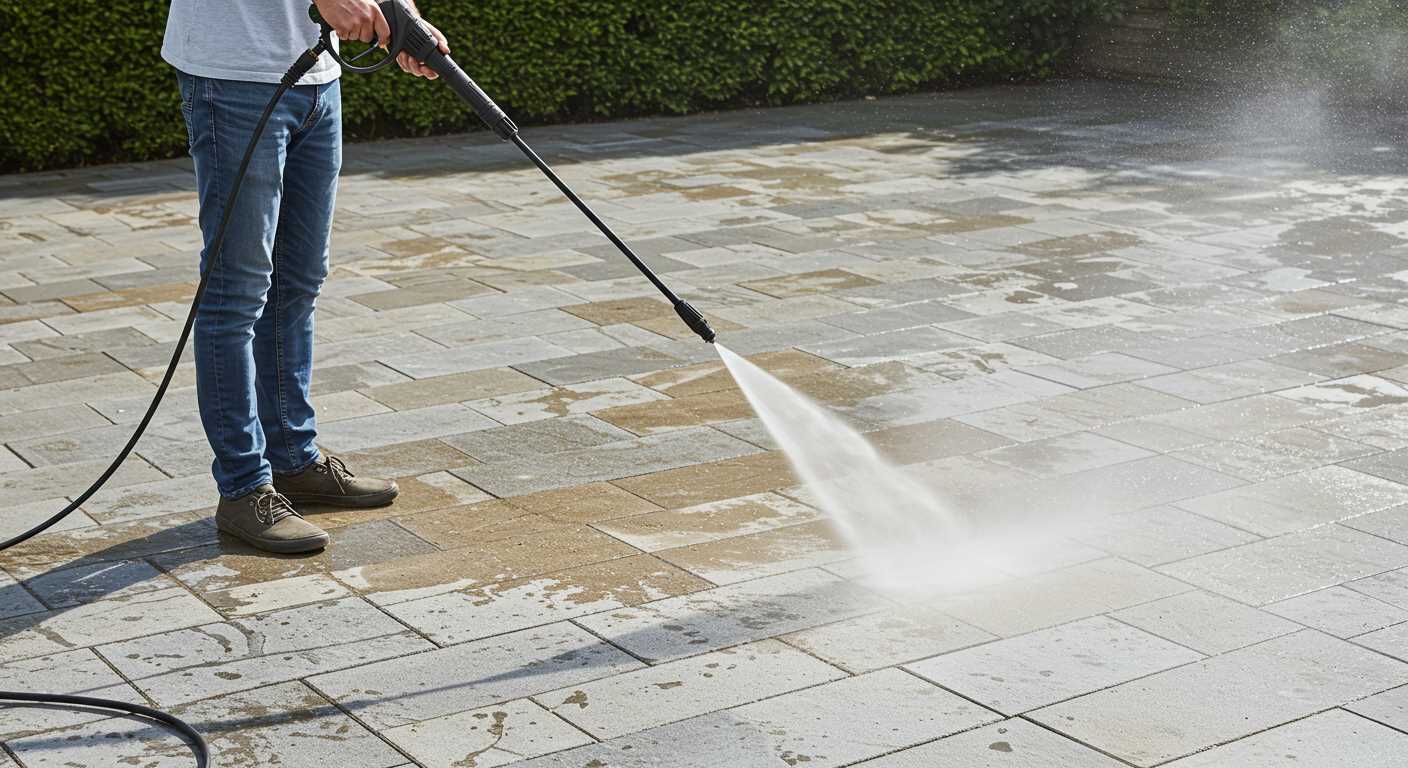
Installing a Nozzle for Enhanced Pressure
Opt for a nozzle that matches your intended cleaning task. A narrow nozzle, such as a 0-degree or 15-degree, delivers concentrated pressure, ideal for tackling stubborn stains on concrete or patio surfaces. While broad nozzles, like the 25-degree or 40-degree, are better suited for rinsing or delicate surfaces.

After selecting the appropriate nozzle, securely attach it to the end of your modified cleaning system. Ensure that all connections are tight to prevent leaks. A well-fitted nozzle maximises the water flow and allows you to achieve optimal performance.
During my trials, I found that using a turbo nozzle can significantly enhance cleaning efficiency. This type of attachment rotates the water stream, offering a wider cleaning path without sacrificing pressure. It’s particularly effective for tough grime, making it a worthwhile investment for regular users.
Don’t forget to test the nozzle on an inconspicuous area before proceeding with extensive cleaning. This step helps gauge the impact on different surfaces and ensures you achieve the desired results without damage.
If you’re aiming for professional results, consider pairing your setup with a suitable pressure washer for drives and patios. This combination can elevate your cleaning game and make outdoor maintenance far more manageable.
Testing the Pressure Output of the Modified Equipment
To verify the effectiveness of your modified setup, measuring the output force is crucial. Here’s a straightforward method to test the results.
Required Tools for Testing
- Pressure gauge (suitable for water pressure)
- Bucket or container to collect water
- Measuring tape or ruler
Step-by-Step Testing Procedure
- Attach the pressure gauge to the end of your modified system. Ensure it’s secure to prevent leaks.
- Position a bucket or container at least a few feet away to catch the water output.
- Activate the water source. Observe the pressure gauge reading. Note the maximum pressure achieved.
- Measure the distance the water reaches from the nozzle using the measuring tape. This helps assess the effectiveness of the stream.
- Compare the results with the specifications of commercial high-pressure systems to gauge performance.
In my experience, the results can vary significantly based on the components used and the precision of the connections. A well-modified unit can yield impressive results, often outperforming expectations.
If you’re interested in another type of transformation, check out this guide on how to can fresh green beans without a pressure cooker.
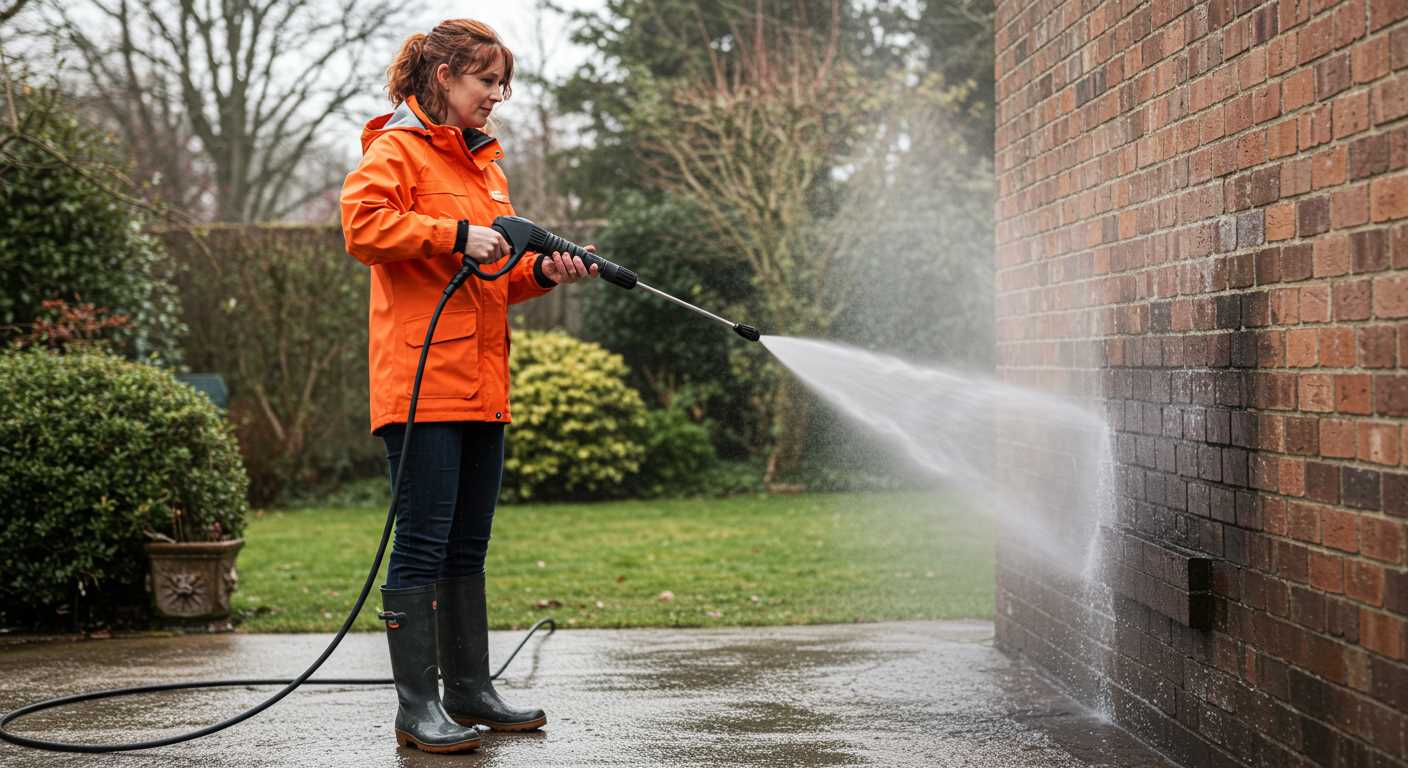
Adjusting the Pressure Settings for Different Tasks
To achieve optimal results, it’s crucial to tailor the force of the output stream depending on the task at hand. For instance, removing dirt from a patio requires a stronger jet than cleaning delicate garden furniture. I’ve learned this through trial and error; the right balance makes all the difference.
Surface Cleaning
For hard surfaces like concrete or brick, a setting between 2000-3000 psi is typically effective. I recall a time when I tackled a particularly grimy driveway. Using a higher setting allowed me to blast away the embedded grime effortlessly. Always test a small area first to avoid damage, as some materials can be sensitive to high pressure.
Delicate Surfaces
Conversely, when cleaning vehicles or wooden structures, dial it back to around 1200-1500 psi. A friend learned this the hard way when he accidentally stripped paint from his porch while using an overly forceful stream. I advised him to start with the lowest setting and gradually increase it until he found the sweet spot that removed dirt without causing harm.
Using adjustable nozzles can also help in controlling the intensity. A fan spray pattern is ideal for rinsing and gentle cleaning, while a concentrated stream is suited for tougher jobs. Always keep safety in mind; protective gear can never be underestimated when dealing with powerful jets.
Maintenance Tips for Your Converted Pressure Washer
Regular upkeep is key to ensuring your modified cleaning tool performs at its best. After each use, inspect the components for any signs of wear or damage. A quick visual check can prevent bigger issues down the line.
Flush the system after every session. Running clean water through the attachment helps eliminate any debris or soap residue that could clog the nozzle. I’ve seen too many setups suffer from reduced efficiency due to neglecting this simple step.
Keep an eye on the connections. Tighten any fittings that may have loosened during operation. I’ve had instances where a loose connection resulted in leaks and loss of pressure, affecting the overall cleaning performance.
Inspect the nozzle for blockages and clean it regularly. A clogged nozzle can lead to uneven spray patterns, which I discovered can turn a straightforward task into a frustrating experience. Use a pin or a small brush to clear any debris.
Check for kinks or twists in the line. These can restrict flow and reduce the effectiveness of your tool. When I first converted my setup, I made the mistake of not paying attention to the line, resulting in subpar performance. Keeping the line straight and free from obstructions improved my results significantly.
Store your equipment properly. Avoid leaving it in direct sunlight or extreme temperatures, as this can degrade materials over time. I learned the hard way that exposure can lead to cracks and brittle components, which are costly to replace.
Lastly, consider replacing any worn-out parts proactively. I’ve often found that addressing minor wear before it becomes a major problem saves time and money. Regularly reviewing the condition of seals and connectors will keep your system running smoothly.
Safety Precautions While Using the Pressure Washer
Always wear protective eyewear. High-velocity water can propel debris, and a single miscalculation could lead to serious injuries. I’ve seen friends end up at the hospital because they underestimated the power of the spray.
Ensure a firm footing. Slippery surfaces can lead to falls, especially when operating equipment that requires movement. I’ve slipped before, and it wasn’t a pleasant experience; a solid grip on the ground is crucial.
Electrical Safety
If your setup involves electricity, check for any frayed wires or exposed connections. Water and electricity don’t mix well. I learned this the hard way during a rainy day project when I didn’t check my extension cord thoroughly–thankfully, I escaped without injury.
Area Clearance
Clear the work area of obstacles and bystanders. When I was washing my patio, I didn’t account for my dog running around. A sudden burst of water startled him, and he darted right into my path. Keep children and pets at a safe distance to avoid accidents.

.jpg)


