
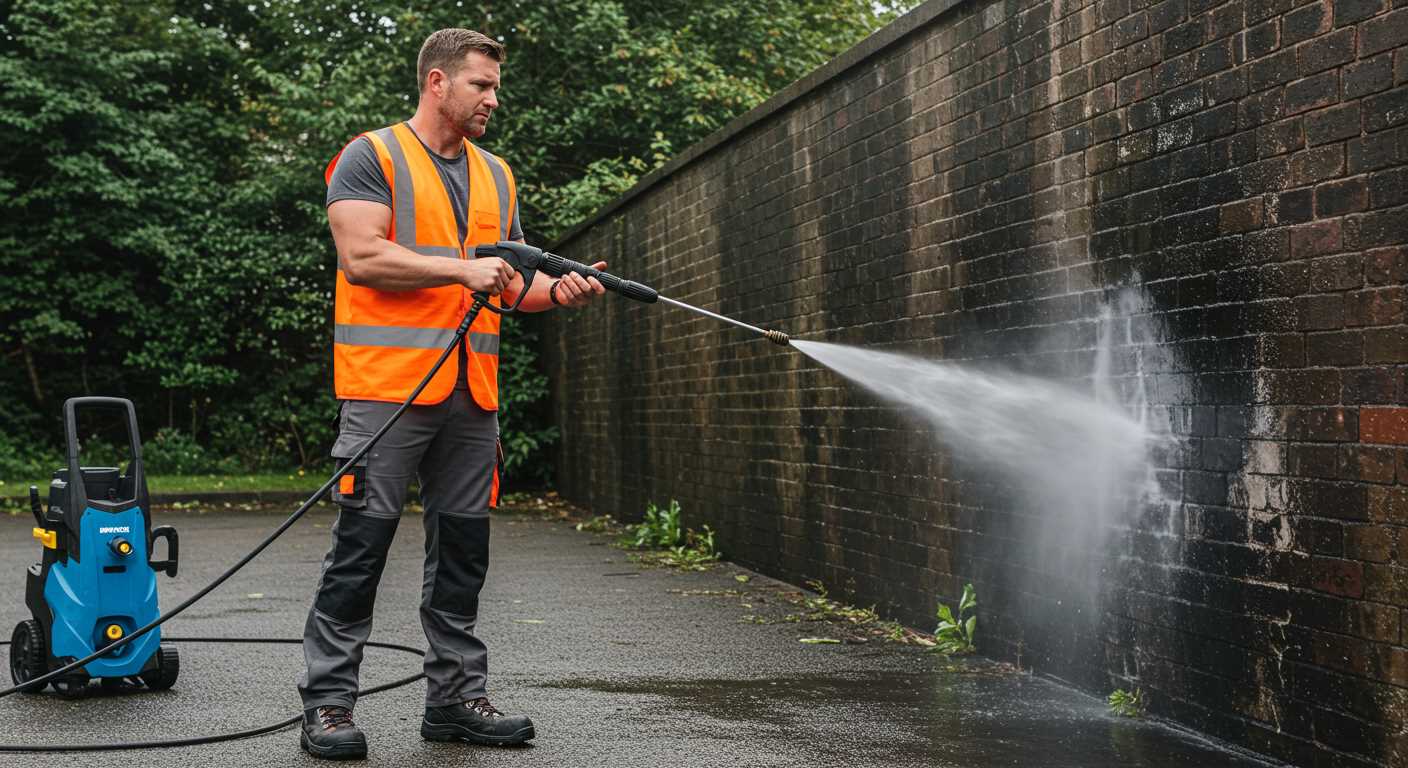


Begin by gathering the right gear. Equip yourself with a quality high-pressure cleaning device, ensuring you have an appropriate nozzle for the task. A 25-degree nozzle typically works well, striking the balance between power and safety. Safety goggles and gloves are non-negotiables; protect yourself from debris and the spray.
Prior to commencing, assess the condition of the barrier. Remove any visible debris, such as leaves and branches, which could obstruct the process. Should you encounter stubborn stains or mould, consider applying a suitable cleaning solution to the affected areas. Allow it to sit for a few minutes to penetrate and loosen the grime.

Position the sprayer at an angle, keeping it around two feet away from the surface. This distance prevents damage while effectively removing dirt. Begin at the top and work your way down, ensuring even coverage. Maintain a steady motion to avoid streaks, and don’t rush; a thoughtful approach yields the best results.
After achieving the desired cleanliness, rinse thoroughly. This step is crucial to remove any residual cleaning agents. Once the task is complete, allow the timber to dry fully before applying any protective coatings if desired. This not only extends the life of your fencing but also enhances its appearance, giving your outdoor space a fresh look.
Thorough Approach to Revitalising Timber Barriers
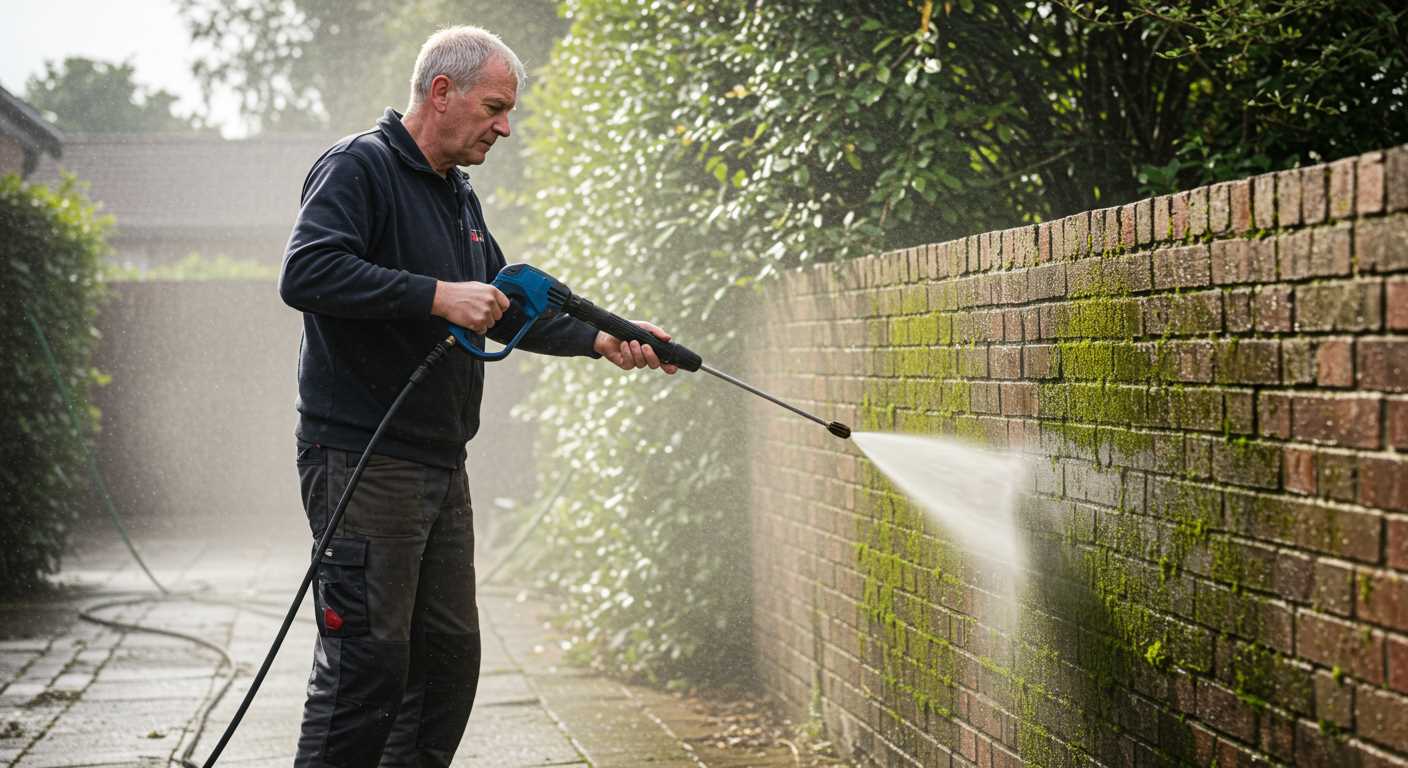
I’ve found that the right method can make all the difference. Begin by gathering your gear: a quality high-pressure machine, a suitable nozzle, and protective eyewear. Ensure you’re using a fan tip nozzle, ideally around 25 degrees, to avoid damaging the surface.
Before starting, it’s wise to check the condition of your structure. Look for any loose boards or protruding nails. Fasten or replace these to prevent further damage during the cleaning process.
Next, pre-soak the area. This helps to loosen dirt and grime. Use a garden sprayer or a hose to mist the surface lightly. Be careful not to soak it too heavily, as excess water can lead to splintering.
-
Angle: Position the spray at a 45-degree angle. This technique minimises the risk of driving water into the wood.
-
Distance: Maintain a distance of at least 18 inches. Getting too close can result in gouging the timber.
-
Technique: Work in sections. Start from the top and move downwards to ensure that dirt flows away from already cleaned areas.
-
Speed: Keep a steady pace while operating the sprayer. Rushing can lead to uneven results.
After the initial wash, inspect the surface. Stubborn stains or mildew might need a second treatment. For these, consider applying a mild cleaning solution specifically designed for timber care. Follow the product instructions carefully.
Once satisfied, let everything dry fully before applying any protective finish or stain. This step is crucial for achieving longevity and maintaining the aesthetics of your barriers.
In my experience, routine maintenance every few years can prolong the life of your structures significantly. A little effort goes a long way in preserving the beauty and integrity of your wooden installations.
Choosing the Right Pressure Washer for Your Fence
For optimal results, select a unit with a minimum pressure of 1500 PSI. I remember a time when I underestimated the power needed for a project. I opted for a lower-spec model, and the outcome was disappointing. Stubborn stains remained, and I had to repeat the task, wasting time and energy.
When it comes to flow rate, aim for at least 1.5 GPM. This measurement indicates how much water the machine can deliver. Higher flow rates help in rinsing away dirt and debris more effectively. During one of my tests, I used a model with a 2.5 GPM rating, and the difference was astonishing. Stains that once took hours to remove vanished in minutes.
Consider the type of nozzle as well. A 25-degree nozzle is versatile and ideal for most surfaces, providing a balance between pressure and coverage. I’ve often switched nozzles, and the 25-degree option has consistently delivered satisfactory results without damaging the surface.
Electric or gas? Electric models are quieter and easier to maintain, making them a great choice for residential tasks. Gas units, while louder and bulkier, typically offer more power and are suitable for larger areas. I’ve used both types, but for smaller jobs, I always reach for my electric unit. It’s lighter and gets the job done without the hassle.
Don’t overlook the importance of accessories. A good surface cleaner attachment can cut your time in half, especially on large areas. I once tackled an extensive project without one and regretted it. The surface cleaner made the next one a breeze.
Lastly, pay attention to the warranty and build quality. A well-constructed model will serve you longer and perform better over time. I learned this the hard way after investing in a budget option that broke down after a few uses. It’s often worth spending a bit more for durability.
Selecting the Appropriate Nozzle and Pressure Settings
For optimal results, I always recommend starting with a 25-degree nozzle for the initial wash. This angle provides a good balance between coverage and power, effectively removing dirt without risking damage to the surface. If your project involves stubborn grime or mildew, consider switching to a 15-degree nozzle for those tougher spots. Just remember, this nozzle delivers a concentrated stream, so keep it at a safe distance to avoid gouging the material.
Pressure Settings
Adjusting the pressure is equally crucial. Generally, a setting between 1200 to 1500 PSI is sufficient for most surfaces. If you encounter particularly thick layers of dirt, increasing the pressure slightly can help, but don’t exceed 2000 PSI unless you’re experienced. High pressure can strip the finish or cause splintering, especially on softer timber. I once made the mistake of cranking it too high on an older installation, resulting in costly repairs.
Technique Matters
When applying the spray, maintain a consistent distance of around 12 to 18 inches from the surface. Move the nozzle in a sweeping motion, overlapping each pass to ensure complete coverage. This technique reduces the risk of streaking and provides a uniform finish. On one occasion, I rushed through the process and ended up with patchy results, which taught me the value of patience and precision.
Preparing the Area Around the Fence Before Cleaning
Clear the surrounding space of any obstacles. Move planters, garden furniture, or anything else that could get in the way. This ensures you have a safe environment to work in and prevents any accidental damage to your belongings.
Next, check for nearby plants and shrubs. If you have delicate flora close to the structure, consider covering them with tarps or plastic sheeting. High-pressure streams can cause harm, so take precautions to protect your garden.
Also, ensure that the ground is free from debris like leaves or branches. A tidy area reduces the risk of slips and falls while manoeuvring your equipment. Plus, it helps you avoid unnecessary cleanup after the task is complete.
Additionally, if you have any nearby electrical outlets or fixtures, it’s wise to cover them to prevent water damage. Use plastic bags or waterproof covers to shield these areas. This step is often overlooked but can save you from costly repairs later.
Lastly, take a moment to review your equipment and check hoses for any leaks. If you encounter issues, you can find pressure washer repair and troubleshooting solutions to common problems online. Prepping the area and ensuring everything is in order will make the entire process smoother and more enjoyable.
Applying Cleaning Solutions for Best Results
For maximum effectiveness, choosing the right cleaning solution is key. I’ve experimented with various products over the years and found that using a dedicated cleaner designed for outdoor surfaces yields the best results. Look for biodegradable options that are safe for plants and animals.
Types of Cleaning Solutions
- Oxygen Bleach: Ideal for removing mould and mildew. It’s gentle on surfaces while still being tough on stains.
- Vinegar and Water: A natural alternative that works wonders for light stains and helps to restore the wood’s natural colour.
- Commercial Wood Cleaners: Often contain specialised agents to tackle deep-seated dirt and discolouration. Ensure compatibility with your surface type.
Application Techniques
- Always pre-wet the surface to prevent the cleaner from soaking in too deeply.
- Apply the solution using a garden sprayer or a low-pressure setting on your equipment for even distribution.
- Allow the cleaner to sit for the recommended time–typically 10 to 15 minutes–before rinsing.
- For tougher spots, agitate the area gently with a brush before rinsing.
After applying any cleaning solution, always rinse thoroughly. Residual chemicals can cause damage if left on the surface. I’ve seen wood deteriorate quickly when not rinsed properly, so don’t skip this step. Remember, a little preparation goes a long way in achieving that fresh, revitalised look for your outdoor wooden structures.
Techniques for Pressure Washing Different Wood Types
For effective results, understanding the characteristics of various timber species is crucial. Each type reacts differently to high-pressure cleaning, and a tailored approach ensures longevity and aesthetics.

Pine and Spruce
These softwoods are commonly used in outdoor structures. I recommend using a wider nozzle, such as 25 degrees, to prevent damage while still removing dirt and grime. Keep the spray wand at least 12 inches away from the surface, moving in a steady sweeping motion. Avoid lingering too long in one spot to prevent gouging.
Cedar and Redwood
These durable woods are naturally resistant to decay but can still benefit from a gentle cleanse. Opt for a 40-degree nozzle for a lighter touch. The key is to maintain a distance of 18 to 24 inches from the surface, allowing the water to gently lift away contaminants without stripping the natural oils.
| Wood Type | Nozzle Angle | Distance from Surface | Recommended Technique |
|---|---|---|---|
| Pine/Spruce | 25 degrees | 12 inches | Sweeping motion, avoid lingering |
| Cedar/Redwood | 40 degrees | 18-24 inches | Gentle lifting motion |
| Hardwood (Oak, Maple) | 15 degrees | 12-18 inches | Short bursts, follow the grain |
Hardwoods like oak and maple require a more aggressive approach due to their density. A 15-degree nozzle works best for these types. Keep the distance between 12 to 18 inches and apply short bursts, always moving along the grain to minimise the risk of damaging the surface.
Each wood type has unique properties that dictate the most suitable approach. By adapting techniques, you can ensure that your outdoor installations stay in top condition for years to come.
Drying and Finishing After Cleaning
After rinsing the surfaces, allow the timber to dry naturally for 24 to 48 hours. Avoid direct sunlight, as it can cause rapid evaporation, leading to uneven drying and potential warping. For shaded areas, the drying time may extend beyond two days.
Inspection and Repair
Once the surfaces are dry, inspect for damage. Look for cracks, splinters, or areas needing re-staining or sealing. Minor repairs can be tackled easily using wood filler or sealant. Addressing these issues promptly prevents further deterioration and extends the life of your structure.
Sealing and Finishing
Applying a protective finish enhances longevity. Use a quality sealant or stain suited for external timber. A brush or roller allows for even application, ensuring every inch receives treatment. Remember to follow the manufacturer’s instructions for drying times between coats. A second coat improves durability and offers better protection against the elements.
Maintaining Your Wood Fence Post-Cleaning

After achieving a fresh appearance for your barrier, focus on preservation. Start by inspecting for any damage, such as rot or loose boards. Addressing these issues promptly prevents further deterioration. I’ve seen many homeowners skip this step, leading to costly repairs down the line.
Sealing and Staining
Applying a sealant or stain after washing enhances the longevity of the timber. Choose a high-quality product designed for outdoor use. In my experience, a semi-transparent stain offers both protection and aesthetic appeal. Ensure the surface is completely dry before application; this typically takes 24-48 hours. I recommend using a paint sprayer for an even coat, though a brush works just as well for precision.
Regular Maintenance Schedule
Set a routine for upkeep. Annual inspections and touch-ups can prevent major issues. Clean any debris, such as leaves or dirt, that collects at the base to avoid moisture retention. I found that a simple yearly maintenance plan saves both time and money while keeping your barrier looking its best. For those interested in preserving homegrown produce, consider checking out how to can fresh green beans without a pressure cooker for more tips on maintaining your garden’s bounty.
.jpg)
.jpg)


