
.jpg)


.jpg "How to clean sidewalk with pressure washer")
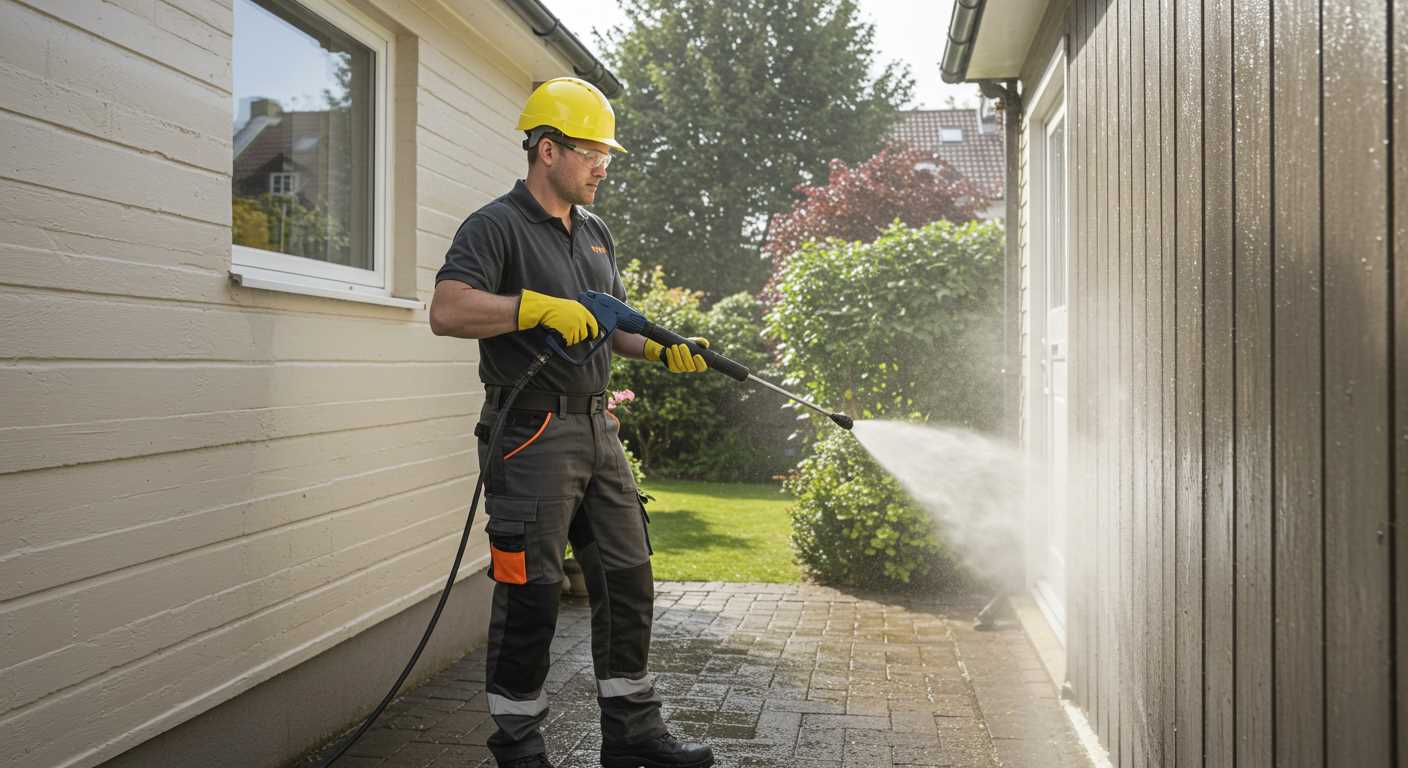
Begin by selecting the right nozzle for your equipment. A 25-degree nozzle is often the best choice for hard surfaces, as it strikes a balance between power and coverage. I recall a time when I used a narrower nozzle, which ended up causing damage to the surface. Learning from that experience, I always opt for the appropriate attachment now.
Before getting started, it’s wise to prepare the area. Clear away any furniture, plants, or debris. I’ve found that a quick sweep can make a significant difference, allowing for better results and reducing the likelihood of dirt splattering back onto clean spots. One of my colleagues once forgot this step and spent more time cleaning the surrounding areas than the pathway itself.
Adjust the pressure settings on your machine based on the condition of the surface. For heavily soiled areas, a higher setting may be necessary, but don’t forget to test a small section first. I learned this lesson the hard way when I accidentally stripped paint off an adjacent wall because I was too eager to tackle the grime. A gentle approach is often more effective and preserves the integrity of the material.

As you work, maintain a consistent motion. I’ve found that moving in straight lines and overlapping each pass slightly ensures even cleaning without missing spots. On one occasion, I rushed through a section and ended up with streaks that required additional touch-ups. Taking my time has always yielded the best results.
Lastly, once you’ve finished, take a moment to inspect your work. I’ve discovered that a final rinse can help remove any lingering soap residues, leaving the surface looking pristine. It’s rewarding to step back and see how much of a difference it makes, transforming a dull pathway into a welcoming entrance.
Effective Techniques for Revitalising Outdoor Pathways
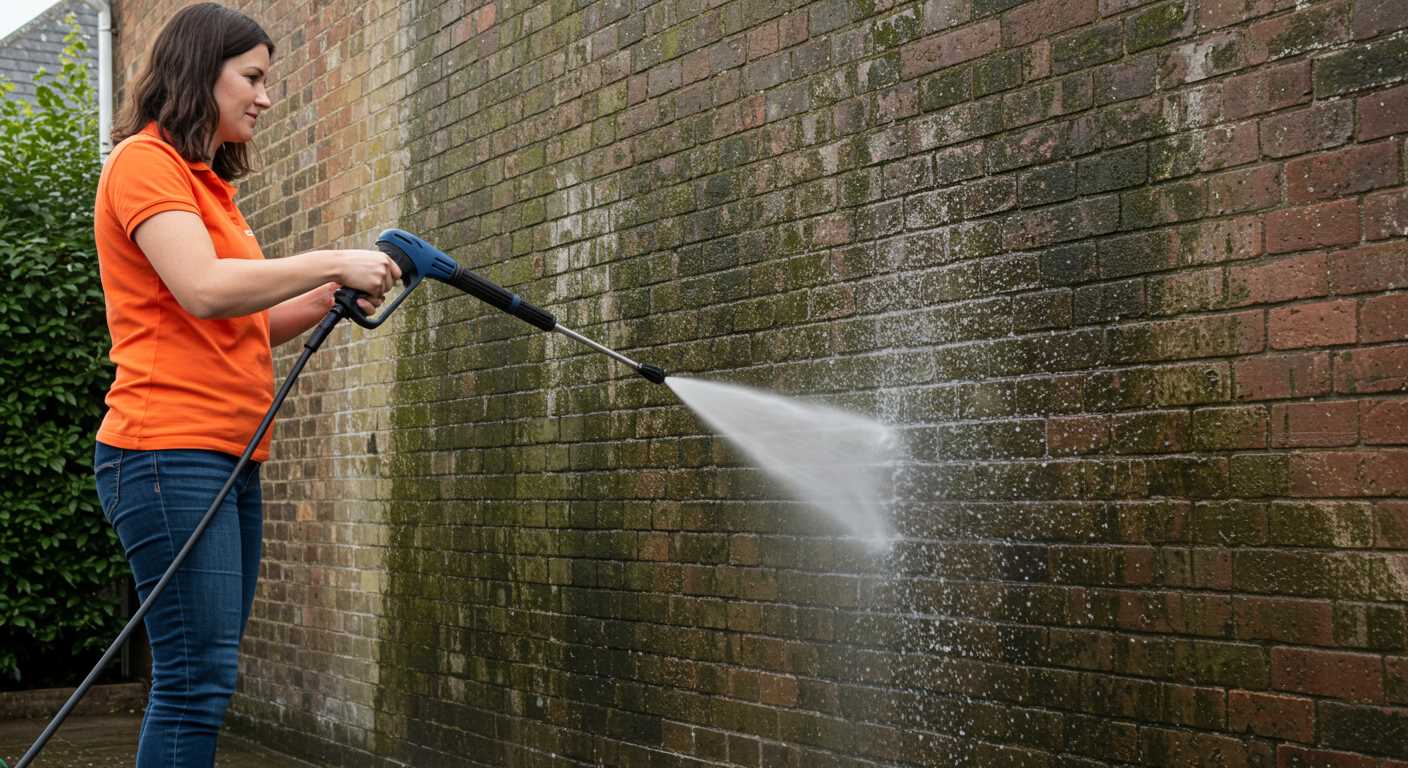
Utilising the right nozzle is key. I always opt for a 15-degree or 25-degree nozzle for tough grime. The narrower the spray, the more concentrated the force. This is particularly effective on stubborn stains like oil or mildew. Maintain a distance of around 12 inches from the surface to avoid damage, especially on older concrete.
Another aspect I’ve learned is the importance of surface preparation. Remove any loose debris or large particles before you begin. A simple broom will do the trick. If you want to enhance results, consider applying a suitable cleaner designed for outdoor surfaces ahead of time. Let it sit for the recommended duration to break down tough stains, making the subsequent wash easier and more efficient.
Technique for Maximum Impact
When you start, make sweeping motions from side to side, overlapping each pass slightly. This ensures consistent coverage and prevents streaks. I’ve found that working in sections helps maintain focus and allows you to monitor progress more effectively. For really stubborn areas, a back-and-forth motion can help lift embedded dirt.
Post-Cleaning Care
After completing the task, it’s wise to rinse the area thoroughly to remove any leftover cleaning agents. This step prevents potential residue build-up, which can attract dirt quickly. Allow the surface to dry completely before using it again to avoid slipping hazards. A little maintenance goes a long way in keeping those pathways looking sharp and inviting.
Choosing the Right Pressure Washer for Sidewalk Cleaning
To tackle stubborn grime on your pathways, selecting an appropriate cleaning machine is crucial. I’ve found that models with a minimum of 2000 PSI and a flow rate exceeding 1.5 GPM tend to provide the best results. This combination ensures enough force to dislodge embedded dirt without causing damage to the surface.
Types of Machines
Electric machines are often lighter and quieter, making them ideal for residential use. They are perfect for occasional tasks and smaller areas. However, if you’re facing heavy stains or larger expanses, opting for a gas-operated variant will yield superior power and efficiency, thanks to their higher pressure levels.
Accessories and Nozzles
Don’t overlook the importance of attachments. A rotating surface cleaner can significantly reduce the time spent on the job, providing even coverage. Additionally, interchangeable nozzles allow for versatility; a 25-degree nozzle works well for most surfaces, while a 15-degree one provides a more concentrated jet for tougher spots.
| Feature | Electric Model | Gas Model |
|---|---|---|
| Pressure (PSI) | 1500 – 2000 | 2000 – 4000 |
| Flow Rate (GPM) | 1.2 – 1.5 | 2.0 – 4.0 |
| Weight | Lightweight | Heavier |
| Noise Level | Quieter | Louder |
| Maintenance | Low | Higher |
From my experience, always consider your specific needs and the severity of staining before making a decision. The right machine, combined with the appropriate accessories, can save time and yield impressive results on your outdoor surfaces.
Preparing the Sidewalk Area Before Washing
Clear the area of any obstacles such as furniture, potted plants, or decorative items. I once overlooked this step and ended up with a broken flower pot, which could have easily been avoided. Ensure the path is accessible for the equipment, allowing for smooth movement during the task.
Next, inspect the surface for any loose debris or materials. A quick sweep can make a significant difference in the outcome. I remember a time when I didn’t remove small stones, and they ended up creating scratches. Removing these helps prevent damage and ensures an even clean.
Check for nearby electrical outlets or water sources to avoid any issues while operating the device. Keeping cables and hoses away from foot traffic is wise to prevent tripping hazards. I’ve seen accidents happen simply because someone didn’t plan the layout properly.
If there are any plants or landscaping nearby, consider covering them with plastic sheeting to protect them from strong sprays. One day, I neglected this and ended up with a few wilting flowers due to the soap I used. Ensuring plants are shielded will save you from potential regrets later.
Consider applying a pre-treatment solution to tough stains, especially grease or oil. I often recommend a car cleaner to use with pressure washer for this purpose. It can break down grime effectively before you begin the actual washing process.
Finally, make sure to wear appropriate safety gear. Goggles and boots are important to protect yourself from flying debris or water. I learned this the hard way after a rogue stone hit my shin during a particularly vigorous cleaning session. Safety first always!
Selecting the Appropriate Cleaning Solution
For effective results, choosing the right detergent is key. I often recommend a biodegradable cleaner, especially if you’re concerned about the environment. These formulas break down quickly and won’t harm nearby plants or wildlife. Look for a product specifically designed for outdoor surfaces; they usually target tough stains like oil, grease, and mildew.
In my experience, a mixture of water and vinegar can be surprisingly effective for lighter stains. Just mix one part vinegar with one part water in a spray bottle and apply it to the affected areas. Let it sit for about 15 minutes before rinsing. However, for more stubborn grime, a commercial product might be necessary. Always read labels to ensure compatibility with your equipment.
When trying out a new solution, I advise testing it on a small, inconspicuous area first. This helps ensure it won’t cause discolouration or damage. Remember, using too much detergent can leave a residue, so always follow the manufacturer’s instructions regarding dilution ratios.
After you’ve selected a cleaner, it’s crucial to rinse thoroughly. Any leftover solution can attract dirt and negate your hard work. If you need tips on maintaining glass surfaces, check out this guide on how to clean an old aquarium glass. The principles of cleaning apply across different surfaces, and you’ll find useful techniques there as well.
Setting Up Your Pressure Washer Correctly
To ensure optimal performance, it’s crucial to configure your cleaning equipment properly before use. I’ve seen too many people skip this step, leading to unsatisfactory results. Here’s how to get it right:

- Choose the Right Nozzle: Different tasks require different nozzles. For hard surfaces, a 15° or 25° nozzle usually does the trick. I’ve always preferred the 15° for tougher stains.
- Connect the Hose: Ensure the water hose is securely attached to both the washer and the water source. A loose connection can cause a drop in pressure, which affects performance.
- Water Supply: Ensure your water source provides a minimum of 5 gallons per minute. I once had a client whose supply was inadequate, and the machine couldn’t build up enough pressure.
- Check the Fuel: If you’re using a petrol model, make sure it has fresh fuel. Old fuel can cause engine problems. I learned this the hard way during a busy spring cleaning season.
- Electrical Setup: For electric units, confirm that the power outlet can handle the washer’s requirements. A dedicated circuit is often best. I recommend using a GFCI outlet for safety.
- Inspect the Equipment: Before starting, check for any leaks or signs of wear, especially on hoses and connectors. I once missed a small crack that turned a straightforward job into a messy affair.
Following these steps will set you up for success, ensuring your equipment runs smoothly and effectively. Trust me, a bit of preparation saves a lot of hassle during the actual cleaning process.
Techniques for Effective Pressure Washing
Begin by selecting the right nozzle for the task. A 25-degree or 40-degree nozzle is typically ideal for flat surfaces, as it disperses water effectively without causing damage. For stubborn stains, consider using a rotary nozzle to increase the intensity of the spray.

Position the nozzle at a consistent distance of around 12 to 18 inches from the surface. This distance helps maintain pressure while preventing potential etching or surface damage. Keep the nozzle moving in a steady, sweeping motion to avoid concentrating the spray in one area, which could lead to uneven cleaning results.
Utilise overlapping strokes, starting from one side and working your way across. This technique ensures that no patches are missed and promotes an even finish. Adjust your stance to maintain comfort and control while operating the machine, especially during extended periods of use.
Incorporate a two-pass method for enhanced results. The first pass should focus on removing loose debris and grime, while the second pass should concentrate on any remaining stains or streaks. This approach allows for a thorough clean without overwhelming the surface with excessive water pressure all at once.
After washing, it’s beneficial to rinse the area thoroughly with clean water to eliminate any residual cleaning solutions or debris. This final touch enhances the overall appearance and ensures that no slippery residue is left behind.
Lastly, adjusting the pressure settings based on the condition of the surface can lead to better outcomes. Higher pressure may be required for heavily stained areas, while lower pressure works well on delicate surfaces. Always test a small, inconspicuous area first to gauge the reaction before proceeding with the entire space.
Post-Cleaning Care and Maintenance of the Sidewalk
After tackling the grime and stains, it’s crucial to ensure that the area remains tidy and well-maintained. Here are some steps to follow post-cleaning:
Inspection and Assessment
- Examine the surface for any areas that may require further attention. Look for stubborn stains or spots that may have been missed during the initial wash.
- Check for any damages, such as cracks or loose pavers. Addressing these issues promptly can prevent further deterioration.
Regular Maintenance
- Schedule periodic washings based on the environment. If your area is prone to heavy foot traffic or adverse weather, consider more frequent cleanings.
- Apply a sealant if the surface material permits. This can help protect against future stains and make future cleaning easier.
- Keep the area free from debris. Regularly sweep away leaves, dirt, and other materials that can accumulate and lead to staining.
- Consider using a gentle cleaning solution on a regular basis to maintain appearance without the need for high-pressure methods.
A proactive approach to maintenance can significantly extend the lifespan and aesthetic of the surfaces. My own experience has shown that neglecting even minor issues can lead to larger problems down the line, so staying vigilant is key.
Safety Precautions When Using a Pressure Washer
Always wear appropriate personal protective equipment. This includes safety goggles to shield your eyes from debris, sturdy footwear to prevent slips, and gloves to protect your hands from water and chemicals. A full-length apron can also help keep your clothes dry and safe from any cleaning solutions.
Keep children and pets at a safe distance. While you’re focused on the task, it’s easy to lose track of your surroundings. Establish a clear boundary and communicate with those nearby to ensure they stay away during the process.
Preparing for Operation
Before turning on the device, check for any loose fittings or worn hoses. It’s crucial to ensure everything is secure to prevent any unexpected accidents. Inspect the area you’ll be working in for potential hazards like loose debris, electrical cords, or wet surfaces. Clear any obstacles to avoid mishaps.
When you start the machine, maintain a firm grip. The force of the water can cause loss of control if you’re not prepared. Always point the nozzle away from yourself and others until you’re ready to use it. Make sure to adjust the pressure settings according to the material being treated; lower pressure is often better for more delicate surfaces.
Handling Chemicals Safely
If you opt to use any cleaning agents, read labels carefully. Some solutions can be harmful if inhaled or if they come into contact with skin. Use a mask if necessary and work in well-ventilated areas. Always store chemicals away from children and pets, and never mix different products, as this can create dangerous reactions.
After finishing, turn off the equipment and release any built-up pressure in the hose before storing it. This simple step can prevent accidental discharges and prolong the lifespan of your tools. Keep everything clean and dry to avoid any future issues.
.jpg)


