


Attach the detergent system directly to the inlet of the lance. This straightforward connection allows for seamless integration, ensuring optimal performance while maintaining pressure. Make sure the threads are clean and free of debris to avoid leaks, which can hinder efficiency.
In my experience, I’ve found that using a quick-release coupling can significantly speed up the process. These couplings provide a secure lock and allow for easy disconnection when switching between tasks. I remember struggling with a stubborn connection during a job; once I switched to a quick-release model, the frustration vanished.
Always check the compatibility of the detergent system with your model. While many systems are universal, some specific attachments may require adapters. Having a few adapters in your toolkit can save time and prevent interruptions while working.

After securing the connection, it’s essential to test the system. Start with a low-pressure setting to ensure that everything is functioning correctly. I once overlooked this step and ended up with a mess, as the detergent was not dispensing as intended. A simple test run could have saved me from that hassle.
Regular maintenance of the detergent system is also key. Clean the filter periodically to prevent clogs. I’ve learned that neglecting this aspect can lead to decreased performance and costly repairs down the line. A clean filter ensures that the cleaning solution flows freely and effectively.
Choosing the Right Cleaner for Your Equipment
For optimal results, select a formulation tailored to the specific tasks you intend to tackle. For instance, if you’re removing oil stains from a driveway, a degreaser is your best bet. Conversely, for general grime on patios, a milder detergent will suffice. Always check labels for compatibility with your device, as some mixtures can cause damage or void warranties.
Consider the Surface Type
Different surfaces require distinct approaches. A powerful solution may be necessary for concrete, while wooden decks benefit from gentle, biodegradable options to avoid damage. My experience taught me the importance of testing any product on a small, inconspicuous area first. This can save you from costly mistakes and ensure the cleaner won’t harm your surfaces.
Concentration and Dilution
Pay attention to concentration levels. Some formulations are designed to be used straight from the bottle, while others require dilution. I remember a time when I didn’t dilute a concentrated cleaner enough, resulting in a foamy mess that took ages to rinse away. Follow the manufacturer’s guidelines for the best outcomes and avoid any unnecessary hassle.
Preparing Your Equipment for Cleaner Attachment
Before attaching your washing tool, ensure the device is turned off and unplugged. This simple step prevents any accidental activation while you’re working on it. I remember a time when I was in a rush and neglected this precaution; it resulted in a minor mishap that could have been avoided.
Inspecting Connections
Check the connections on your device. Ensure that the hose is securely fitted and there are no leaks. I often take a few moments to inspect these parts, as a loose connection can drastically affect performance. If you notice any damage, replacing that section is crucial to maintain efficiency.
Cleaning the Nozzle
Before attaching the scrubbing unit, clean the nozzle thoroughly. Any obstructions can diminish the output and effectiveness of your tool. I typically use a small brush to remove debris, ensuring a smooth flow. A well-maintained nozzle makes all the difference in achieving good results.
After ensuring everything is in order, you’ll be ready to attach your scrubbing accessory. For an optimal cleaning experience, it’s also wise to consider the right cleaning agents for your specific application. For instance, if you’re looking to enhance air quality in your workspace, check out the best air scrubber for hvac options available.
Lastly, always follow the manufacturer’s guidelines for attaching and using any additional tools. This practice not only prolongs the lifespan of your equipment but also ensures maximum efficiency during your cleaning tasks.
Step-by-Step Guide to Attaching the Cleaner
Begin with ensuring the safety of your equipment. Disconnect the power source to eliminate any risk of accidental activation while you work. This simple step can prevent potential injuries or damage.
Next, locate the designated attachment point on your device. It’s typically situated at the front end where the nozzle connects. Examine the connection type–whether it’s a threaded fitting or a quick-release mechanism.
For a threaded connection, align the attachment carefully and rotate it clockwise until it feels secure. Avoid overtightening, as this might cause damage to the threads. If your model uses a quick-release feature, simply push the attachment into place until you hear a click, confirming it’s locked in.
Once attached, inspect for any gaps or misalignments. A tight seal is crucial to ensure that the solution flows correctly during operation. If you notice any issues, it’s best to detach and reattach the component to guarantee a proper fit.
After securing the attachment, reconnect the power source. Before commencing full operation, test the unit on a small, inconspicuous area to ensure the solution is dispensed correctly. This precaution helps avoid any unwanted surprises on your surfaces.
During use, monitor the performance closely. If you encounter any irregularities, such as inconsistent flow or unusual noises, pause and reassess the connection. Prompt adjustments can save you time and hassle later.
By following these steps, you’ll achieve optimal results while ensuring your device operates efficiently. A little attention to detail can lead to a significant difference in your cleaning tasks.
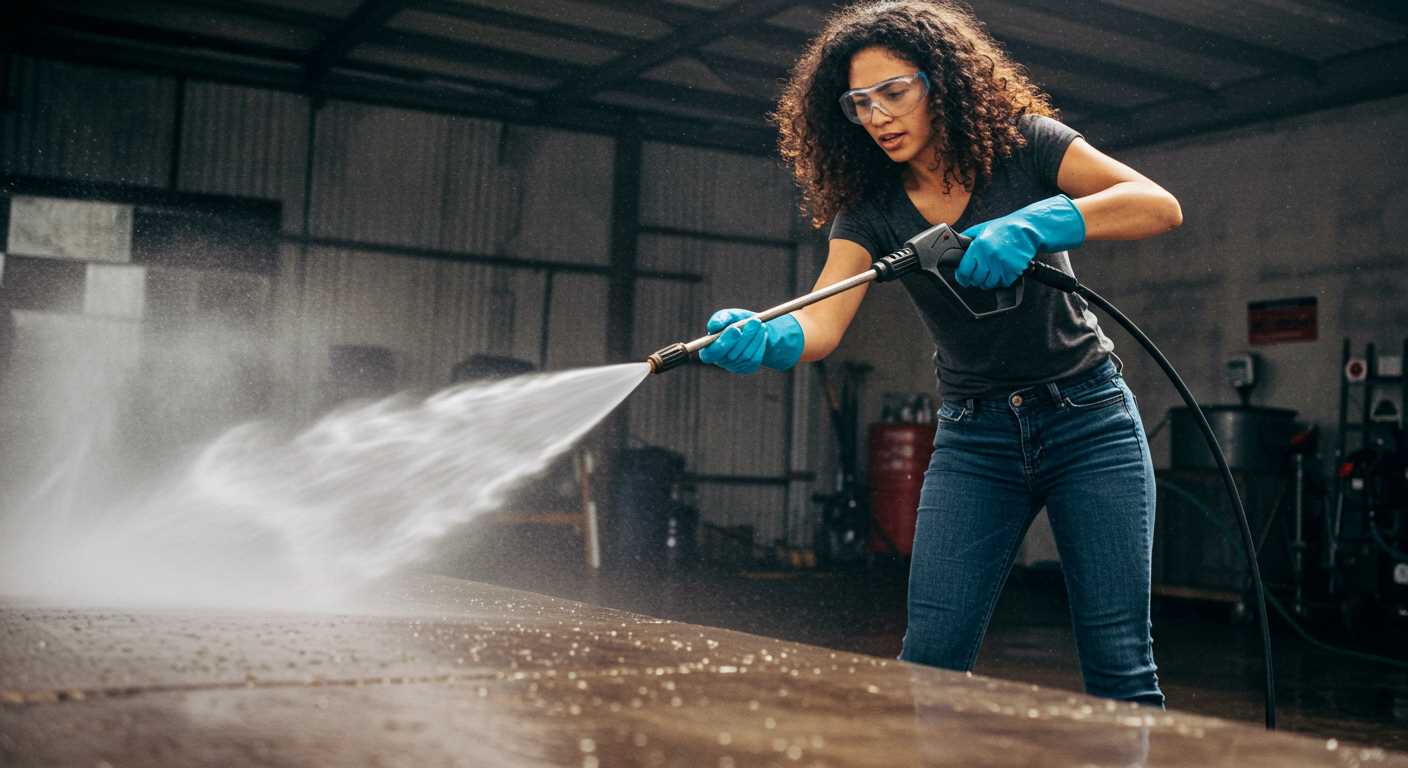
Testing the Connection for Leaks and Functionality
After securing your attachment, it’s imperative to ensure that everything is functioning correctly and securely. Here’s how I approach this crucial step.
- Turn on the machine and let it reach its operating pressure. This initial stage helps to identify any immediate issues.
- Inspect all connection points. Look for any signs of water seeping out. A tight seal should prevent leaks; if you notice any moisture, it’s a clear indication that adjustments are necessary.
- Test the spray pattern. Direct the nozzle at a suitable surface and activate the machine. A consistent and strong jet of water indicates a proper connection. If the pattern is erratic or weak, reassess the attachment points.
- Monitor the machine’s performance for unusual sounds. Any rattling or excessive noise can signal a problem with your setup.
- After the initial tests, turn off the machine and disconnect the attachment. Check for any residue or build-up that might suggest improper sealing or alignment.
When working with a light duty pressure washer, these checks can save you from larger issues down the line. Trust me; a little diligence now can lead to smoother operations later.
Adjusting Pressure Settings for Optimal Cleaning
For the best results, set the pressure level according to the surface you’re working on. For delicate materials like wood, aim for a lower setting, usually around 1000-1500 PSI. I recall a time when I was cleaning a wooden deck and started too aggressively; the results were less than desirable, and I had to sand it down afterwards.

For concrete or brick surfaces, you can safely crank it up to 2500 PSI or more. During a large outdoor project, I found that this pressure effectively removed years of grime without damaging the surface. Always test a small, inconspicuous area first to gauge the impact.
Adjusting the nozzle can also play a crucial role. A wider spray pattern disperses the force, which is ideal for cleaning larger areas, while a narrow stream focuses the pressure for stubborn stains. I remember using a narrow nozzle on a particularly tough oil stain on my driveway; it made a world of difference.
Monitor the flow rate as well. Too much pressure can lead to excess water usage and create a mess. I’ve learned that balancing water flow and pressure can maximise cleaning efficiency. If you notice a drop in performance, check for any blockages in hoses or nozzles, as these can hinder operation.
Regularly consult the manufacturer’s guidelines for optimal pressure settings tailored to specific tasks. Each model may have different recommendations, and following these can enhance performance and prolong the life of the equipment. I’ve always found that adhering to these specifications ensures that I am getting the most out of my tools while maintaining safety and efficacy.
Maintenance Tips for Cleaner and Pressure Washer Compatibility
Regularly check the connector for wear and tear. A worn connector can cause leaks and reduce performance. Replace any damaged parts immediately to maintain a tight seal.

Always clean the inlet filter on the machine. A clogged filter can hinder the flow of liquid, affecting the overall efficiency of the setup. Rinse it under running water and ensure it’s free from debris.
Inspect hoses for cracks or kinks. These can lead to pressure loss and reduce the effectiveness of the cleaning process. If you notice any damage, replace the hose to ensure proper function.
Store your equipment in a dry place, away from direct sunlight. UV exposure can degrade plastics and rubber components over time, leading to premature failure of attachments and hoses.
Use only compatible detergents. Check the manufacturer’s guidelines to ensure the cleaning solution used does not damage the machine or its attachments. Using the wrong product can lead to warranty issues.
Perform a thorough inspection before each use. Check all components, including the detergent tank, for any signs of leaks or damage. Early detection can save you from larger issues down the line.
After each use, flush the system with clean water to remove any residual detergent. This practice prevents build-up and helps maintain the integrity of internal components.
Lastly, refer to the user manual for specific maintenance schedules. Following the recommended intervals for servicing and part replacements can significantly extend the lifespan of the equipment.


.jpg)


