


First and foremost, ensure that the machine is completely powered down and disconnected from any electrical source. This step is crucial for safety and prevents any accidental operation while you’re working on it. Next, locate the water inlet where the hose connects to the unit. Detach the hose with care, allowing any residual water to drain out. This simple action prevents contamination and ensures a clean start for your next use.
Once the hose is disconnected, it’s advisable to remove any filters or screens present in the inlet. These components can accumulate dirt and debris over time, impacting performance. Rinse them thoroughly under running water to clear away any buildup, and inspect for damage. If they appear worn, replacing them can enhance the efficiency of your device significantly.

Now, let’s address the interior components. If your model allows, open the casing to access the pump. It’s common for sediments to settle within, affecting functionality. A gentle rinse with clean water can help dislodge any particles stuck in the pump housing. I recall an instance with a friend’s device that had reduced pressure due to a simple blockage that was easily resolved with this method.
After everything is clean, reassemble the components in reverse order. Ensure that all fittings are securely tightened to prevent any leaks during operation. Finally, reconnect the water supply and run the machine briefly to check for any irregularities. This routine not only prolongs the lifespan of your equipment but also ensures that every cleaning task is as effective as possible.
Flushing the System
Begin by disconnecting the water supply and removing the nozzle from the lance. This allows for a clear path for the liquid to flow through the internal components. Next, attach a hose specifically designed for clean water to the inlet. Ensure it is secured tightly to prevent any leaks.
Running Clean Water
Turn on the water supply and let it flow through the machine for several minutes. This step is crucial to remove any residual soap or debris. I have often found that running the system without any attachments helps in clearing out the pump and hoses effectively. Observe the discharge; it should be clear and free of any contaminants.
Final Steps
After allowing the clean liquid to circulate, disconnect the hose from the inlet. Reattach the nozzle and check for any signs of clogs or blockages. If everything appears in order, proceed to reconnect your water source. Regular maintenance like this not only extends the lifespan of your unit but also ensures optimal performance for your next cleaning task.
Gather Necessary Tools and Materials
Before you begin the maintenance of your cleaning device, ensure you have the following items at hand:
- Garden hose: A standard hose is crucial for connecting to a water source.
- Bucket: Useful for collecting any residual liquid during the process.
- Cleaning solution: Opt for a non-toxic cleaning agent suitable for your equipment.
- Wrench or pliers: Handy for loosening any tight fittings or connections.
- Safety goggles: Protect your eyes from any splashes or debris.
- Gloves: Keep your hands safe from chemicals and ensure a better grip.
- Soft brush: Ideal for cleaning the exterior and removing stubborn grime.
- Water source: A reliable supply is necessary for the operation.
Always check the condition of your equipment prior to starting. I once overlooked a worn-out hose, which caused a leak and made the process much messier than it needed to be. A simple inspection can save you quite a bit of hassle.
Once you gather your materials, you’re well on your way. Don’t forget to keep your workspace tidy–this will help you avoid accidents. You might even find this a digital camera memory card is 1 4 full analogy fitting: just as you wouldn’t want a cluttered card, a clean workspace makes for a smoother experience.
Turn Off the Pressure Washer and Disconnect Power
Before you proceed with any maintenance, ensure the machine is completely turned off. Locate the power switch and flip it to the off position. This is a crucial step to avoid any accidental activation while you’re working.
Disconnecting the Power Source
Once the unit is off, it’s time to disconnect it from its power source. Follow these steps:
- Unplug the power cord from the electrical outlet. Make sure you pull the plug itself, not the cord, to prevent damage.
- If your model uses a battery, remove it carefully to avoid any short circuits.
- For gas-powered models, ensure the fuel valve is closed to prevent any leakage.
Safety Precautions

Taking additional safety measures can prevent accidents:
- Wear gloves to protect your hands from any residual chemicals or dirt.
- Make sure the area around the machine is clear to avoid tripping hazards.
- Keep children and pets at a safe distance while you work.
Following these steps ensures that you can safely carry out the next phases of maintenance without any risk of injury or equipment damage.
Drain Existing Water from the System
Begin by locating the drain valve, typically situated at the base of the unit. Place a container or hose beneath this valve to catch the water. Open the valve carefully; you may want to wear gloves to protect your hands from any residual pressure or chemicals.
Release Any Pressure
Before opening the drain valve, squeeze the trigger on the gun to release any built-up pressure in the system. This step is crucial, as it prevents water from spraying unexpectedly and ensures a smooth draining process.
Check for Residual Water
After draining, inspect the area around the drain valve and any hoses for leftover water. If you notice any, tilt the unit slightly to encourage complete drainage. Ensuring no water remains is key to preventing damage during storage or maintenance.
Once you’re satisfied that all liquid has exited the system, close the drain valve securely. This simple practice can save you significant hassle in the future and help maintain the longevity of your cleaning equipment.
Mix Cleaning Solution for Flushing
To prepare the cleaning solution, I recommend mixing a dedicated detergent designed for high-pressure equipment. Typically, you’ll want a solution that is biodegradable and safe for both the machine and the environment. I’ve found that a 5:1 ratio of water to detergent works well for most applications.
Here’s a straightforward method to get your mixture right:

| Ingredient | Amount |
|---|---|
| Water | 5 litres |
| Cleaning Detergent | 1 litre |
Mix these ingredients in a clean bucket. Ensure you stir the solution thoroughly until the detergent is fully dissolved. It’s vital to avoid using any harsh chemicals that could damage internal components or seals.
Once prepared, pour the mixture into the designated detergent tank of your equipment. If your model doesn’t have a tank, you can use a siphon method, ensuring the inlet hose is submerged in the solution. This will allow the equipment to draw the cleaning mixture effectively during operation.
Always check your manufacturer’s guidelines for any specific recommendations on cleaning agents. Some models may require specific types of solutions to maintain warranty coverage and optimal performance.
Attach the Garden Hose to the Pressure Washer
First, ensure you have a garden hose that is compatible with your equipment. Look for a hose that is at least 3/4 inch in diameter to guarantee optimal water flow. Begin by locating the water inlet on your machine, which is typically situated at the rear or side. Clean the area around the inlet to prevent any debris from entering the system.
Next, take one end of the garden hose and securely connect it to the inlet. Make sure it is fastened tightly to avoid leaks. If your model has a quick-connect feature, simply push the hose into the connector until it clicks into place. For threaded connections, turn the hose clockwise until it is snug, but be careful not to overtighten as this can cause damage.
Check for Leaks
After attaching the hose, turn on the water supply. Observe the connection for any leaks. If you notice water seeping from the joint, turn off the water and tighten the connection further. A well-sealed attachment is crucial for effective operation.
Ready for Use
Once you’ve confirmed there are no leaks, your machine is ready for the next steps. With the garden hose securely attached, you can proceed with your maintenance routine without any interruptions. This simple task sets the foundation for the cleaning process, helping to ensure everything runs smoothly.
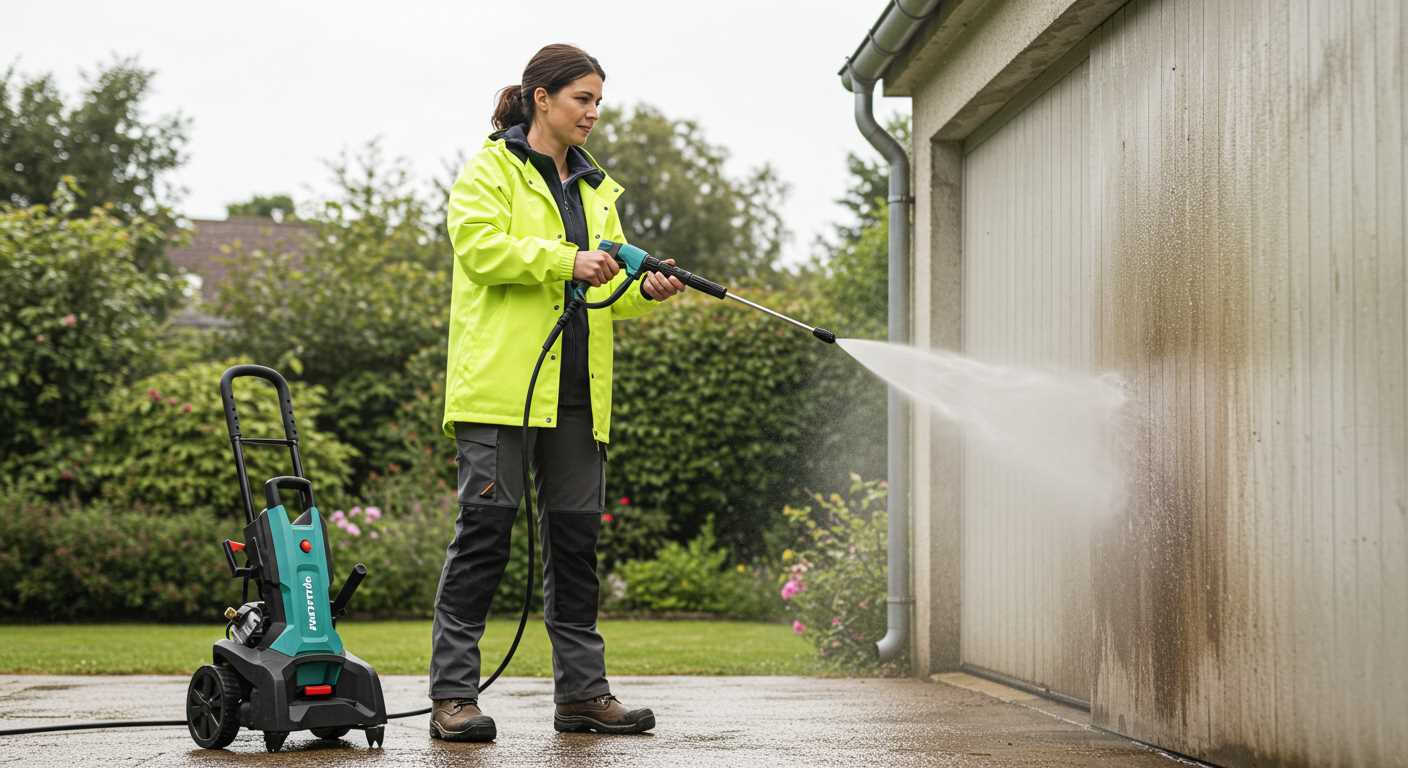
Start the Pressure Washer with Cleaning Solution
Attach the siphon tube to the detergent inlet on the machine. This step is crucial as it allows the cleaning solution to be drawn into the system. Make sure the connection is secure to prevent leaks.
Next, ensure that the cleaning solution is properly mixed and ready to use. Pour it into a suitable container, ensuring it is diluted according to the manufacturer’s instructions. Using a concentrated solution without dilution can lead to damage.
With everything in place, turn on the unit. Set the nozzle to the low-pressure setting to start dispensing the cleaning solution. This setting allows for a gentle application that won’t damage surfaces while still ensuring effective cleaning.
As I recall from my years of experience, it’s always wise to test the solution on a small, inconspicuous area first. This precaution helps you ensure compatibility with the surface you’re cleaning. You don’t want any unpleasant surprises, especially on delicate materials.
While applying the solution, maintain a consistent distance from the surface. Typically, a distance of around 30 cm works well. This helps to evenly distribute the cleaner without causing any harm.
Let the cleaning solution sit for the recommended time. This dwell time is critical for breaking down stubborn grime and dirt. I’ve often observed that patience here pays off significantly.
Once the solution has had time to work, you can switch to a higher pressure setting to rinse away the cleaner along with the loosened dirt. This two-step process–application and rinse–will yield the best results for your cleaning tasks.
Run the Pressure Washer for Recommended Time
Let the machine operate with the cleaning mixture for approximately 10 to 15 minutes. This duration allows the solution to circulate through the internal components effectively, ensuring that any build-up or residue is adequately addressed. I’ve often seen users cut this time short, thinking they could save effort. However, rushing can lead to incomplete cleaning, causing issues later on.
Monitor Performance
While the unit is in operation, pay attention to how it sounds and performs. If you notice any unusual noises or irregular spray patterns, it may indicate that the cleaning solution isn’t circulating properly. In my experience, a well-maintained device should run smoothly without any hitches. If problems arise, consider checking the connections or the solution mixture.
Prepare for Rinsing
After the designated time, switch to a clean water rinse. This step is crucial to eliminate any remaining cleaning agent from the system. Make sure to attach a suitable pressure washer spray gun for this phase, as it can ensure a thorough rinse. Keeping the equipment in top condition will extend its lifespan and enhance its performance.
Flush with Clean Water Afterwards
After using a cleaning solution, it’s critical to ensure that no residue remains in the system. This step is vital for maintaining the longevity of your equipment. Begin by attaching a garden hose to the inlet of the unit. Make sure it’s securely fastened to prevent any leaks.
Run Only Clean Water
Turn on the water supply and start the machine. Allow it to operate for a few minutes with just clean water. This action will help clear out any remnants of the cleaning agent that may linger in the lines and pump. Pay attention to the water that discharges from the nozzle; it should run clear. If you still see any discolouration, continue the process until the water is completely clean.
Check the Filter
Once you’re satisfied that the system is purged of any cleaning solution, turn off the machine and disconnect the garden hose. It’s wise to inspect the filter at this stage. Remove any debris or buildup that could hinder performance during future use. A clean filter is paramount for optimal operation.
This final step not only ensures your equipment remains in top shape but also prepares it for your next cleaning task without the risk of contaminating surfaces with leftover chemicals. Remember, attention to detail here saves you time and money in the long run.
Inspect and Clean Filters and Nozzles
Begin with the filters and nozzles; these components are critical for optimal operation. Remove the filter from the water inlet and examine it for debris and buildup. A clogged filter restricts water flow, leading to performance issues. Clean it thoroughly under running water or replace it if it appears damaged.
Next, check the nozzles. Unscrew them from the spray wand and inspect for blockages. Use a small pin or a brush to clear any obstructions. Sometimes, mineral deposits can form, especially if hard water is used. In such cases, soaking the nozzles in a vinegar solution can help dissolve these minerals.
Reassemble everything carefully, ensuring that all connections are tight and secure. A loose nozzle can create leaks or inconsistent spray patterns. Regular maintenance of these parts not only extends the life of your equipment but also enhances cleaning efficiency.

.jpg)


