


First step: always check the power source. Ensure the outlet is functioning correctly. I recall a case where the issue was as simple as a blown fuse. Plugging into a different socket can save you a lot of time and frustration. If the unit still doesn’t respond, inspect the power cord for any visible damage.
Next, examine the water supply. A blocked inlet can cause significant performance issues. I had a client who was convinced their device was malfunctioning, only to discover that a small piece of debris was obstructing the water flow. Detaching the hose and cleaning both the inlet filter and the hose itself can resolve many problems. Regular maintenance of these components can prevent future headaches.
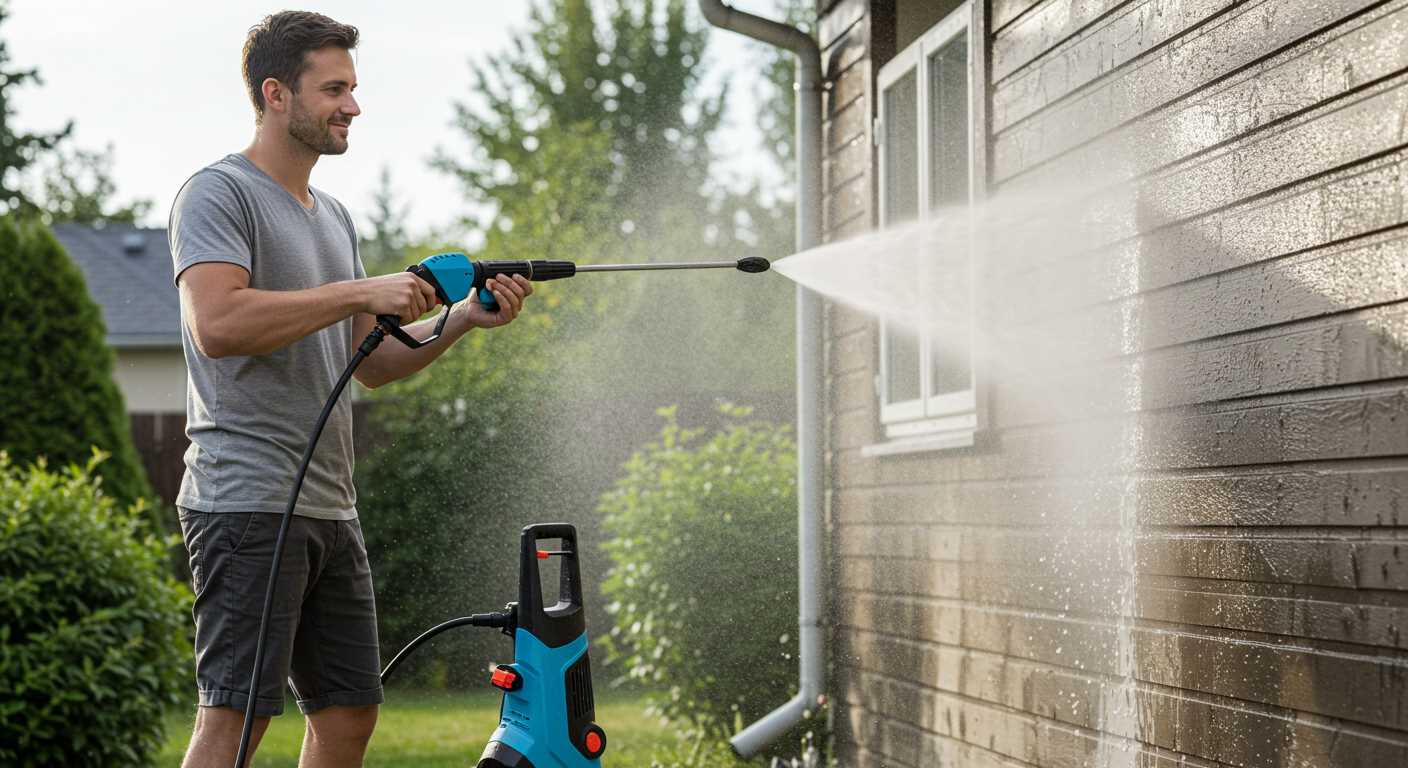
If you’re experiencing low pressure, check the nozzle. Over time, nozzles can become clogged or worn out. I once had a unit that seemed to be working fine until I replaced the nozzle; the difference was remarkable. A quick clean or a replacement can make all the difference in the world.
Finally, listen for unusual sounds. If the motor is making odd noises, it could indicate a more serious internal issue. I’ve seen motors that needed a simple bearing replacement to run smoothly again. If you’re not comfortable with disassembly, seeking professional help can be wise.
Repair Techniques for Your Equipment
Start by checking the power supply. Ensure the outlet is functional and the extension cord, if used, is not damaged. A simple test with a multimeter can save time. If the motor does not start, inspect the switch and thermal reset button for faults. These are often overlooked but can cause significant issues.
Water Flow Issues
Low water flow can stem from a blocked inlet filter. Remove the filter and clean it thoroughly or replace it if necessary. Inspect hoses for kinks or leaks that might impede water movement. If the spray wand produces a weak stream, consider replacing the nozzle. A clogged nozzle can severely reduce performance, and a new one may restore proper function.
Motor Performance Problems
For motor-related challenges, listen for unusual noises. A grinding sound can indicate worn bearings. In such cases, disassemble the motor and examine the bearings for wear or damage. If they look worn, replace them to restore smooth operation. Regular maintenance, including lubricating moving parts, can prevent future issues.

Lastly, always refer to the user manual for specific troubleshooting tips tailored to your model. Each unit has unique characteristics that can guide you in resolving common problems efficiently.
Identifying Common Issues with Black and Decker Pressure Washers
One of the most frequent problems encountered is inconsistent water flow. If you notice that the stream is either weak or intermittent, check the following:
- Inspect for clogs in the nozzle or hose.
- Ensure the water supply is adequate and the inlet filter is clean.
- Verify that the connections are tight and leak-free.
Another common issue is the motor failing to start. This often stems from:
- Checking the power cord for damage or loose connections.
- Ensuring the outlet is functional by testing it with another device.
- Looking for any tripped circuit breakers in the electrical supply.
Leaks can also pose a significant challenge. They typically occur at connection points or the pump. To address this problem:
- Examine all fittings and seals for wear and tear.
- Tighten any loose connections carefully.
- Replace damaged O-rings or seals with compatible parts.
In cases where the unit is producing excessive noise, it may indicate:
- A malfunctioning pump or motor bearing.
- Debris lodged in the impeller.
- Improper lubrication in the motor housing.
For those looking for efficient ways to maintain a clean work environment while tackling these issues, consider using the best air scrubber for rent. It can significantly aid in managing dust and debris.
Gathering Necessary Tools for Repair
Before tackling any issues with your cleaning device, ensure you have the right tools at hand. This not only streamlines the process but also minimises frustration. Here’s a list to help you prepare:
- Socket set: A good quality socket set will allow you to access various bolts and screws. Make sure it includes both metric and imperial sizes.
- Screwdrivers: Have both flathead and Phillips screwdrivers in different sizes. Some components may require specific sizes for a snug fit.
- Pliers: Needle-nose and regular pliers are handy for gripping small parts and twisting wires.
- Wrench set: An adjustable wrench can help with larger fittings that don’t fit standard sockets.
- Multimeter: This tool is invaluable for diagnosing electrical issues, helping you check continuity and voltage.
- Replacement parts: Stock up on common components like seals, nozzles, and hoses. Having these on hand can save time during repairs.
- Cleaning solution: A degreaser or cleaning agent will assist in keeping parts clean and functional.
- Work gloves: Protect your hands from sharp edges and grime while working.
- Protective eyewear: Safety first! This will shield your eyes from debris during disassembly.
In my experience, I once started a project without a multimeter, thinking it wouldn’t be necessary. After several hours of trial and error, I realised that a simple voltage check could have pointed me directly to the issue. Don’t make the same mistake; gather all necessary tools before diving into the task.
Having everything ready creates a smoother workflow, allowing you to focus on fixing rather than searching for tools. Trust me, being prepared pays off in the long run.
Fixing a Pressure Washer That Won’t Start
If your cleaning machine refuses to come to life, first check the power source. Ensure the outlet is functioning by plugging in another device. If that works, inspect the power cord for any damage. A frayed or broken cord could be the culprit.
Next, examine the on/off switch. Sometimes, a faulty switch can prevent the machine from turning on. If it feels loose or unresponsive, it may need replacement. Additionally, look for any blown fuses or tripped breakers in your electrical panel.
Fuel or oil levels play a significant role too. If your model uses fuel, confirm that the tank is filled and the fuel is fresh. Stale fuel can clog the system. For electric units, ensure that the water supply is adequate; without sufficient water, the motor may not engage.
Another common issue is a blocked inlet filter. Remove it and clean any debris. This simple task can often resolve starting issues. Additionally, inspect the spray gun for clogs; if the nozzle is blocked, it can prevent the unit from functioning properly.
If you’ve checked all these areas and the machine still refuses to start, it might be time to take a closer look inside. Here’s a quick reference table for troubleshooting:
| Problem | Possible Cause | Solution |
|---|---|---|
| No power | Faulty outlet or damaged cord | Test outlet; inspect and replace cord |
| Machine won’t engage | Faulty switch or blown fuse | Replace switch; check fuses |
| Stale fuel | Old or contaminated fuel | Drain and refill with fresh fuel |
| Inadequate water flow | Blocked inlet filter or hose | Clean or replace filter; check hose |
| Clogged nozzle | Debris accumulation | Clean spray gun and nozzle |
Persistence is key. Keep investigating until you pinpoint the issue, and don’t hesitate to consult the user manual for guidance tailored to your specific model. Each machine has its quirks, and sometimes a small adjustment can make all the difference.
Repairing Leaks in the Hose or Connections
First, check the connections. Loose fittings often lead to leaks. Ensure all couplings are tightened properly. Use a wrench if necessary, but avoid overtightening, which can cause damage.
If the hose itself is leaking, look for cracks or worn areas. A simple patch might work for small holes. For larger damage, consider replacing the hose entirely. When replacing, select a hose designed for high-pressure use to ensure safety and longevity.
In my experience, I’ve found that using hose clamps can be an effective temporary solution. Just make sure they are positioned correctly and tightened evenly to prevent further leaks.
| Type of Leak | Recommended Action |
|---|---|
| Loose Connection | Tighten with a wrench |
| Small Crack | Use a patch kit |
| Large Hole | Replace the hose |
| Worn Fitting | Replace the fitting |
After any adjustments, run the machine for a few minutes to test for leaks. If water still escapes, reassess your work. I’ve encountered situations where a simple oversight has led to continued issues, so thoroughness is key.
Keep in mind that regular maintenance of hoses and connections can prevent leaks in the first place. Inspect your equipment frequently to catch any wear before it becomes a problem. In my experience, it’s always better to be proactive than reactive.
Addressing Problems with the Spray Gun and Nozzle
Begin by inspecting the spray gun for any blockages or damage. A common culprit is debris lodged inside the nozzle, which can restrict water flow. Remove the nozzle and check for clogs. Use a small, soft brush or a toothpick to clear any obstructions carefully. If the nozzle is severely damaged or worn, consider replacing it to restore optimal performance.
Checking the Trigger and Hose Connections
The trigger mechanism can sometimes become stuck due to dirt or wear. Examine the trigger for smooth operation; if it feels stiff, clean around the pivot points. Lubricate with a silicone-based spray for improved movement. Ensure that all hose connections are secure. Loose connections can lead to leaks or reduced pressure, affecting the overall functionality of your equipment.
Adjusting the Pressure
Incorrect pressure settings can lead to unsatisfactory results. If the spray pattern appears weak or inconsistent, adjust the pressure according to the task at hand. For tough stains, increase the pressure, while delicate surfaces may require a gentler setting. Regularly test the different modes to familiarise yourself with their effectiveness for various cleaning scenarios.
Troubleshooting Electrical Issues in Pressure Washers
First, check the power source. Ensure the outlet is functioning by testing it with another device. If the outlet works, inspect the power cord for any visible damage. A frayed or cut cord can lead to failure in operation.
If the cord appears intact, examine the plug. Sometimes, the prongs can become bent or dirty. Clean them if necessary, and straighten any bent prongs to ensure a solid connection.
Examining Internal Components
Open the casing to access the internal components. Look for any loose or disconnected wires, as they can prevent the unit from powering up. Tighten any loose connections and replace any corroded terminals. Pay attention to the thermal switch, which may trip during overheating. If it has tripped, allow the unit to cool down before resetting it.
Testing the Motor and Circuitry
Next, use a multimeter to test the motor. Check for continuity; if there’s no continuity, the motor may need replacement. Additionally, inspect the circuit board for burnt components. If you find damaged parts, replacing the circuit board may be necessary to restore functionality.
Replacing the Pump: Step-by-Step Guide
First, disconnect the power source and turn off the water supply. This is crucial for safety. Then, remove the cover of the unit by unscrewing the screws that hold it in place. Keep track of these screws; they can be easy to misplace.
Next, locate the pump assembly. It’s usually situated towards the front of the machine. Carefully detach any hoses connected to the pump. Take your time; some hoses might be tightly secured. Use pliers if necessary to loosen clamps.
Once the hoses are removed, you will find bolts securing the pump to the chassis. Use a socket wrench to unscrew these bolts. Be aware of the orientation of the pump; taking a photo can help with reassembly. Lift the old pump out and set it aside.
Now, take the new pump and position it where the old one was mounted. Align it with the bolt holes and secure it using the bolts you removed earlier. Don’t overtighten, as this might damage the pump casing.
Reattach the hoses to the new pump, ensuring they fit snugly. Check the connections for any signs of wear or damage before securing them. A good seal is necessary to prevent leaks.
After all connections are made, replace the cover of the unit and secure it with the screws. Reconnect the water supply and plug the unit back in.
Before testing, double-check all connections and ensure everything is tight. Turn on the water supply, and then power up the machine. Watch for leaks around the new pump; if everything is sealed correctly, you should be good to go.
In my experience, replacing the pump can breathe new life into the equipment. I’ve seen units that were deemed irreparable come back to life, saving both time and money. Just take your time and follow each step carefully, and you’ll find success.
Cleaning and Maintaining the Filter System
Regular cleaning of the filter is crucial for optimal performance. A clogged filter restricts water flow, leading to reduced efficiency. Here’s how to keep it in top shape.
Steps to Clean the Filter
- Turn off the machine and disconnect the power supply.
- Locate the filter, usually found where the water intake connects.
- Carefully remove the filter. It may require gentle twisting or pulling.
- Rinse the filter under running water to eliminate dirt and debris.
- If necessary, use a soft brush to scrub away stubborn residue.
- Let the filter dry completely before reinstalling it.
Maintaining the Filter
In addition to regular cleaning, consider these maintenance tips:
- Inspect the filter for signs of wear or damage. Replace if needed.
- Check the water source for contaminants that could clog the filter.
- Consider installing an external filter if your supply water is particularly dirty.
By keeping the filter clean, you enhance the longevity and performance of your equipment. For those interested in various types of cleaning devices, check out domestic pressure washers for more options.
Testing the Pressure Output After Repair
After completing the necessary fixes, it’s crucial to evaluate the output to ensure everything functions as intended. Begin by connecting the unit to a water source and powering it on. Stand clear of the nozzle to avoid any accidents. Engage the trigger to release any air trapped in the system; this helps in achieving accurate readings.
Checking the Pressure Gauge
If your model includes a pressure gauge, observe the readings while activating the spray. Ideally, the output should meet the specifications outlined in the user manual. If the gauge indicates lower than expected levels, inspect all connections and ensure no leaks are present. A loose connection or damaged hose can significantly reduce performance.
Testing Different Nozzles
Use various nozzles to assess the pressure variability. Each nozzle is designed for specific tasks and can influence the force of the water stream. For instance, a narrow nozzle typically produces higher pressure and should deliver a strong, concentrated jet. If you notice a weak stream across all attachments, there may be an internal blockage or pump issue requiring further attention.


.jpg)


