


To achieve optimal cleaning results, selecting the right detergent is paramount. For my own projects, I found that using a specially formulated cleaner compatible with your device maximises efficiency and prevents damage. Always ensure that the product you choose is suitable for the surfaces you intend to treat. I’ve seen firsthand how a mismatch can lead to frustrating outcomes and additional costs.
When mixing the solution, follow the manufacturer’s guidelines meticulously. I typically aim for a balance that provides a robust cleaning action without risking the integrity of the equipment. It’s not uncommon for users to overlook the dilution ratios, leading to subpar results or even equipment malfunction. Trust me, an even mix can make a world of difference.

After preparing your cleaner, the next step involves proper application. I recommend using a dedicated attachment for foam generation. This not only enhances coverage but also allows for a more thorough clean. From my experience, starting from the bottom and working your way up ensures that debris is effectively lifted away rather than smeared across surfaces.
Finally, rinse thoroughly to remove any residue. This step is crucial; leaving detergent on surfaces can lead to streaks or even damage over time. I’ve learned the hard way that a good rinse is as important as the initial application. By following these steps, you’ll maximise the cleaning power of your machine and ensure impressive results every time.
Method for Releasing Detergent from a Cleaning Unit
To efficiently release cleaning agents from your unit, ensure the correct nozzle is attached. I’ve found that using a wide-angle nozzle is most effective for this process. Engage the machine and allow it to run for a few minutes. This primes the system and prepares it for the next step.
Adjusting Settings
Next, adjust the detergent setting on the unit. Many models have a dial or switch specifically for this purpose. Set it to the maximum level to ensure optimal flow. If you’re uncertain about the dial, consult the manual for specific instructions on your model.
Check the Hose Connection
Inspect the hose connection for any kinks or blockages. I once faced a frustrating situation where reduced flow was due to a simple bend in the hose. Straightening it out resolved the issue immediately. After confirming the hose is clear, activate the trigger on the lance and observe the mixture being drawn into the system. You should see the detergent mixing with the water stream.
If the mixture isn’t flowing properly, consider checking the detergent container for clogs. Sometimes, residues can build up, obstructing the flow. Clean the container and ensure it’s securely attached. In cases where the unit has a filter, ensure it’s clean as well, as a dirty filter can significantly impair performance.
Finally, once you’ve completed your cleaning task, run the machine without the agent for a few moments. This clears any residual cleaning solution from the system, preventing future clogs.
Understanding the Soap Application Process
Begin by ensuring the right type of cleaning agent is selected for your task. A compatible solution will enhance the cleaning process and prevent any damage to the equipment.
Preparation Steps
- Check the tank: Ensure it’s clean and free from any residue from previous solutions.
- Dilution: Follow the manufacturer’s instructions for diluting the cleaning agent if needed.
- Fill the tank: Pour the prepped solution into the designated compartment of the unit.
Application Techniques
- Adjust the nozzle: Select the appropriate nozzle for the job. A wider spray pattern is often ideal for spreading the solution evenly.
- Spray technique: Start from the bottom and work your way up. This prevents streaking and ensures thorough coverage.
- Let it dwell: Allow the cleaning agent to sit for a few minutes to break down grime before rinsing.
After applying the mixture, be sure to switch to a high-pressure setting for rinsing. This helps remove any residual cleaner effectively, leaving surfaces spotless.
Choosing the Right Type of Detergent for Your Equipment
For optimal cleaning, selecting the right detergent is paramount. Not all cleaning agents are created equal, and using the correct one can significantly enhance your results. Always look for products specifically designed for your machine type, as compatibility is key to achieving the best performance.
Types of Cleaning Agents
There are several categories of cleaning products tailored for various surfaces and tasks. Here’s a quick comparison:
| Type | Best For | Notes |
|---|---|---|
| Alkaline Cleaners | Grease and Oil | Effective on heavy-duty stains but may damage softer surfaces. |
| Acidic Cleaners | Mineral Deposits | Great for removing limescale and rust; use on hard surfaces only. |
| Neutral Cleaners | General Cleaning | Safe for most surfaces; versatile option for everyday use. |
| Specialty Cleaners | Specific Tasks (e.g., brick cleaning) | Designed for particular surfaces like brick cleaner for pressure washer, ensuring safe and effective results. |
Concentration Matters
Pay attention to the concentration of the cleaning agent. A highly concentrated detergent might seem economical, but it requires dilution, which can be tricky if not followed correctly. Always read the manufacturer’s instructions for the proper mixing ratios to avoid damaging your equipment or the surfaces you’re cleaning.
Finally, personal experience has taught me that testing a small area before full application helps ensure that the chosen detergent is safe and effective for your specific cleaning task. Each surface reacts differently, so a little precaution goes a long way.
Preparing Your Equipment for Detergent Application
First, ensure the machine is turned off and unplugged. Safety is paramount. Disconnect any existing accessories, including the nozzle and hose, to simplify the setup.
Check the Detergent System
Inspect the detergent tank for any residue from previous use. Clean it thoroughly with water to prevent any interaction between different cleaning agents. If your model has a pre-mixed solution, ensure it’s the right blend for your tasks.
- Empty the tank completely.
- Rinse it with clean water.
- Dry it to avoid dilution of the new solution.
Connect Hoses and Nozzles Properly
Once the tank is ready, attach the appropriate detergent hose. Make sure it’s securely fastened to avoid leaks during application. Select a low-pressure nozzle; this is critical as it allows for even distribution without damaging surfaces.
- Attach the detergent hose to the tank.
- Connect the low-pressure nozzle at the end of the lance.
- Reattach the high-pressure hose securely.
After setting everything up, plug the unit back in and perform a quick test to ensure that the system is operating correctly. Check for any leaks or unusual sounds, which could indicate a problem with the setup.
Once you’ve confirmed that everything is in order, you’re ready to move on to applying your chosen cleaning solution. A well-prepared machine ensures a smooth and effective cleaning experience.
Connecting the Soap Bottle to the Pressure Washer
Begin by locating the detergent bottle that comes with your unit. It’s typically a small, transparent container designed to fit snugly into a designated holder on the machine. Ensure the bottle is clean and free from any residue from previous uses.
Next, take the bottle and align it with the connector on the device. Gently push it into place until you hear a click, indicating a secure fit. If your model features a twist-lock mechanism, rotate the bottle clockwise until it locks in securely.
Check the hose attached to the bottle for any kinks or blockages. A clear path is essential for the liquid to flow properly. If you notice any issues, gently straighten the hose or remove any debris.
Once the bottle is connected, ensure the dial or switch for detergent application is set to ‘on’. This step is crucial; otherwise, the mixture won’t be drawn into the system. Adjust the nozzle to a low-pressure setting to facilitate the introduction of the cleaning solution.
After these preparations, do a quick check of the entire setup. Look for leaks around the connection points and ensure everything is secure. This will save you time and frustration while using the equipment.
Finally, before you begin, give the bottle a gentle shake to mix the contents if necessary. This ensures an even distribution of the cleaning agent when it’s dispensed.
Adjusting the Pressure Settings for Soap Dispensing
Set the pressure to low during the application of cleaning solution. This ensures proper coverage and allows the product to adhere effectively to surfaces. I’ve often seen people cranking up the pressure, thinking it would enhance the process, but it often leads to overspray and wastage.
To modify the settings, locate the pressure adjustment knob, usually found on the machine’s handle or control panel. Start at the lowest setting and gradually increase it if necessary. You want to maintain a gentle flow that allows the cleaning agent to be dispensed uniformly.
During my time in the field, I discovered that different surfaces require different approaches. For delicate finishes, such as cars, keeping the pressure low is essential to prevent damage. Conversely, tougher surfaces like concrete can handle higher levels but still benefit from a cautious approach. Always test on a small area first.
Additionally, consider the type of cleaning agent being used. Some formulations work better with specific pressure levels. For example, if you’re using a concentrated formula, a lower pressure might be ideal to allow for better penetration. For recommendations on the best cleaning agents, check out this link: best car wash soap for pressure washer jeep jl.
Maintaining the right pressure not only improves the efficiency of the cleaning process but also extends the life of the machine and the surfaces being cleaned. Adjust accordingly based on your observations and results.
Testing the Soap Dispensing Mechanism
Begin by ensuring the cleaning solution container is securely attached. I’ve often encountered situations where a loose connection leads to inadequate suction, resulting in poor performance. Once confirmed, switch the unit on and select the appropriate nozzle. A wide fan spray is typically best for dispersing the liquid evenly.
Next, observe the flow of the mixture. If you notice inconsistencies, it might be worth checking the filter for clogs. I recall a time when I spent an hour troubleshooting, only to find the filter was obstructed. Cleaning it restored the system’s functionality immediately.
Test the application on a small, inconspicuous area first. This way, you can gauge how effectively the liquid adheres to the surface without risking damage. During one of my demonstrations, I inadvertently applied too much pressure, which led to streaks. Adjusting the pressure settings after that was a lesson learned.
Pay attention to the consistency of the mixture being dispensed. A foamy texture generally indicates proper mixing with water, while a watery stream suggests a need for adjustments. I once experimented with different brands of cleaning solutions and found that some create a richer foam, enhancing the overall cleaning effect.
Finally, assess the area after application. If some spots remain untouched or require additional attention, you may need to modify your technique or switch nozzles. I often find that a more concentrated application yields better results on stubborn stains, which is a trick I picked up from years of experience.
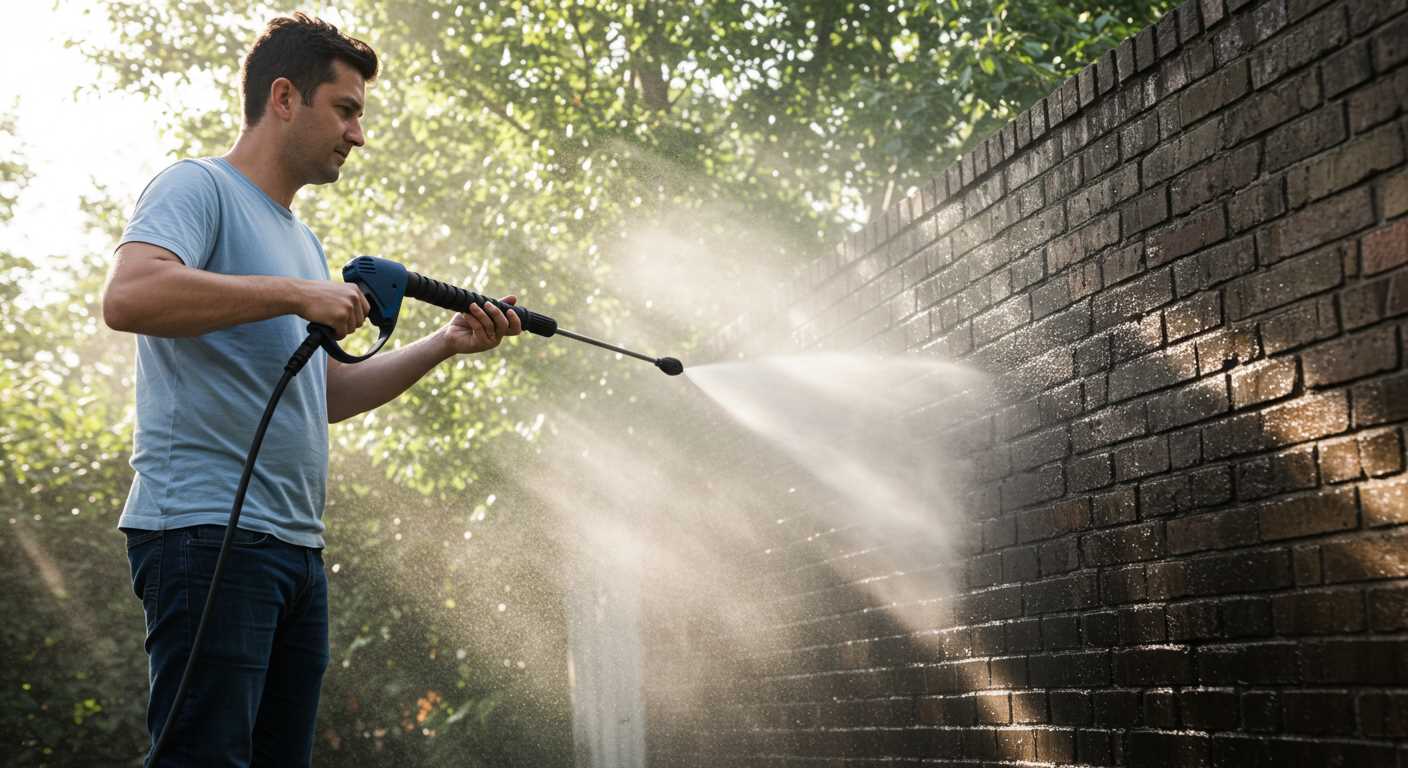
Applying Cleaning Solutions to Different Surfaces Effectively
Start with a test patch on any surface to gauge compatibility with the cleaning formulation. For painted surfaces, maintain a distance of at least 1 metre. This prevents damage and ensures an even application. For concrete or brick, you can safely reduce the distance to about 15-30 cm, allowing for deeper penetration into the pores of the material.
When tackling vehicles, choose a gentle approach. A low-pressure setting works best to avoid scratching the paint. Apply the formula from the bottom to the top, ensuring even coverage while rinsing from the top downwards to prevent streaks. This technique also helps avoid soap residue that can dry on the surface.
For glass surfaces, use a dedicated cleaning solution specifically designed for glass. Apply it with a fan nozzle at a slight angle to reduce drips and ensure a smooth application. After application, immediately rinse with clean water to prevent any streaking or cloudiness.
For outdoor furniture, especially made from wood or composite materials, a soft-bristle brush attachment can enhance the cleaning process. After applying the mixture, scrub gently to remove dirt and grime, then rinse thoroughly. This method avoids deep scratches while ensuring a clean finish.
When cleaning delicate surfaces like awnings or canvas, opt for a diluted solution. Use a wide nozzle and apply from a distance of around 1.5 metres. Rinse promptly to prevent any adverse effects on the fabric. I’ve seen too many instances where improper application led to fading.
For tough surfaces, such as driveways or patios, a more concentrated approach is beneficial. Allow the solution to dwell for 5–10 minutes before rinsing. This dwell time helps break down stubborn stains effectively, making rinsing more efficient.
Lastly, always follow the manufacturer’s instructions on dilution and application to avoid any mishaps. Keeping a log of what works on different surfaces can save time and improve your cleaning routine in the long run. Trust me, the experience gained from trial and error is invaluable for achieving optimal results.
Cleaning Up After Application
Once you’ve completed the application process, it’s crucial to cleanse the unit to prevent any residual product from causing issues down the line. Start by disconnecting the container, ensuring no lingering liquid escapes. I always suggest rinsing it thoroughly with clean water to remove any remnants, as this will help maintain the integrity of the equipment.
Rinsing the System
After detaching the container, connect the water supply and turn on the machine. Instead of using a high-pressure setting, opt for a low flow or rinse mode. This aids in flushing out any leftover solution from the internal components. Allow the water to run through the system for a few minutes. Pay attention to the nozzle and wand; these areas are notorious for trapping unwanted substances.
Cleaning the Accessories
Don’t forget the accessories. Nozzles can clog easily, so a thorough rinse is necessary. I recommend soaking them in warm soapy water if they seem particularly dirty. After soaking, use a soft brush to clear any stubborn residues. It’s a simple step that can significantly extend the life of your tools.
| Step | Action | Tips |
|---|---|---|
| 1 | Disconnect the container | Ensure no spills occur |
| 2 | Connect water supply | Use low flow for rinsing |
| 3 | Run the unit | Flush for several minutes |
| 4 | Clean nozzles and accessories | Soak and brush if necessary |
By taking these steps, you not only ensure your equipment remains in peak condition but also enhance its performance for future tasks. Proper maintenance is key to longevity in this line of work, and I’ve always found that a few minutes spent cleaning saves hours of frustration later on.
Maintaining Your Karcher Pressure Washer Post-Use
Once you’ve finished using your cleaning equipment, proper care is crucial for longevity. Here are the steps I recommend based on my years of experience:
- Rinse the System: After every session, run clean water through the unit for a few minutes. This clears any remaining residue and prevents clogging.
- Disconnect Accessories: Detach all nozzles, hoses, and attachments. Inspect them for any wear or damage before storing.
- Clean Filters: Check and clean the water filter located at the inlet. A clogged filter can lead to reduced performance.
- Drain Water: If you’ve used the machine in colder climates, ensure all water is drained to prevent freezing and cracking.
- Inspect the Pump: Look for any leaks or unusual sounds. If something seems off, it might be worth consulting the manual or a professional.
- Store Properly: Keep the unit in a dry, sheltered location. Avoid direct sunlight and extreme temperatures.
Each of these steps is aimed at ensuring your cleaning unit remains in top condition. I’ve seen too many devices fail prematurely due to neglect, so don’t skip this vital maintenance routine.

.jpg)


