
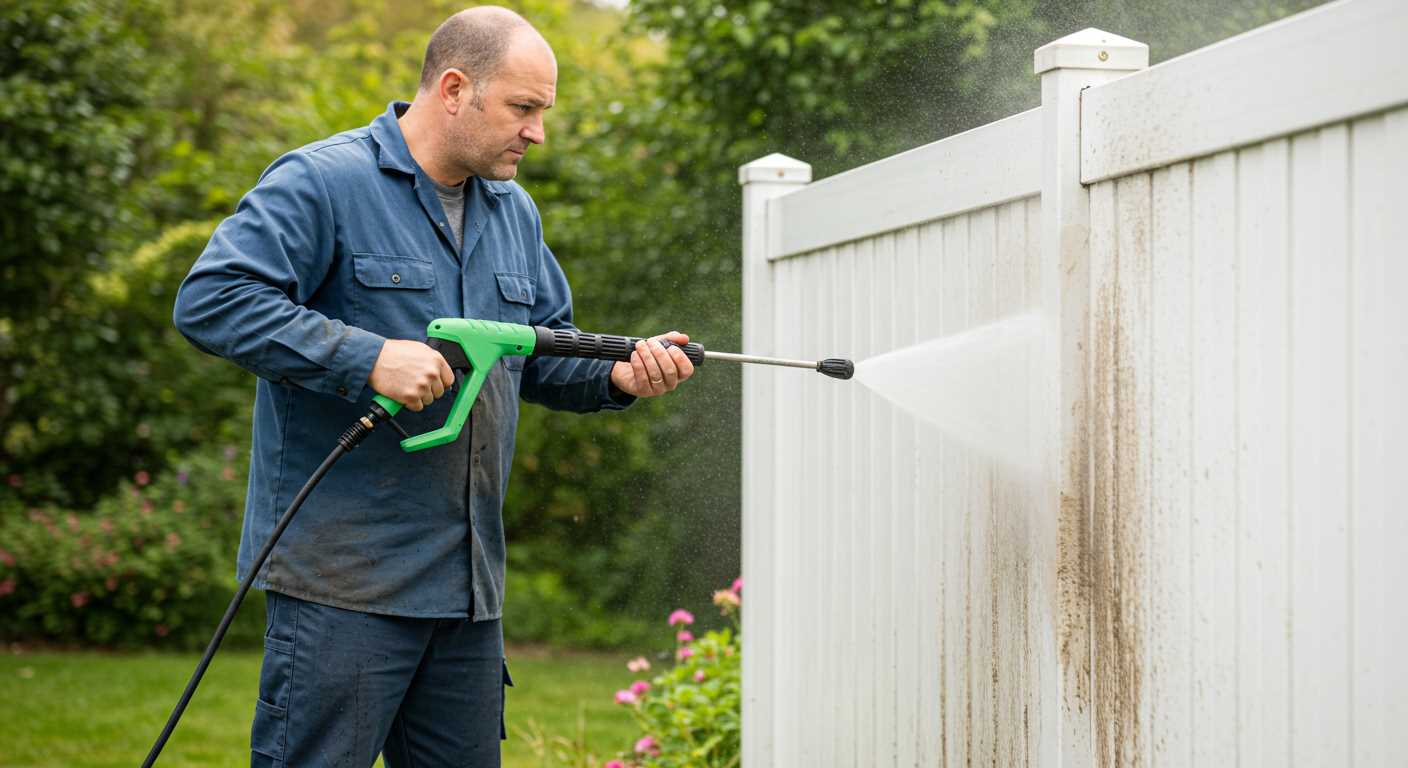


To achieve a flawless finish when applying a new coat to surfaces, begin with a thorough cleaning using a high-pressure cleaning device. This step is non-negotiable; it removes dirt, grease, and old flaking coatings, ensuring the surface is primed for the fresh layer. I remember the first time I tackled an outdoor project–without proper preparation, the paint peeled off within weeks. A reliable cleaning tool transformed my approach.
Adjust the nozzle to a fan spray pattern to cover larger areas efficiently, while the concentrated stream is ideal for stubborn grime. I often start from the top of the surface and work my way down, which prevents streaks and ensures even cleaning. Pay attention to the distance between the nozzle and the surface; too close can cause damage, while too far may not provide adequate cleaning power.
After cleaning, allow the surface to dry completely before proceeding with the application of your chosen coating. I’ve learned from experience that rushing this step can lead to adhesion issues, ruining your hard work. Once everything is prepared, the application process becomes significantly smoother, resulting in a professional finish that lasts.
Selecting the Right Paint for Pressure Washing
Choose a high-quality exterior acrylic latex for the best results. This type of paint adheres well to various surfaces and withstands the forces from cleaning equipment. Opt for a paint designed specifically for outdoor use; it will resist fading and offer protection against harsh weather conditions.
Consider the finish. A satin or semi-gloss finish can provide a more durable surface that is easier to clean. Flat finishes tend to absorb dirt and grime, making maintenance more challenging. If you’re working on surfaces like decks or fences, a paint with a non-slip formula can enhance safety.

Always test a small sample on the surface before committing to a full application. This step allows you to see how the paint reacts with the chosen substrate and whether it meets your aesthetic expectations. Pay attention to drying times as well; some paints may require extended periods before they can handle moisture without compromising the finish.
When shopping, check for products with mildew-resistant properties, especially if the area is prone to dampness. For a durable option, look for paints that include additives to resist mould and fungus.
Finally, if you’re considering a heavy-duty cleaning approach, ensure that the paint you select can endure such treatment without peeling or chipping. Always consult the manufacturer’s guidelines for compatibility with cleaning methods and equipment.
For those interested in enhancing their equipment for specific tasks, consider checking out a pressure washer for snow fosming car forim. This can be particularly useful for maintaining the appearance of vehicles and other delicate surfaces.
Preparing Your Surface for Painting
Begin with a thorough inspection of the area. Look for any signs of damage, such as cracks, peeling, or mould. Address these issues before proceeding. Here’s what I recommend:
- Repair Damages: Fill in cracks and holes with appropriate filler. Allow it to cure completely.
- Remove Old Coatings: If the surface has multiple layers of old finish, consider stripping them down. A clean surface enhances adhesion.
- Scrub Mould and Mildew: Use a solution of water and bleach or a specialised cleaner to eliminate any growth. Rinse thoroughly.
- Clean Thoroughly: Dust, dirt, and grease can prevent the finish from adhering. A good scrub with a stiff brush and a cleaning solution can do wonders.
Once the surface is clean and repairs are made, it’s time to prepare for the next step.
- Rinse: Ensure all cleaning products and loose debris are removed. This is key for a seamless application.
- Drying Time: Allow the surface to dry completely. Moisture can lead to poor adhesion and issues later.
- Sanding: Lightly sand glossy areas to create a texture for better adhesion. Clean off the dust afterwards.
In my experience, taking the time to prepare can save hours of work later. A well-prepped surface leads to a more durable and professional-looking finish.
Choosing the Correct Nozzle for Painting
Select a nozzle that matches the type of coating and surface you are working with. For broad coverage and a smooth finish, a wide fan nozzle (25-40 degrees) is ideal. I remember a time when I attempted to repaint a wooden deck using a narrow nozzle. The result was uneven and splattered, which could have been avoided with a wider option.
For thicker materials, such as exterior latex or oil-based stains, a nozzle with a smaller degree (15-25 degrees) allows for better penetration and adhesion. During a project on my own home, swapping to a 15-degree nozzle made all the difference in how the stain absorbed into the wood, providing a richer colour and longer-lasting protection.
Always check the manufacturer’s recommendations for the nozzle type that pairs with your chosen product. Some paints may require specific nozzles to maintain their integrity and application properties. I recall a job where I ignored this advice, resulting in clogging and improper application. It taught me the value of aligning equipment choices with material specifications.
Lastly, consider the distance from which you will be working. A nozzle that offers adjustable spray patterns can be beneficial for varying distances, allowing for flexibility in your approach. One time, I used a variable nozzle to transition from wider areas to detailed trim work without needing to change the attachment constantly. It saved me time and improved my workflow significantly.
Adjusting Pressure Settings for Optimal Application
Setting the right pressure is critical for achieving a smooth finish without damaging the surface. I recommend starting with a lower setting, around 1500 PSI, especially for delicate surfaces like wood or previously painted areas. This allows you to test the application without risking any harm. If the paint isn’t adhering properly, you can gradually increase the pressure.
Finding the Sweet Spot
In my experience, the ideal pressure often lies between 2000 to 2500 PSI for most exterior surfaces such as concrete or metal. I recall a time when I worked on an old fence; starting too high caused the wood to splinter. Lowering the pressure made all the difference, allowing for a smooth, even coat. Adjustments can be made as you go, ensuring the paint applies evenly without stripping away the material underneath.
Testing and Tweaking
Always test on a small, inconspicuous area first. This not only helps you gauge the effectiveness of the pressure setting but also allows you to assess the paint’s behaviour. If you notice the paint running or pooling, reduce the pressure slightly. A consistent distance of around 12 to 18 inches from the surface usually yields the best results, but keep an eye on how the paint reacts.
Lastly, don’t forget to clean the nozzle frequently to prevent clogs, which can lead to inconsistent application. A well-maintained setup ensures a smooth flow and even coverage, making your painting project successful and hassle-free.
Techniques for Even Paint Distribution
For a flawless finish, maintaining a consistent technique during application is crucial. Here are specific strategies to achieve uniform coverage:
- Maintain a Steady Distance: Keep the nozzle approximately 12 to 18 inches away from the surface. This distance helps prevent uneven spots and drips.
- Use Overlapping Strokes: As you spray, ensure each pass overlaps the previous one by about 50%. This technique guarantees that no area is missed and promotes uniform thickness.
- Work in Sections: Divide the area into manageable sections. Focus on one section at a time, allowing for a consistent application without the risk of the paint drying unevenly.
- Adjust Speed: Move the sprayer at a steady, moderate pace. Rushing can lead to uneven application while moving too slowly may cause drips or runs.
- Watch the Angle: Tilt the nozzle slightly to control the spray pattern. This adjustment helps in reaching edges and corners without overspraying.
- Test Before Full Application: Always perform a test spray on a scrap piece of material or an inconspicuous area. This practice helps you gauge the flow and adjust your technique accordingly.
In my experience, one of the most overlooked aspects is the importance of consistency in technique. During a project for a client’s deck, I noticed that my colleague was varying the distance too much, leading to patchy results. By maintaining a steady hand and distance, I achieved a more uniform finish, which impressed the homeowner.
Remember to keep your equipment in optimal condition. A clogged nozzle can disrupt the flow and lead to an uneven application. Regular cleaning and maintenance of your tools will contribute significantly to achieving the desired results.
For those curious about unusual topics, check out this interesting piece on how can dogs sense an electric fence.

Cleaning and Maintaining Your Pressure Cleaner After Use
After completing a painting project, the first step is to clear any residual materials from the equipment. Begin by running clean water through the system for a few minutes. This removes any leftover paint or cleaning solution from the lines and prevents clogs in the nozzle. I’ve found that even a small amount of dried paint can cause significant issues later on.
Disassembling Components

Next, detach the nozzle and other accessories. Soak them in warm, soapy water to dissolve any stubborn paint. A soft brush can be handy for scrubbing away any residue. I once neglected this step, and it resulted in a clogged nozzle that took hours to fix. Always inspect the filter and clean it thoroughly to ensure optimal performance for future tasks.
Storing the Equipment Properly
Once everything is clean, it’s time to store the unit. Keep it in a dry location to avoid rust. If possible, winterize the equipment if you live in a colder climate; this involves adding a stabiliser to the fuel and running it through the engine. I learned this the hard way when I found my machine damaged after a harsh winter.
| Task | Frequency |
|---|---|
| Flush the system with water | After each use |
| Clean the nozzle and accessories | After each use |
| Check and clean the filter | Monthly |
| Inspect hoses for wear | Monthly |
| Winterize if necessary | Before winter |
By following these steps, you’ll prolong the lifespan of your equipment and ensure it’s ready for the next project. Trust me; a little maintenance goes a long way in keeping your tools in top shape.
.jpg)
.jpg)
.jpg)


