
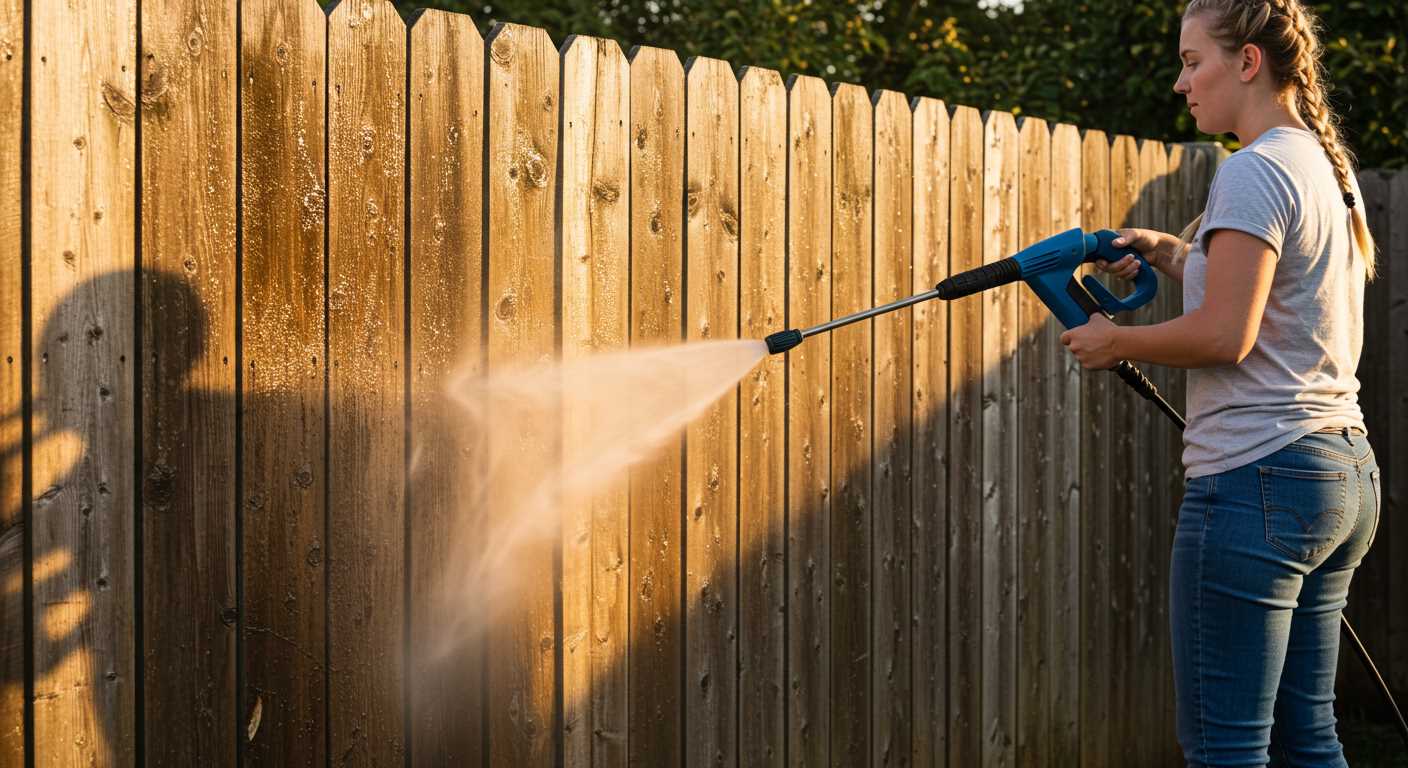


For optimal results, always begin with the right nozzle attachment. I’ve found that the 25-degree nozzle is perfect for most outdoor surfaces, striking a balance between power and coverage. It’s my go-to for cleaning patios and driveways, as it effectively removes dirt without damaging the surface. The 0-degree nozzle can be tempting for tough stains, but caution is key; it delivers a concentrated stream that can easily strip paint or etch concrete.
Before you switch on the machine, ensure that the area is free from obstacles and that you have a steady water supply. I remember a time when I neglected to check the hose connection, leading to frustrating downtime while I fixed leaks. Always inspect the hoses and connections beforehand to prevent interruptions. Also, consider using a detergent specifically designed for heavy-duty cleaning tasks; it can significantly enhance your results, especially on greasy surfaces.
Adjusting the pressure settings to suit the task at hand can make a world of difference. For delicate surfaces such as wood or painted fences, dialling down the pressure prevents damage and ensures a thorough clean. During a recent project, I had to restore an old wooden deck; using lower pressure allowed me to safely remove years of grime without harming the wood’s integrity.
Finally, don’t forget about safety. Protective eyewear and gloves are non-negotiable. I learned this lesson the hard way after a stray pebble ricocheted off a surface and hit my glasses. Always maintain a safe distance from the cleaning area and be aware of your surroundings. Taking these precautions not only protects you but also ensures a smooth and enjoyable cleaning experience.
Using Your Bosch Cleaning Device
First, ensure the equipment is positioned on a flat surface. This prevents unwanted movement during operation. I recall a time when I set mine on uneven ground, resulting in a messy situation. Connect the water supply securely to the inlet, avoiding leaks that could disrupt the cleaning process.

Next, select the appropriate nozzle for your task. The fan spray is perfect for large surfaces, while a narrow jet works wonders on stubborn stains. I remember tackling a particularly grimy patio; switching to the narrow setting made all the difference. Adjusting the pressure is also key. High pressure is great for tough jobs, but I often dial it down for more delicate surfaces to prevent damage.
Once everything is connected, turn on the water flow before powering on the unit. This ensures the pump is properly primed. I’ve made the mistake of switching on the device without water, which led to unnecessary wear and tear. When you’re ready to start, hold the trigger firmly and maintain a safe distance from the surface to avoid any mishaps.
After completing the task, detach the accessories and run the device briefly with clean water to flush out any detergent residue. This simple step prolongs the lifespan of the machine. I’ve seen units fail prematurely due to neglecting this maintenance. Always store it in a dry area, protecting it from the elements.
Regularly inspect the hoses and connections for any signs of wear. I once overlooked a small crack in the hose, which eventually led to a frustrating leak during a big job. Keeping your equipment in top shape ensures it performs reliably whenever you need it.
Choosing the Right Bosch Pressure Washer Model
To select the most suitable model, consider your cleaning needs and frequency of use. In my experience, understanding the type of tasks you plan to tackle makes a significant difference in your choice.
Assessing Your Requirements
- Light-Duty Tasks: For occasional cleaning of patios, garden furniture, or bicycles, a compact model with a lower bar pressure (around 100-120 bar) suffices.
- Medium-Duty Tasks: If you’re tackling tasks like cleaning vehicles or small driveways, aim for models with a pressure range of 120-140 bar. These units strike a balance between power and portability.
- Heavy-Duty Tasks: For larger areas, stubborn stains, or commercial use, opt for high-performance models exceeding 140 bar. These often include features like adjustable pressure settings and larger water flow rates.
Additional Features to Consider
- Portability: Look for wheels and a lightweight design if you need to move it around frequently.
- Accessories: Check for included attachments like different nozzles, foam sprayers, and surface cleaners, which enhance versatility.
- Storage: Models with onboard storage for hoses and accessories save time and space.
Over the years, I’ve noticed that investing in a slightly more advanced model often pays off. The extra features can significantly simplify your cleaning tasks, making them more efficient and enjoyable. Choose wisely based on your specific needs, and you’ll find the right match that will serve you well for years to come.
Understanding the Pressure Washer Components
Familiarity with the different parts of a cleaning machine can significantly enhance your experience and outcomes. Here’s a breakdown of the key components and what they do:
- Motor or Engine: This is the powerhouse. An electric model typically features a high-performance motor, whereas gas units come with a robust engine. The wattage or horsepower rating will determine the overall strength.
- Pump: The heart of the device, converting the motor’s energy into water pressure. Look for models with a brass pump head for durability. A triplex pump, while pricier, offers longevity and reduced maintenance.
- Water Inlet: This is where the water source connects. Ensure a secure fit to prevent leaks. A filter is often located here to catch debris, which keeps the internals clean.
- High-Pressure Hose: Made from durable materials, this component withstands the intense pressures generated during operation. Pay attention to the length; a longer hose provides greater reach but may reduce pressure slightly.
- Gun and Nozzle: The gun controls the flow of water and pressure. Different nozzles create various spray patterns: wide for rinsing and narrow for stubborn stains. Always match the nozzle to your task for optimal results.
- Soap Injection System: Some models include an integrated system for applying detergent. This feature is handy for tackling grime but check compatibility with the cleaning solution to avoid damage.
- Wheels and Frame: A sturdy frame and quality wheels ensure mobility. Larger wheels can handle uneven terrain better, making movement easier.
- Accessories: Various attachments, such as surface cleaners or extension wands, enhance versatility. Investing in the right tools allows for more efficient cleaning.
Understanding these components will not only help in choosing the right model but also in troubleshooting any issues that may arise during operation.
Preparing the Area for Pressure Washing
Before starting the cleaning task, clearing the area is crucial. Move any furniture, plants, or decorative items away from the surfaces you’ll be working on. I once forgot to clear a small garden statue, and the force of the water knocked it over, resulting in a costly repair. You don’t want to repeat that mistake.
Next, cover any electrical outlets, light fixtures, and nearby windows with plastic sheeting or waterproof tape. During one of my early jobs, I neglected to secure a window, and the water seeped inside, causing a headache for both me and the homeowner. A little preparation goes a long way.
Check for any loose debris, such as leaves or dirt, on the surface being cleaned. Removing these not only ensures a more thorough clean but also prevents clogging the nozzle. I recall a scenario where I had to stop mid-task to clear the nozzle because I hadn’t done a proper sweep beforehand. It wasted time and interrupted the flow of work.
Inspect the surface for any damage or areas that may require special attention. For example, older wooden decks might need a gentler approach. I once encountered a deck with hidden rot, and the high-pressure stream exacerbated the problem, leading to more extensive repairs. Always assess the condition to avoid surprises.
Lastly, ensure the area has proper drainage. If the surface is sloped, water will flow away naturally. However, if it’s flat, consider using a squeegee or wet vacuum to manage excess water after cleaning. This not only speeds up the drying process but also helps maintain a clean work area.
Connecting the Pressure Cleaner to Water Supply
Always ensure that the water source is compatible with the equipment. A standard garden hose will usually suffice, but check the specifications to avoid any mishaps. Before connecting, inspect the hose for any leaks or damage; a faulty hose can compromise the entire cleaning process.
Steps to Connect
Begin by attaching the hose to your water supply. Make sure it is securely fastened to prevent any leaks. If your water source is a tap, use a hose connector for a tight fit. After that, connect the other end of the hose to the inlet of the device. Most models have a quick-connect feature, making it a simple task.
Water Pressure Considerations
Check the water pressure at your supply. Ideally, it should be between 20 to 100 psi for optimal performance. If the pressure is too low, the unit may not function properly. In cases where the water supply is inadequate, consider using a water tank or reservoir to ensure a consistent flow during operation.
Finally, turn on the water supply before starting the machine. This step is crucial, as running the equipment without water can lead to significant damage. Once everything is set, you’re ready to tackle those stubborn stains and dirt!
Setting Up the Power Source Safely
Before connecting the equipment to its power source, ensure the outlet is suitable for the device’s voltage requirements. I remember a time when I overlooked this detail, and it led to frustrating interruptions during a cleaning task. Always check the specifications in the user manual to avoid any mishaps.
Use a residual-current device (RCD) for additional protection against electrical shocks. This safety feature disconnects the power supply if it detects any faults. It’s a simple yet effective precaution that saved me from a close call during one of my first experiences with high-powered cleaning gear.
Inspect the power cord and plug for any signs of wear or damage. A frayed wire can lead to dangerous situations. I learned this the hard way when I had to replace my cord mid-project. If you notice any issues, replace the cord before proceeding.
Always run the equipment on a dedicated circuit to prevent overloading. I once used multiple devices on the same circuit, and it tripped the breaker, halting my work. It’s best to have a clear and direct power supply for uninterrupted operation.
Ensure the cord is not a tripping hazard. I often use cable clips to secure it along pathways, keeping the area safe and tidy. This small adjustment can make a significant difference in avoiding accidents.
For an added layer of safety, avoid using extension cords unless absolutely necessary. If you must use one, ensure it is rated for outdoor use and can handle the power requirements of your equipment. I once used a regular extension cord, and it overheated, which was a lesson learned the hard way.
Finally, keep the power source dry. Water and electricity do not mix well. I always ensure the area is clear of water before connecting anything. This simple step can prevent electrical hazards.
By following these safety measures, you can focus on the task at hand without worrying about electrical issues. Once everything is set up, you’ll be ready to tackle your cleaning jobs efficiently. For additional cleaning tips, check out this guide on how to clean laminate wood floors steam mop.
Selecting the Appropriate Nozzle for Your Task
Choosing the right nozzle can make or break your cleaning experience. I recall a time when I attempted to remove stubborn oil stains from my driveway. I initially used a wide-angle nozzle, thinking it would cover more area quickly. Instead, I ended up spreading the stains rather than removing them. Switching to a narrow, high-pressure nozzle did the trick, cutting through the grime efficiently.
Nozzle Types
Each nozzle serves a specific purpose. The zero-degree nozzle delivers a concentrated stream, perfect for tough stains on hard surfaces like concrete. A 15-degree nozzle is great for stripping paint or cleaning heavily soiled areas. For general cleaning tasks, a 25-degree nozzle works well on surfaces like decks and patios. Lastly, the 40-degree nozzle is ideal for light cleaning tasks, such as washing cars or windows. Always consider the task at hand before selecting.
Tips for Selection
When in doubt, start with the widest nozzle and test its effectiveness. You can always switch to a narrower nozzle if needed. Also, consider the material of the surface you’re cleaning; softer materials like wood require gentler pressure to avoid damage. Remember, using the wrong nozzle can lead to less effective cleaning and potential surface harm.
Adjusting the Pressure Settings for Different Surfaces
Adjust the pressure according to the surface to avoid damage. For delicate surfaces, such as painted wood or car exteriors, a lower setting is crucial. On the other hand, tougher materials like concrete can handle higher pressure.
In my experience, I found that starting with the lowest setting and increasing gradually works best. This method prevents unexpected damage while still providing effective cleaning. Here’s a quick reference table based on my personal testing:
| Surface Type | Recommended Pressure (PSI) | Suggested Nozzle |
|---|---|---|
| Car Exterior | 1200 – 1500 | 25° or 40° |
| Wood Deck | 1300 – 1600 | 25° |
| Vinyl Siding | 1300 – 1600 | 25° |
| Concrete Driveway | 2000 – 3000 | 15° or 0° |
| Brick Walls | 2000 – 2500 | 0° or 15° |
| Patio Furniture | 1200 – 1500 | 25° or 40° |
Always test on a small, inconspicuous area first. I once accidentally stripped paint off a garden bench by using too high a pressure setting without checking. A little caution goes a long way. Adjusting the pressure not only ensures the job is done well but also prolongs the life of the surfaces you’re cleaning.
Using Detergents with Your Pressure Washer
Always choose a detergent specifically designed for high-pressure cleaning equipment. Regular soaps can create excessive foam, which might clog the system. I remember a time when I used a household cleaner instead of a proper detergent. The foam build-up caused my unit to sputter, resulting in a frustrating cleaning session.
Before applying any cleaning solution, dilute it according to the manufacturer’s instructions. A concentrated mix can damage surfaces or leave a residue. I once underestimated the strength of a product and ended up needing to rinse a patio surface multiple times to remove the leftover soap.
Utilise the detergent tank, if available, to avoid manual mixing during the cleaning process. This feature simplifies application and ensures even distribution. I find it handy, especially when tackling larger areas like driveways, as I can focus on cleaning without constant refilling.
Start by applying the solution from the bottom up. This technique helps lift dirt and grime effectively. I’ve learned that working in sections allows for better control and prevents the detergent from drying before rinsing. After waiting the recommended time for the detergent to work, rinse from the top down, ensuring all residues are washed away.
For stubborn stains, consider using a brush attachment compatible with your device. I once faced a particularly tough oil stain on my driveway; applying the detergent with a brush made a significant difference in its removal.
After finishing, clean the detergent tank and nozzle to prevent clogs. I’ve seen how neglecting this step can lead to performance issues later on. A quick rinse ensures your equipment remains in top condition for the next task.
Cleaning Techniques for Optimal Results
For the best outcomes, start from the top and work your way down. This method prevents dirt and debris from falling onto areas already cleaned. Always maintain a consistent distance of around 2 feet from the surface, adjusting as necessary for delicate materials.
Technique Variations
Switching up your angle can significantly impact effectiveness; a 45-degree angle often works wonders for flat surfaces. On vertical surfaces, a straight-on approach is generally more effective, allowing the water to lift grime without forcing it deeper into the material.
For stubborn stains, pre-soaking with a suitable detergent can save time and effort. Allow the solution to sit for 5–10 minutes before rinsing. Just be cautious not to let it dry, as this can cause residues to set.
Surface-Specific Tips
For driveways and patios, focus on sectioning off areas; this ensures thorough cleaning without leaving streaks. Conversely, softer surfaces like wood require a gentler touch; use a wider nozzle and lower pressure to avoid damage. If you ever find yourself without a machine, consider using a natural thing to clean slabs without a pressure washer for maintaining aesthetics.
Ultimately, the key lies in understanding the surface you’re working on and adapting your techniques accordingly. Each material has its quirks, and getting familiar with them will yield the best results every time.

.jpg)


