


For optimal performance, ensure you dilute the agent according to the manufacturer’s instructions before pouring it into the dedicated tank. I recall a time when I underestimated the concentration level, thinking a stronger mix would yield better results. The outcome was a foamy mess that took longer to rinse away than the grime itself.
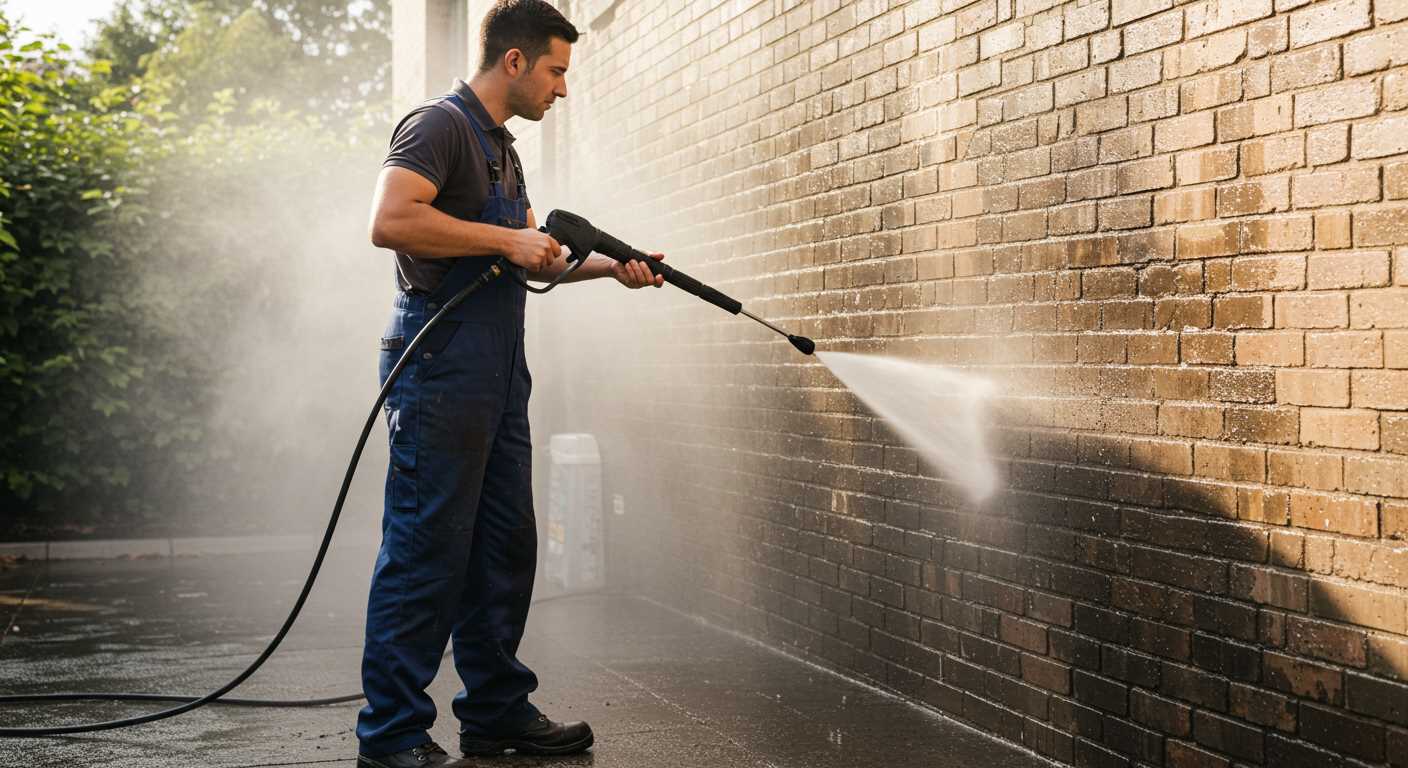
Attach the correct nozzle to your equipment; a wider spray pattern is ideal for applying the mixture evenly across surfaces. During my years testing various models, I found that a 25-degree nozzle provided excellent coverage without risking damage to more delicate surfaces. Remember, the right attachment can make all the difference in achieving a thorough clean.
Begin the application from the bottom and work your way upwards. This technique prevents streaking and ensures that dirt is pushed downwards, enhancing the overall efficiency of the cleaning process. I often share this tip with new users, as it significantly reduces the time spent on stubborn stains.
After applying the agent, allow it to dwell for a few minutes. This period lets the formulation break down tough grime, making rinsing much easier. In my experience, rushing this step often leads to less satisfactory results, requiring additional rounds of cleaning.
Finally, rinse thoroughly with clear water, ensuring all residues are removed. I once neglected this step, thinking a quick rinse would suffice, only to find remnants of the agent left behind. It’s a mistake that’s easy to make but one you’ll want to avoid for the best finish.
Application of Detergents with Your High-Pressure Cleaner
Mix the appropriate detergent with water according to the manufacturer’s directions. I always found that following the dilution ratios ensures optimal performance and prevents damage to surfaces. Once mixed, pour the solution into the designated tank of the machine, which is typically located at the back or side.
Utilising the Right Nozzle
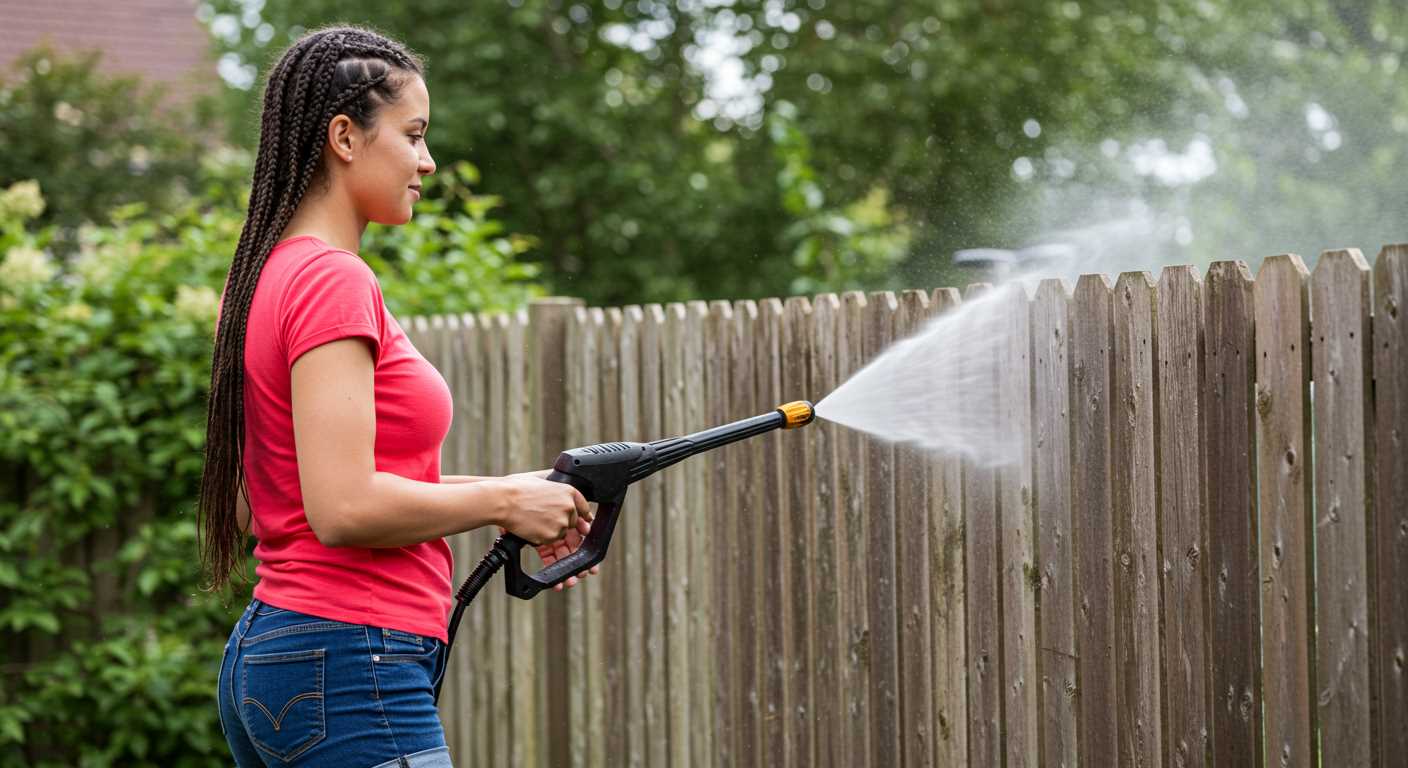
Switch to the low-pressure nozzle, usually marked in green or yellow. This nozzle allows the mixture to be applied evenly without creating excessive foam. I’ve had great success using this setting, especially on delicate surfaces like painted wood or glass. Start by testing a small area to see how well the mixture reacts with the surface.

Timing and Rinsing
Let the detergent sit for a few minutes, but avoid allowing it to dry. I usually set a timer to remind myself. Afterward, switch back to a high-pressure nozzle to rinse off the residue effectively. A thorough rinse ensures no detergent residue remains, which can lead to streaking or damage over time. I learned this the hard way after a few cleaning sessions that didn’t go as planned!
Selecting the Right Cleaning Solution for Your Pressure Washer
When it comes to achieving optimal results, choosing the right detergent is paramount. Each type of surface requires a specific formula for effective removal of dirt and grime. For example, a degreaser is ideal for driveways, while a gentle formula works wonders on delicate surfaces like wood or painted areas.
In my experience, one of the most frequent mistakes I see is using a one-size-fits-all approach. I recall a time when I tried a harsh formula on a wooden deck, believing it would save time. The result was splintered wood and a lot of regret. Always read labels carefully, as they provide guidance on the appropriate surfaces and conditions for each product.
Consider the concentration as well. Some products come ready to use, while others need to be diluted. A concentrated cleaner often yields better value and performance. I remember a client who was thrilled after switching to a concentrated option; they noticed a significant difference in cleaning power and cost savings.
pH levels matter too. Acidic solutions work well for rust stains but can damage surfaces like concrete if used incorrectly. I once had a project involving a rust-stained patio that required a careful balance between effectiveness and safety. The right choice made all the difference, leaving the patio spotless without causing harm.
Lastly, always consider environmental impact. Biodegradable options are available and often just as powerful as their chemical counterparts. I’ve personally tested several eco-friendly formulations, and the results were impressive. Not only do they clean effectively, but they also leave a minimal footprint on nature.
Preparing Your Karcher Pressure Washer for Cleaning Solution
Begin by ensuring your device is switched off and unplugged. This simple step can prevent accidental activation while you prepare. Next, inspect the detergent tank for any residue from previous products. A quick rinse can help avoid unwanted chemical reactions. If your model allows, detach the tank for a thorough clean.
Choosing the right attachment is key. If your unit comes with a foam nozzle, attach it securely to allow for optimal application of the product. For models without this feature, a dedicated detergent injector works perfectly. Ensure all connections are tight to prevent leaks during operation.
Before adding any product, consult the manufacturer’s guidelines regarding dilution ratios. Mixing too strong a concentration can damage surfaces or the machine itself. Once mixed, pour the solution into the tank, ensuring not to exceed the maximum fill line.
After filling, reconnect the tank if detached, and check the nozzle’s settings. A wider spray pattern is ideal for initial application, while a narrower setting might be needed for stubborn areas. As a tip, always test the solution on a small, inconspicuous area first to assess compatibility.
Once everything is set, connect to a water source and power up your device. Familiarise yourself with the operation of the detergent feature before tackling larger areas. For those interested in maintaining aquariums, you might find valuable insights in this guide on how to clean an aquarium tank.
Mixing cleaning agents with water: ratios and techniques
For optimal results, knowing the right proportions is key. I’ve found that a common ratio for many formulations is 1 part detergent to 10 parts water. This balance maximises the effectiveness while preventing damage to surfaces. Always check the manufacturer’s guidelines as some products may require different mixes.
Testing the mixture
After mixing, I recommend testing the solution on a small, inconspicuous area first. This step ensures compatibility and prevents any unwanted reactions. In my experience, even mild agents can cause discolouration if not used correctly.
Application techniques
When applying the mixture, a low-pressure setting is often best. This method allows for even distribution without oversaturating the surface. I typically start from the bottom and work upwards, ensuring that dirt and grime are lifted without streaking. If you’re looking for reliable equipment, check out pressure washer dublin ca for options suited to your needs.
Applying the Cleaning Solution with the Pressure Washer
To achieve optimal results, it’s crucial to apply the detergent correctly. Start by ensuring your machine is set to the low-pressure mode. This setting is typically designated by a specific nozzle, usually the widest one. It allows the mixture to coat surfaces evenly without stripping paint or damaging delicate items.
Steps for Effective Application
- Fill the detergent tank with the prepared mixture, ensuring not to overfill.
- Attach the appropriate nozzle to the lance. The wider the nozzle, the gentler the spray.
- Begin spraying from the bottom of the surface upwards. This method ensures that the solution adheres better and prevents streaking.
- Allow the mixture to dwell on the surface for the recommended time, usually 5-10 minutes, but avoid letting it dry out.
- Rinse off the mixture using a high-pressure setting, starting from the top and working downwards to wash away any residue.
Tips for Best Results
- Always follow the manufacturer’s guidelines for the specific product you are using.
- Test a small, inconspicuous area first to ensure compatibility with the surface.
- Adjust the dilution ratio based on the severity of the stains; more concentrated mixtures work better for tough grime.
- Use a surface cleaner attachment for flat surfaces like driveways or patios to ensure even coverage.
Through years of testing various combinations, I’ve found that patience pays off. Allowing the mixture to sit for the recommended time can make a significant difference in the outcome. Rinsing thoroughly is just as important; any leftover residue can lead to unsightly streaks or marks.
Adjusting Pressure Settings for Optimal Cleaning
Setting the right force is key for achieving the best results. I remember the first time I tackled a particularly stubborn driveway. I cranked up the force to max, thinking it would make the job easier. Instead, I ended up damaging the surface. So, the first tip: always start at a lower setting and gradually increase it.
For most surfaces, a setting between 1000 to 1500 PSI works wonders. For tougher grime on concrete or brick, you might need to push it to around 2000 PSI. However, delicate surfaces like wood or painted areas require much less, often around 500 to 800 PSI. Always consult the manufacturer’s guidelines for specific recommendations.
Adjusting the nozzle also plays a significant role. A wider spray angle disperses the force and is perfect for rinsing large areas. On the other hand, a narrower angle concentrates the pressure, which is ideal for tough stains. I often switch between settings depending on the task at hand, ensuring each area is treated appropriately.
It’s also wise to test a small, inconspicuous section before committing to a full wash. This quick check can save you from costly mistakes, especially on sensitive surfaces. I learned this lesson the hard way on my wooden deck–an area I now treat with extra care.
Lastly, remember to adjust the settings based on the cleaning agent you’re applying. Some products work better at certain pressures. Mixing and matching until you find the right combination can significantly enhance your outcomes. In my experience, patience and attention to detail lead to the most satisfying results.
Techniques for different surfaces: what to consider
When tackling various surfaces, it’s crucial to adjust your approach based on the material at hand. For example, brickwork can withstand higher pressure, but always begin with a lower setting to avoid damage. I recall a time I miscalculated on a patio; the mortar was compromised due to excessive force. Start gently and increase gradually if necessary.
For painted surfaces, such as fences or wooden siding, opt for a diluted mix and a fan spray pattern. A direct stream can strip paint, leading to an expensive repainting job. My friend once learned this lesson the hard way after he aimed too closely at his garden shed–now it has a patchy look. A wider spray disperses the force, preserving the finish.

Concrete is resilient, so a stronger mix can be effective here, especially for stubborn stains. However, be cautious with older or cracked surfaces. A personal incident involved a driveway that I thought was strong enough to handle everything. A stubborn oil stain took a bit of effort, but I realised that too much pressure exacerbated existing cracks. Always assess the condition before proceeding.
For glass or windows, use a low-pressure setting and a dedicated attachment if available. A high-pressure blast can shatter glass or cause it to crack. I once rushed a job at a friend’s house, and the result was a costly repair. Patience pays off, so take your time.
Outdoor furniture typically requires a gentler approach. A mix that’s too harsh can damage finishes or upholstery. I’ve seen cushions fade or lose shape after one too many aggressive washings. Stick to a mild blend and a soft spray to keep your items looking new.
Lastly, for vehicles, always choose a specific product designed for automotive use. The paint on cars is delicate, and a harsh mix can strip wax or cause scratches. I learned this after a particularly bad wash left my own car looking dull. Now, I prioritise using the right blend and technique to maintain that shine.
Rinsing and finishing: ensuring residue-free surfaces
After applying the detergent, it’s critical to rinse thoroughly to eliminate any lingering substances. I recommend starting from the top of the surface and working your way down. This method prevents dirty water from running over areas you’ve already cleaned.
Adjust your machine to a moderate pressure setting during this phase. Too high a pressure can cause damage, especially on softer surfaces. Use a wide spray nozzle to evenly distribute the water, ensuring you cover every inch of the area. If you’re washing a vehicle, maintain a distance of about 2-3 feet to avoid any potential harm to the paintwork.
For surfaces like patios or driveways, a flat surface cleaner attachment can significantly speed up the rinsing process. It provides a consistent rinse and reduces the risk of streaks. Once you’ve rinsed, inspect the area closely for any missed spots or residue. If you find any, a second pass might be necessary.
After rinsing, it’s beneficial to let the surface air dry. This allows you to see any remaining spots clearly, and if necessary, a quick touch-up can be performed. For vehicles, consider drying with a microfibre cloth to avoid water spots.
| Surface Type | Recommended Pressure Setting | Distance from Surface |
|---|---|---|
| Vehicle | 100-130 bar | 2-3 feet |
| Patio/Driveway | 130-160 bar | 1-2 feet |
| Wood Deck | 80-120 bar | 1-2 feet |
Finally, always check the manufacturer’s recommendations for the specific surfaces you’re cleaning. This ensures you maintain their integrity while achieving a spotless finish. Trust me, the extra care in rinsing pays off with beautiful, residue-free results every time.
Safety Precautions When Using Cleaning Solutions
Always wear protective gear. This includes gloves, goggles, and a mask to guard against splashes and fumes. I recall one time I underestimated the potency of a particular detergent. The fumes caused irritation, reminding me of the importance of proper attire.
- Read Labels: Before mixing, carefully check the manufacturer’s instructions. Some products can react negatively when combined with others.
- Proper Ventilation: Ensure the area where you’re working is well-ventilated. I once worked in a closed garage and quickly realised the importance of fresh air.
- Store Safely: Keep all substances in a secure location, away from children and pets. During my time in the field, I encountered many clients who overlooked this, leading to potential hazards.
- Test Surfaces: Always perform a spot test on a small, inconspicuous area before applying anything widely. I learned this the hard way after damaging a client’s patio.
- Keep Equipment Clean: Rinse out any residual chemicals from the tank and hoses after each use to prevent buildup and ensure longevity. I’ve seen equipment fail due to neglect in this area.
Accidents can happen in an instant. I once witnessed a colleague slip because of a spill. A quick clean-up could have prevented that. Always have absorbent materials on hand to manage any spills immediately.
Incorporating these precautions into your routine will not only protect you but also enhance the overall experience while working with powerful machines and potent products. Stay safe and enjoy the results!

.jpg)


