
.jpg)


.jpg "How to use spray attachment on pressure washer")
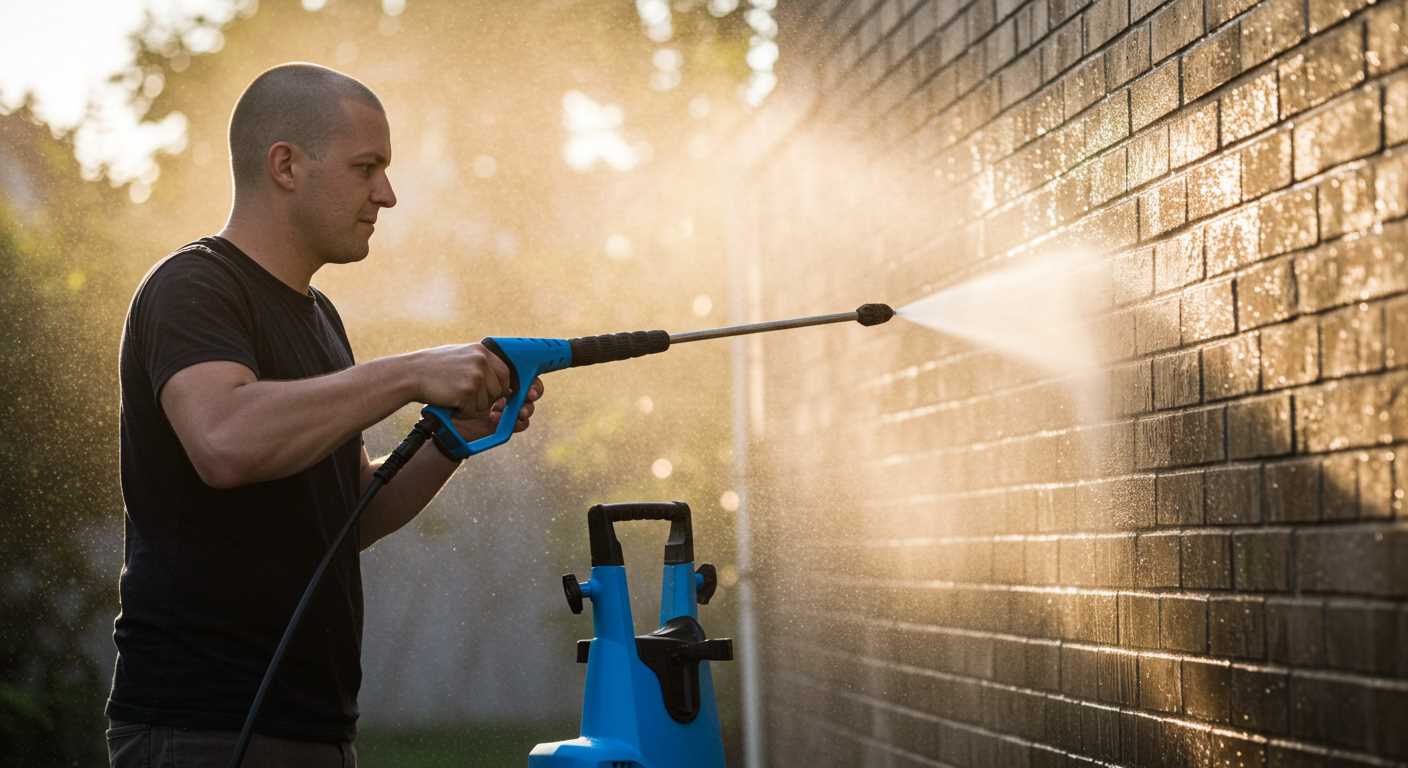
For a thorough clean, select the correct nozzle based on the surface you’re working with. For example, a 0-degree nozzle delivers a concentrated stream ideal for tough stains on concrete, while a 40-degree nozzle disperses water broadly, perfect for washing delicate surfaces like vehicles.
Adjusting pressure is equally important. Always start with the lowest setting to avoid damaging surfaces. Gradually increase pressure if needed, ensuring you maintain control over the spray to protect your surroundings.
Using a cleaning solution can enhance results. Apply soap with a dedicated nozzle, allowing it to sit for a few minutes before rinsing. This method lifts dirt and grime effectively, making the rinse-off much easier. Just remember to rinse thoroughly to prevent any soap residue from drying on surfaces.

Safety is paramount. Always wear protective gear, including goggles and gloves, to shield yourself from debris and chemicals. Keep a safe distance from the surface being cleaned, adjusting your stance for optimal control and comfort.
Regular maintenance of your equipment ensures longevity. Check for clogs in the nozzle and clean them as needed. A well-maintained device not only performs better but also saves time and effort in the long run.
Understanding the Different Types of Nozzle Options
Choosing the right nozzle can significantly impact your cleaning efficiency. From my experience, each type serves distinct purposes, enabling you to tackle various surfaces and grime levels effectively.
Types of Nozzles
Here’s a breakdown of the most common varieties:
| Nozzle Type | Pressure Level | Best For |
|---|---|---|
| 0° (Red) | High | Heavy-duty cleaning, stubborn stains |
| 15° (Yellow) | Medium-High | Concrete, metal surfaces |
| 25° (Green) | Medium | Decks, patios, siding |
| 40° (White) | Low | Cars, boats, and delicate surfaces |
| Soap Nozzle | Variable | Applying detergents |
Choosing the Right One
I’ve often found that starting with a wider angle, like the 25° or 40°, is beneficial for general cleaning tasks. If you encounter stubborn spots, switching to a narrower angle can enhance the cleaning power without risk of damage. Always remember to adjust the distance from the surface to avoid any unwanted wear. Also, don’t underestimate the soap nozzle; it’s invaluable for pre-treating surfaces before a thorough rinse.
Choosing the Right Nozzle for Your Cleaning Task
For optimal results, selecting the correct nozzle is paramount. For instance, when tackling delicate surfaces like car paint or wooden decks, a 40-degree nozzle with a gentle fan spray is ideal, minimising the risk of damage while still offering effective cleaning. Conversely, the 15-degree nozzle is perfect for tougher jobs, like removing stubborn grime from concrete or brick, as it delivers a concentrated stream that penetrates deeper into the surface.
Consider the type of dirt or stain you’re addressing. For oil or grease stains, a nozzle that produces a more forceful jet, like the 0-degree option, works wonders. This narrow stream can break down tough residues, making your cleaning efforts more successful. However, it’s vital to test a small area first to prevent any unintended surface damage.
Environmental factors also play a role in your choice. Windy conditions can affect the trajectory of the water, so opting for a wider spray can help maintain effectiveness without losing power. Additionally, if you’re working in areas where precision is vital, such as around delicate plants or outdoor furniture, a nozzle with adjustable settings allows you to adapt quickly as needed.
Finally, always keep in mind the surface material. Different materials respond uniquely to varying pressures. For example, vinyl siding can withstand a stronger stream, while painted surfaces may require a gentler approach to avoid chipping or fading. Always refer to the manufacturer’s guidelines to ensure compatibility and avoid damage.
Attaching the Nozzle Securely
To ensure a strong hold, align the nozzle with the lance and insert it firmly until you hear a click. This sound indicates that the mechanism has locked the piece in place. It’s important to give it a gentle tug afterward to confirm it’s secured properly. If it feels loose, it could cause leaks or even detach during operation, leading to accidents or ineffective cleaning.
Over the years, I’ve seen many users struggle with improper fittings. Once, a customer brought in a unit that had been damaged because the nozzle popped off during a heavy-duty task. He was frustrated, and rightly so. The right approach is to regularly check the condition of both the nozzle and the lance. Look for any wear or damage that might prevent a snug fit. If you notice anything unusual, replace the part before your next cleaning session.
Also, consider using a small amount of lubricant on the threads or sealing areas. This can help maintain a tight seal and make it easier to attach and detach components over time. Just be cautious not to overdo it; a little goes a long way.
Finally, after each use, detach the nozzle and clean it to prevent any debris buildup that could affect the fit during the next use. Trust me, taking these extra steps will save you hassle and ensure your equipment performs at its best.
Adjusting spray patterns for various surfaces
For optimal cleaning, it’s critical to adjust the nozzle patterns according to the surface type. Different materials respond uniquely to water pressure and spray width. Here’s a breakdown based on my years of experience.
| Surface Type | Recommended Pattern | Key Tips |
|---|---|---|
| Concrete | Narrow fan (15°) | Maintain a distance of about 12 inches to avoid damage while effectively removing stains. |
| Wood | Wide fan (40°) | Keep the nozzle at least 24 inches away to prevent splintering and ensure a gentle clean. |
| Brick | Medium fan (25°) | Test a small area first; adjust distance based on the condition of the mortar and bricks. |
| Vehicles | Wide fan (40°) | Use a safe distance of 3 feet to avoid damaging paintwork, and always start from the top down. |
| Glass | Narrow fan (15°) | Keep the nozzle at least 3 feet away to prevent breakage while ensuring thorough cleaning. |
Adjusting the nozzle correctly not only enhances cleaning efficiency but also protects your surfaces from damage. Always test the spray on a small, inconspicuous area first to gauge the effect before proceeding with the entire surface. Over the years, I’ve seen too many mishaps from improper settings, so it pays to be cautious. Remember, the right pattern makes all the difference in achieving a professional-looking clean without the risk of harm.
Best practices for maintaining your spray nozzle
Regular cleaning is paramount. After each session, detach the nozzle and rinse it under warm water to remove any dirt or detergent residue. This simple step prevents clogs and ensures optimal performance. I recall a time when I neglected this and faced a frustrating blockage during a critical job. Lesson learned!
Inspect for wear and tear
Check the nozzle frequently for any signs of damage. Look for cracks or chips that could affect the water flow. If you notice any wear, replace it promptly to avoid uneven spraying. I once ignored a small crack, thinking it wouldn’t matter, but it escalated into a much larger issue, wasting valuable time on repairs.
Storage tips
Store the nozzle in a cool, dry place away from direct sunlight. High temperatures can weaken plastic components. I used to leave mine in the garage, only to find it warped after a summer heatwave. A simple storage solution can save you money in the long run.
Lubricate the O-rings with a silicone-based lubricant to maintain a proper seal. A little maintenance goes a long way in prolonging the life of your equipment.
Finally, always refer to the manufacturer’s guidelines for specific care instructions. Each model can have unique requirements that are crucial for longevity. Keeping these practices in mind will ensure your cleaning tasks remain efficient and hassle-free.
Common mistakes to avoid when using spray attachments
One of the most common blunders involves selecting the wrong nozzle for the task. Using a high-pressure nozzle on delicate surfaces can cause damage, while a low-pressure option may not effectively remove grime. Always match the nozzle to the cleaning job at hand.
- Neglecting safety precautions: Failing to wear protective gear such as goggles and gloves can lead to injuries. Always prioritise safety before starting any cleaning task.
- Not maintaining proper distance: Keeping the nozzle too close to the surface can cause abrasions. Generally, maintaining a distance of at least 12 inches is advisable, adjusting as needed based on the surface type.
- Ignoring surface conditions: Cleaning surfaces in direct sunlight can lead to streaks and uneven results. Choose a cooler, overcast day for optimal cleaning conditions.
- Overusing detergent: Applying too much cleaning solution can leave residue that attracts dirt. Follow the manufacturer’s guidelines for dilution and application.
- Failing to check connections: Not ensuring that connections are tight can lead to leaks and reduced performance. Always double-check before starting.
- Inadequate cleaning technique: Using a random pattern instead of a systematic approach can leave spots uncleaned. Work in sections, overlapping each pass for thorough results.
- Neglecting equipment care: Skipping regular maintenance can lead to performance issues. Always rinse out the nozzle after use and store it in a dry place.
Share experiences with others; learning from mistakes is beneficial. I’ve seen these missteps time and again, and avoiding them will significantly improve your cleaning results.
Safety Precautions While Using Pressure Cleaning Equipment

Always wear protective eyewear. High-velocity water can easily cause injuries, especially if debris is propelled towards your face. I once had a close call when a small stone hit my glasses–never again!
Protective clothing is equally important. Long sleeves, gloves, and sturdy footwear will guard against accidental water spray and potential slips. During one particularly slippery session, I was grateful for my non-slip boots.
Check Your Surroundings
Clear the area of any obstacles. I learned this the hard way when I tripped over a garden hose while concentrating on my cleaning task. Keeping a tidy workspace prevents accidents and improves efficiency.
Be mindful of electrical hazards. Ensure that all electrical connections are secure and away from water exposure. I’ve seen cables damaged by water spray, leading to safety hazards. Use GFCI outlets when available.
Proper Handling Techniques
Maintain a firm grip on the equipment at all times. The force of the water can make it challenging to control if you’re not prepared. I’ve experienced the machine kicking back unexpectedly when the nozzle wasn’t firmly held. Always brace yourself and keep your feet planted.
Before starting, ensure that the machine is in a stable position. I once had a unit tip over while I was adjusting the nozzle, which caused a minor mess and a delay in my work. Stability is key.
Lastly, consider the cleaning agent you’re using. For specific surfaces, like brick, opting for the right pressure washer detergent for brick can enhance results and ensure safe cleaning without damaging the material.
Cleaning and storing your spray attachment after use
After finishing your cleaning task, immediately clean the nozzle to prevent residue buildup. A simple rinse under lukewarm water will suffice. For stubborn debris, use a soft brush to dislodge particles. Avoid using harsh chemicals that could damage the materials.
Follow these steps to ensure proper care:
- Detach the nozzle from the lance and inspect for any visible damage.
- Rinse thoroughly, ensuring that all dirt and grime are removed.
- For nozzles with filters, check and clean these components as well.
- Dry completely before storing to prevent rust or corrosion.
Storage is equally important. Store the cleaned nozzle in a dry, cool place, ideally in a protective case or in the original packaging. This prevents accidental damage and keeps everything organised.
Consider creating a dedicated storage space for all your cleaning tools. This way, you’ll always know where to find your equipment, making your next cleaning session smoother. If you’re looking for additional tools for your space, check out the best air scrubber for grow room.
Regular maintenance extends the life of your equipment. Make it a habit to inspect and clean after every use, ensuring optimal performance every time you need it.

.jpg)


