


To ensure optimal cleaning results, locate the detergent tank, typically situated on the unit’s side or rear. Open the cap carefully, avoiding any spills. This step is crucial as excessive exposure can lead to build-up or damage over time.
Next, pour the cleaning solution directly into the tank, filling it to the indicated line. Be mindful of the type of cleaner used; not all mixtures are suitable for every model. I recall when I first started using these machines–underestimating the impact of the right solution led to less than stellar outcomes on stubborn grime.

Once the mixture is in place, reconnect any necessary hoses. Make sure everything is secure before turning on the machine. After a few tests, I found that allowing the solution to sit for a short while enhances its effectiveness, especially on tougher surfaces. A quick tip: always rinse the tank with water after use to prevent residue build-up.
Filling the Cleaning Solution Container
Begin by locating the container specifically designed for the cleaning solution on your unit. It’s usually marked and can be found on the side or at the front. Make sure the machine is powered off and disconnected from the electrical supply before you proceed.
Steps to Follow
- Unscrew the cap of the cleaning solution container.
- Carefully pour in the cleaning liquid, ensuring not to exceed the maximum fill line indicated on the container.
- Once filled, securely screw the cap back on to prevent any leakage.
In my experience, using the right type of solution is crucial for achieving optimal results. Check the manufacturer’s recommendations for suitable products. Avoid using harsh chemicals that could damage the machine.
Adjusting the Nozzle
After filling the container, adjust the nozzle to the appropriate setting for applying the solution. This ensures even distribution and maximises cleaning efficiency. I often find that starting with a wider spray pattern helps to cover more area before switching to a more focused jet for stubborn stains.
- Test the spray pattern on a small, inconspicuous area first.
- Make adjustments as necessary to find the best setting for your specific cleaning task.
Following these steps guarantees that your equipment operates smoothly and effectively, making the cleaning process quicker and more thorough. Always remember to clean the solution container after use to maintain the machine’s performance over time.
Identifying the Correct Cleaning Solution for Your Equipment
Choosing the right cleaning solution for your equipment is straightforward once you know what to look for. Always opt for products specifically designed for your model. I recall testing various solutions, and the difference in results was remarkable. For instance, using a general-purpose cleaner can leave residues that are difficult to rinse off and may even damage surfaces.
Concentration Matters
Pay attention to the concentration of the product. In my experience, highly concentrated cleaners require dilution, while ready-to-use options save time. I once made the mistake of using a concentrated formula directly, resulting in excessive foam that clogged the nozzle. Always follow the manufacturer’s instructions for optimal dilution ratios.
Surface Compatibility
Not all solutions are suitable for every surface. I’ve encountered issues with harsh chemicals causing discolouration on painted surfaces. Always check the compatibility with materials like wood, metal, or plastic before making a choice. A dedicated surface cleaner often yields the best results and protects your equipment from potential damage.
Locating the Detergent Tank on Your Vax Pressure Washer
To find the cleaning solution reservoir on your Vax model, first examine the body of the unit. Most often, the tank is positioned near the base, integrated into the chassis. Look for a compartment with a clearly marked cap, which is typically labelled to indicate the appropriate contents.
Visual Indicators
Check for a transparent section on the tank, allowing you to see the fluid level. This feature makes it easier to monitor how much solution remains without needing to open the cap each time. If your model lacks this, take note of the tank’s size to avoid overfilling.
Consulting the Manual
If you’re having trouble locating the reservoir, refer to the user manual that came with your equipment. It usually contains diagrams detailing the layout and function of various components. This can save time and prevent mistakes when preparing your machine for use.
Preparing the Cleaning Solution for Use with Your Equipment
Before using your cleaning machine, ensure the mixture is appropriate for the task. I always check the manufacturer’s recommendations for the right ratio of concentrate to water. Generally, a mix of about 1 part concentrate to 4 parts water works well for most general cleaning jobs. For tougher stains, you might consider a stronger blend, but always refer to the guidelines to avoid damaging surfaces.
Mixing in a Separate Container
It’s wise to prepare your cleaning solution in a separate container. This allows you to mix thoroughly without risking spills on your machinery. I prefer to use a measuring jug for accuracy. After mixing, transfer the solution carefully into the tank, avoiding any frothing that could create air bubbles and affect the delivery system.
Cleaning the Container
After preparing your mixture, clean any equipment you used for mixing. Residue from previous cleaning agents can interfere with the new solution’s effectiveness. A quick rinse with water usually does the trick, ensuring that your next cleaning task is as efficient as possible.
Filling the detergent tank with the right amount
For optimal results, ensure the tank is filled to the recommended level indicated on the tank itself. Overfilling can lead to spillage and affect performance, while underfilling might not provide sufficient cleaning power. I recall a time when I filled my machine too low, thinking it would be enough. The results were disappointing, and I had to redo the task.
Measuring the right quantity
Most models specify a maximum capacity for the cleaning solution compartment. Use a measuring cup to pour the liquid in, making sure to keep an eye on the gauge as you go. I typically pour slowly, allowing the solution to settle before adding more. This method has saved me from making a mess more than once!
Adjusting for different tasks
Depending on the level of dirt or grime, you might need to adjust the amount you use. For light cleaning, a lower quantity suffices, while tougher jobs may require a fuller tank. I’ve found that experimenting with different amounts helped me understand what works best for various surfaces. It’s all about finding that sweet spot for your specific needs.
| Surface Type | Recommended Amount |
|---|---|
| Lightly soiled | 1/4 tank |
| Moderately soiled | 1/2 tank |
| Heavily soiled | 3/4 tank |
Remember to clean the tank regularly. Accumulation of residue can affect the performance of your equipment and the effectiveness of the solution. A quick rinse after each use can save you a lot of trouble down the line. Experience has taught me that maintenance is key to longevity and efficiency in cleaning tasks.
Connecting the detergent nozzle for application
To effectively apply cleaning solution, attach the specific nozzle designed for this purpose. Most models come with a dedicated nozzle, often marked with a different colour or label indicating its use for soap application. Simply remove the standard nozzle from the lance and replace it with the detergent nozzle, ensuring it clicks securely into place.
Adjusting the settings
Once the attachment is secure, adjust the settings on your machine to activate the detergent mode. This typically involves turning a knob or flipping a switch to the appropriate position. It’s important to check the user manual for your particular model, as the process can vary slightly between versions.
Testing the application
Before starting on a large area, it’s wise to test the solution on a small, inconspicuous section of the surface you intend to clean. This ensures compatibility and effectiveness without risking damage. Once you’re satisfied, proceed to apply the cleaning agent evenly across the surface, maintaining a consistent distance for optimal coverage.
Adjusting the Settings for Optimal Cleaning
To ensure effective cleaning with your machine, it’s critical to adjust the settings appropriately when using cleaning solutions. Here’s how to optimise your device for the best results:
1. Select the Right Pressure Setting
- Start with a lower pressure setting to avoid damaging surfaces.
- Gradually increase the pressure as needed, depending on the surface type.
- For delicate surfaces like wood or painted areas, keep it on the lower end.
2. Adjust the Nozzle Type
- Use a wider spray nozzle to distribute the cleaning solution evenly.
- Consider a fan spray for large areas and a narrow spray for targeted spots.
After making the necessary adjustments, test the spray pattern on a small, inconspicuous area to ensure it meets your expectations. This helps prevent any unintended consequences on your surfaces.
For those looking to enhance their cleaning routine, incorporating a best antimicrobial body scrubber can provide additional benefits, especially on surfaces that require extra attention.
Always refer to the manufacturer’s guidelines specific to your equipment for any unique settings or recommendations. This will ensure safety and maximise performance during use.
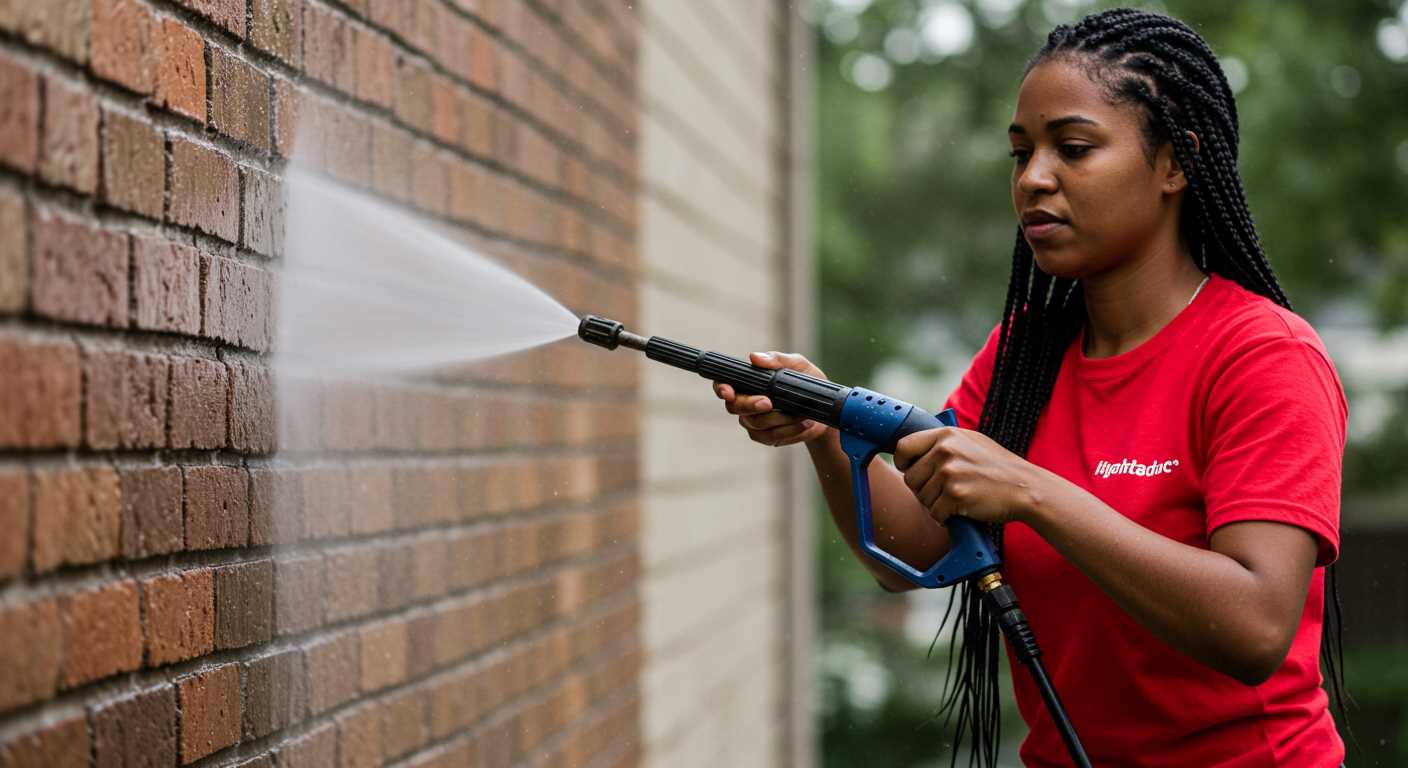
Testing the Detergent Application on a Small Area
Before fully committing to a cleaning task, I always recommend testing the solution on a small, inconspicuous area. This step helps ensure compatibility with the surface and prevents unexpected reactions. Choose a section that won’t be easily visible, like the edge of a patio or behind a flower pot.
Apply the mixture from the tank using the designated nozzle. I usually keep the distance about 30 centimetres from the surface to get a feel for how the solution interacts with the grime. Watch for any immediate changes; if you see the solution starting to lift dirt or stains, you’re on the right track.
After letting the mixture sit for a few minutes, rinse the area thoroughly. This not only removes the cleaning agent but also gives you a clear idea of how effective it is. If the results are satisfactory, you can proceed with confidence, knowing that the cleaner works well with your specific surfaces.
Should you notice any adverse reactions, such as discolouration or damage, stop using it immediately. It’s better to be cautious than to risk harming your surfaces.
In my experience, testing first saves time and potential headaches down the line. It’s a simple step that can prevent bigger issues, ensuring that the entire cleaning process goes smoothly.
Cleaning the Detergent Tank After Use
After using your equipment, it’s vital to clean the container to ensure optimal performance for future tasks. Begin by emptying any leftover solution, taking care not to let it sit for prolonged periods. Rinse the tank thoroughly with warm water, making sure to flush out any residue that may cling to the sides. A soft brush can be handy for scrubbing stubborn areas, ensuring all remnants are removed.
Final Rinse and Drying
Once you’ve scrubbed the tank, conduct a final rinse with clean water. This step eliminates any remaining traces of the cleaning agent that could affect subsequent applications. After rinsing, allow the tank to dry completely. Leaving it wet can lead to mould or mildew, which is something you definitely want to avoid. Store the unit in a cool, dry place to keep everything in top condition.
Regular Maintenance Tips
Incorporate this cleaning routine into your regular maintenance schedule. By doing so, you not only prolong the life of the tank but also enhance the overall efficiency of the equipment. If you’re also caring for your garden, consider checking out lawn levelling rakes for additional maintenance tools.
Storing Leftover Cleaning Solution Safely for Future Use
After using a cleaning solution, it’s vital to store any remaining liquid properly to maintain its effectiveness. I always recommend transferring the unused product into a sealed container, preferably one that is opaque to protect it from light exposure. This simple step can significantly extend the shelf life.
Label the container with the name of the solution and the date of storage. This helps in tracking how long it has been since you stored it. In my experience, keeping a record prevents using outdated solutions that may have lost their potency.
Temperature plays a crucial role in preserving cleaning agents. Store the container in a cool, dry place, away from direct sunlight or extreme heat. I once made the mistake of leaving a solution in a garage during summer, and it rendered the product ineffective. A cupboard or a shelf indoors works best.
If the solution has a specific expiration date, keep that in mind and use it before the deadline. If, however, the product shows any changes in colour, consistency, or odour, it’s best to dispose of it safely rather than risk using it.
Additionally, ensure the container is childproof and secure if you have young ones around. Safety should always be a priority. When it’s time to use the stored solution again, give it a gentle shake to ensure it’s well-mixed, as some components may settle over time.


.jpg)


