


Before anything else, ensure the fuel tank is filled with fresh petrol. I recall a day early in my career when I neglected this step and spent half an hour troubleshooting what I thought was a mechanical issue. Turns out, the tank was simply empty. Using clean fuel not only prevents clogs but also enhances performance.
Next, check the oil level. A common mistake is assuming that the machine is ready to go without a quick inspection. I learned this the hard way when a machine overheated during a job because the oil was too low. Always use the recommended oil type for optimal operation.
Now, look at the spark plug. It should be clean and in good condition. I remember a time when I had to troubleshoot a unit that wouldn’t start, and replacing a worn-out spark plug made all the difference. Regular checks can save you from unnecessary headaches.
Lastly, examine all the hoses and connections for any signs of wear or damage. A small leak can lead to significant pressure loss. I once had a client who faced this issue, and after replacing a damaged hose, their machine performed like new again. Keeping these components in check ensures a smooth experience.
Steps to Engage Your Cleaning Unit
Fill the fuel tank with the recommended type of petrol. Make sure to use fresh fuel to avoid starting issues. I remember a time when I used stale petrol, and it caused the machine to sputter and fail to ignite. Always check the oil level as well; low oil can lead to engine damage.
Preparing the Engine
Before you proceed, locate the choke lever. Set it to the closed position for a cold engine. Pulling the choke lever fully opens the air intake, allowing for a richer fuel mix, which is crucial for ignition. Then, ensure the safety lock is disengaged. I’ve seen too many people forget this step, leading to frustration when trying to pull the starter rope.
Ignition Process
Now, pull the starter rope slowly until you feel resistance, then give it a firm, quick tug. If the unit doesn’t fire up after a few attempts, return the choke to the open position and try again. Patience is key; I once spent an hour troubleshooting a stubborn machine before realising the choke was still closed. Once it roars to life, let it run for a minute to warm up, and you’re set to go!
Choosing the Right Fuel for Your Cleaning Equipment
For optimal performance, always opt for unleaded gasoline with an octane rating of 87 or higher. In my experience, this choice helps ensure smooth operation and longevity of the engine. Using premium fuel is often unnecessary and may not provide any tangible benefits. However, avoid fuel containing ethanol, as it can cause issues like fuel line damage and carburettor gumming.
Storage Considerations
When it comes to fuel storage, I’ve learned the importance of keeping gasoline in a cool, dry place. An airtight container is a must to prevent contamination and evaporation. If you plan on leaving fuel in the tank for an extended period, consider adding a fuel stabiliser. This will prevent degradation and help maintain engine performance during periods of inactivity.
Regular Maintenance Tips
Regularly check fuel lines and filters for any signs of wear or blockage. Clogged lines can lead to poor performance and even engine failure. I’ve found that ensuring a clean fuel system significantly enhances the reliability of the unit. Also, remember to empty the fuel tank if storing the equipment for more than a month.
For those looking to optimise their setup, understanding the right garden hose diameter for pressure washer can also make a big difference in efficiency and water flow.
Preparing the Equipment for Operation
Before tackling any cleaning task, ensure your machine is ready for action. A quick inspection can save you from unexpected issues during use. First, check the oil level. I’ve seen machines fail because of low oil–always top it up if necessary. Use the specified type of oil for your model, as it impacts performance.
Inspecting the Components
Next, examine the hoses and connections for any signs of wear or leaks. A frayed hose can lead to pressure loss, which can be frustrating. I’ve had moments where a simple hose replacement made all the difference in cleaning efficiency. Make sure all connections are tight, as loose fittings can cause leaks and reduce pressure.
Setting Up the Correct Nozzle
Choosing the right nozzle is essential for the task at hand. Different nozzles provide varying spray angles and pressure. For instance, a 0-degree nozzle is great for tough stains, while a 25-degree nozzle works well for general cleaning. I often keep a set of nozzles handy to switch as needed during a job.
| Nozzle Type | Spray Angle | Best Use |
|---|---|---|
| Red (0°) | 0° | Heavy-duty cleaning |
| Yellow (15°) | 15° | Stubborn stains |
| Green (25°) | 25° | General cleaning |
| White (40°) | 40° | Delicate surfaces |
After ensuring everything is in top shape, it’s also a good idea to have the area clear of debris and obstacles. This not only promotes safety but also allows you to clean more effectively. In my experience, a clean workspace makes a significant difference in the outcome.
Lastly, consider the environment in which you’re operating. For dusty jobs, I recommend using an air scrubber to maintain air quality. It’s a handy addition that I’ve found invaluable during construction clean-ups.
Understanding the Control Panel Functions
Familiarity with the control panel functions is key to operating your cleaning machine smoothly. Each element has a specific purpose that can enhance your cleaning experience.
Key Components of the Control Panel
- Power Switch: This is usually a toggle or a push button. Ensure it is in the ‘ON’ position before attempting to engage the engine.
- Throttle Control: Located typically on the panel, this regulates the engine speed. Adjust it to increase or decrease the flow of water and pressure as needed.
- Choke: This lever aids in starting the engine, especially in colder conditions. Set it to the ‘CLOSED’ position when starting, and switch it to ‘OPEN’ once the engine runs smoothly.
- Pressure Regulator: Some models have a dial to adjust the pressure output. Familiarise yourself with suitable settings for various surfaces to avoid damage.
- Water Supply Indicator: This light or gauge signals the water flow. If it shows low pressure, check for blockages or ensure the water supply is adequate.
Additional Tips for Using the Control Panel
- Always refer to the user manual for your specific model; it contains valuable information about the control panel layout.
- Before each use, inspect the control panel for any signs of wear or damage. This can prevent malfunctions during operation.
- Practice adjusting the throttle and pressure regulator at a safe distance from surfaces to get a feel for the adjustments.
- Ensure that connections are secure; loose hoses can lead to operational issues or even accidents.
Understanding these functions makes a significant difference in achieving efficient results while using your cleaning equipment. Regular practice will enhance your confidence and effectiveness with the machine.
Starting the Engine Safely

Before engaging the machine, ensure you’re wearing appropriate personal protective equipment, including safety goggles and gloves. This simple step can prevent injuries from debris or high-pressure water.
Position the equipment on a flat, stable surface away from flammable materials. This reduces the risk of accidents during operation. I recall a time when I was working outdoors, and a gust of wind blew some leaves too close to the exhaust. A quick adjustment saved me from a potential fire hazard.
Check the fuel tank before attempting ignition. If the tank is nearly empty, refuel using the correct type of fuel, as specified in the manufacturer’s manual. Never refill immediately after shutting off the engine; give it time to cool. I’ve seen colleagues make this mistake, leading to spills and unnecessary risks.
Inspect the area around the exhaust and ensure there are no obstructions. A clear space allows the engine to vent properly and reduces the chance of overheating. During one of my early days, I had a minor issue because I overlooked this detail, resulting in a frustrating shutdown.
Engage the safety features. If your model includes a trigger lock or safety switch, ensure they are in the correct position before proceeding. It’s a small step, but it can prevent accidental activation while you’re preparing to operate the machine.
Finally, maintain a safe distance from others while you initiate the engine. Keeping bystanders at least 10 feet away ensures that everyone remains out of harm’s way, especially if something unexpected occurs. I’ve learned the hard way that safety should always come first.
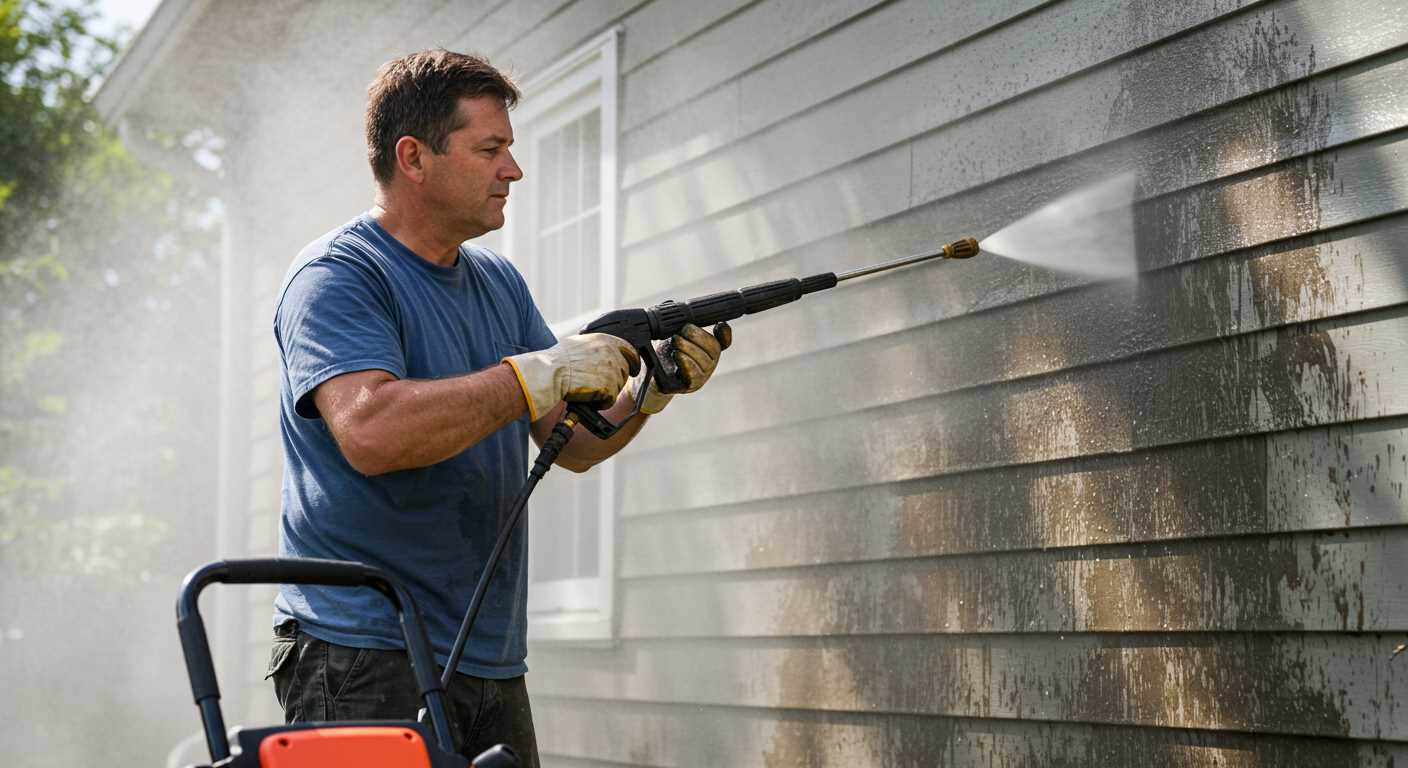
Maintaining Proper Technique during Use
To achieve optimal results while operating your cleaning unit, focus on the angle of the nozzle. Keeping it at a 45-degree angle to the surface being cleaned maximises the impact of the water stream, effectively removing dirt and grime without causing damage.
Body Positioning
Your stance is critical for both control and comfort. Stand with your feet shoulder-width apart for stability, and keep your knees slightly bent. This position allows for better weight distribution and reduces fatigue during extended use.
Grip and Control
- Use a firm grip on the handle; this ensures you maintain control, especially when the machine is in full operation.
- Keep your arms slightly bent to absorb any recoil from the force of the water stream.
- Always point the nozzle away from yourself and others when not in use to prevent accidental injury.
Adjust your distance from the surface. For tougher stains, get closer, but for delicate surfaces, maintain a greater distance to avoid damage. Testing a small area first helps determine the ideal distance.
In my experience, it’s beneficial to move the nozzle in a sweeping motion rather than staying in one spot. This technique ensures even cleaning and prevents the risk of etching or damaging surfaces.
Lastly, take frequent breaks to avoid fatigue. Operating this equipment can be physically demanding, and regular pauses allow you to stay fresh and maintain control throughout your task.
FAQ:
What are the steps to start a gas powered pressure washer?
To start a gas powered pressure washer, follow these steps: First, ensure that the washer is on a flat surface and that the fuel tank is filled with the appropriate gasoline. Next, check the oil level and add oil if necessary. Then, connect the high-pressure hose to the machine and attach the spray wand. Make sure the water supply is connected and turned on. Locate the choke and set it to the closed position. Turn the fuel valve on, and then pull the starter cord to crank the engine. Once it starts, adjust the choke to the open position and let the engine warm up for a few minutes before use.
What safety precautions should I take before operating a gas powered pressure washer?
Before using a gas powered pressure washer, it is important to take several safety precautions. Always wear protective gear, including goggles, gloves, and non-slip footwear. Make sure the area is clear of obstacles and people. Avoid using the washer on windy days to prevent water and debris from being blown back at you. Check the pressure washer for leaks or damage before starting it. Never point the spray nozzle at yourself or others, and keep your hands and feet away from the nozzle while the machine is in operation. Additionally, ensure proper ventilation when starting the engine, as gas fumes can be harmful.
What should I do if my gas powered pressure washer won’t start?
If your gas powered pressure washer won’t start, first check the fuel level to ensure there is enough gasoline. Inspect the spark plug for any signs of wear or damage and replace it if necessary. Make sure the choke is in the correct position—if the engine is cold, it should be closed. Additionally, check the oil level; low oil can prevent the engine from starting. If the machine still won’t start, ensure there are no clogs in the fuel line or air filter. If problems persist, consult the user manual for troubleshooting tips or consider seeking professional assistance.
How do I maintain my gas powered pressure washer for long-term use?
To maintain your gas powered pressure washer for optimal performance, follow these maintenance tips: Regularly check and change the oil as recommended in the user manual. Clean or replace the air filter periodically to ensure proper airflow. After each use, flush the system with clean water to prevent clogging. Store the washer in a dry place and drain any remaining fuel to prevent the fuel from deteriorating. Inspect hoses and fittings for wear and replace them if necessary. Finally, schedule an annual professional service to keep the machine in good condition.

.jpg)
.jpg)


